background image


SSP100 Quick Setup Guide 
 
Introduction 


The purpose of this quick setup guide is to enable an individual with minimal experience of 
the SSP100 to get the SSP operational within a home cinema. The first steps are, 

·


Get a picture on the screen or display  

·


Connect a source e.g. DVD player and get its video onto the display 

·


Get the audio system operational 

 
When the system is operational the fine-tuning of the system can begin.  
 
Setup Overview 


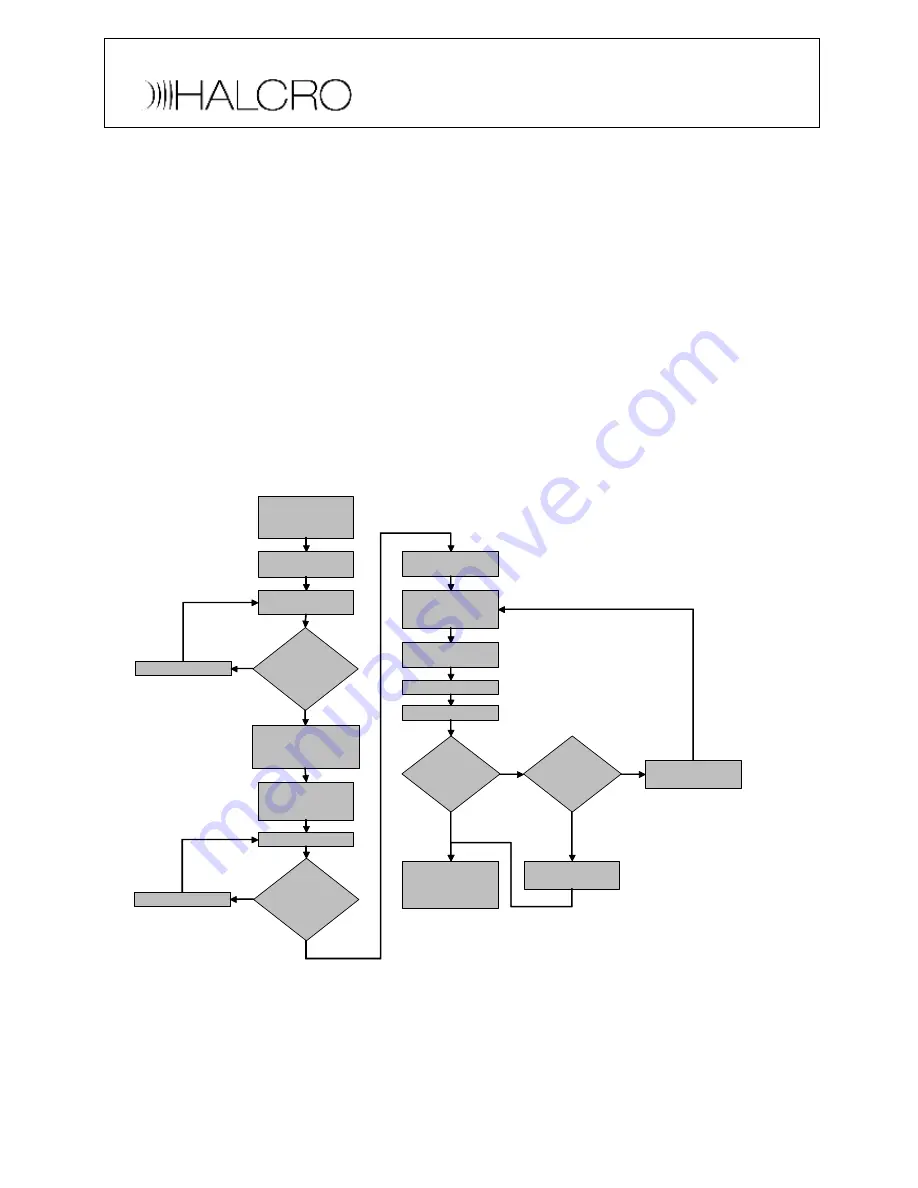
The flow chart below indicates typical steps required to get a home theatre connected and 
operational to the point where fine-tuning can commence. The flow chart assumes the 
audio system is in place. If the audio system is not in place connect a display and source to 
the SSP100 and continue with the setup. 


The sequence in the flow chart above shows a typical setup but it is not necessary to follow 
the sequence as outlined. The steps which follow show how to get a video picture on the 
main display, how to setup a source and how to get the audio system working. 
 
It is essential to understand the capabilities and specifications of the display and sources 
to ensure you get the best performance from your system. It is as important to setup 
the display and sources correctly as it is to set up the SSP100 correctly. 

Connect Amplifier

to SSP 7.1 O/P

& Trigger 1

Connect Speakers

to Amplifier O/P

Connect DVD to

SSP SRC 1

SSP Source 1 setup

Connect Display

to SSP Video O/P

Speaker Setup Size

Display Setup

Read SSP80/100 

Manual &

Safety Instructions

Play DVD

Check DVD O/P &

Source 1 Setup

Yes

Check 

Audio 

O/P

Is 

Amplifier 

On

Check Trigger 1 & 

Power Connections

No

Yes

Check DVD 

Audio Setup Menu

No

Yes

Fine Tune System

Level Setup 2

Distance setup

Press SSP Menu

Check 

SSP Video 

O/P

SSP Display setup

Scaler setup

Video Resolutions pref:

DVD Setup 

Select Mode

Check 

DVD Video 

O/P

No

No

Yes

Содержание SSP100

Страница 1: ...is not necessary to follow the sequence as outlined The steps which follow show how to get a video picture on the main display how to setup a source and how to get the audio system working It is essen...

Страница 2: ...uts Rec Mon OSD 22 Composite video outputs Zone Mon 23 S Video inputs 1 to 6 24 S Video REC output 25 S Video monitor output with OSD 26 S Video monitor output without OSD 27 Optical digital output 28...

Страница 3: ...of the display can be used to scroll through them Pages 1 2 and 3 contain the keys for SSP100 operation source input selection and setup keys DVD SSP CBL TV SAT TV TV AUX2 AUX1 CD DM8 10 Home Page CU...

Страница 4: ...P100 composite inputs To see the volume level from audio sources set the video type to Up conv Note When a digital audio input is active it takes priority over an analog input to that source SSP80 100...

Страница 5: ...nu and save the source setup settings Press MENU and the SSP100 menu will be shown on the front panel and main display output Notes It is important to setup the display projector Plasma screen etc to...

Страница 6: ...ce DVD player and the video will be shown on the main display output Notes It is important to setup the DVD player to give the required audio and video outputs The SSP100 front panel display will only...

Страница 7: ...not to be active enter No If the Main speakers are Small a subwoofer must be used To save the settings press the MENU key or Exit from each page Switch off the menu Using the remote control set the S...

Страница 8: ...panel display it is essential that the Up conv ersion option be selected for Video type If you are using an analog audio input from the CD player do not assign an active digital input from any source...

Страница 9: ...tomatic calibration system Speaker levels can be set manually to 75dB using an SPL meter This level corresponds with the sound levels in public theatres We recommend automatic calibration procedure fi...

Страница 10: ...et the SSP will index to the next speaker until all distances are calibrated Check the distance settings for each speaker in the Distance setup page Notes The adjustment range is from Oft 0m to 61ft 2...

Страница 11: ...EST key Note The adjustment range is from 15 0 dB to 15 0 dB with 0 5 dB steps Distance setup Speaker distances must be correctly setup to ensure sound arrives simultaneously to the listening position...

Отзывы: