05-1491-00-11.fm
107
Maintenance and Servicing
5.11 Wheels
5.11.1 Tyre changing
Dismantling
1. Place the vehicle on a level surface and hold it with the parking brake.
Switch the engine off and pull out the ignition key. Let the engine cool
down.
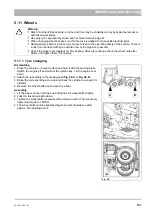
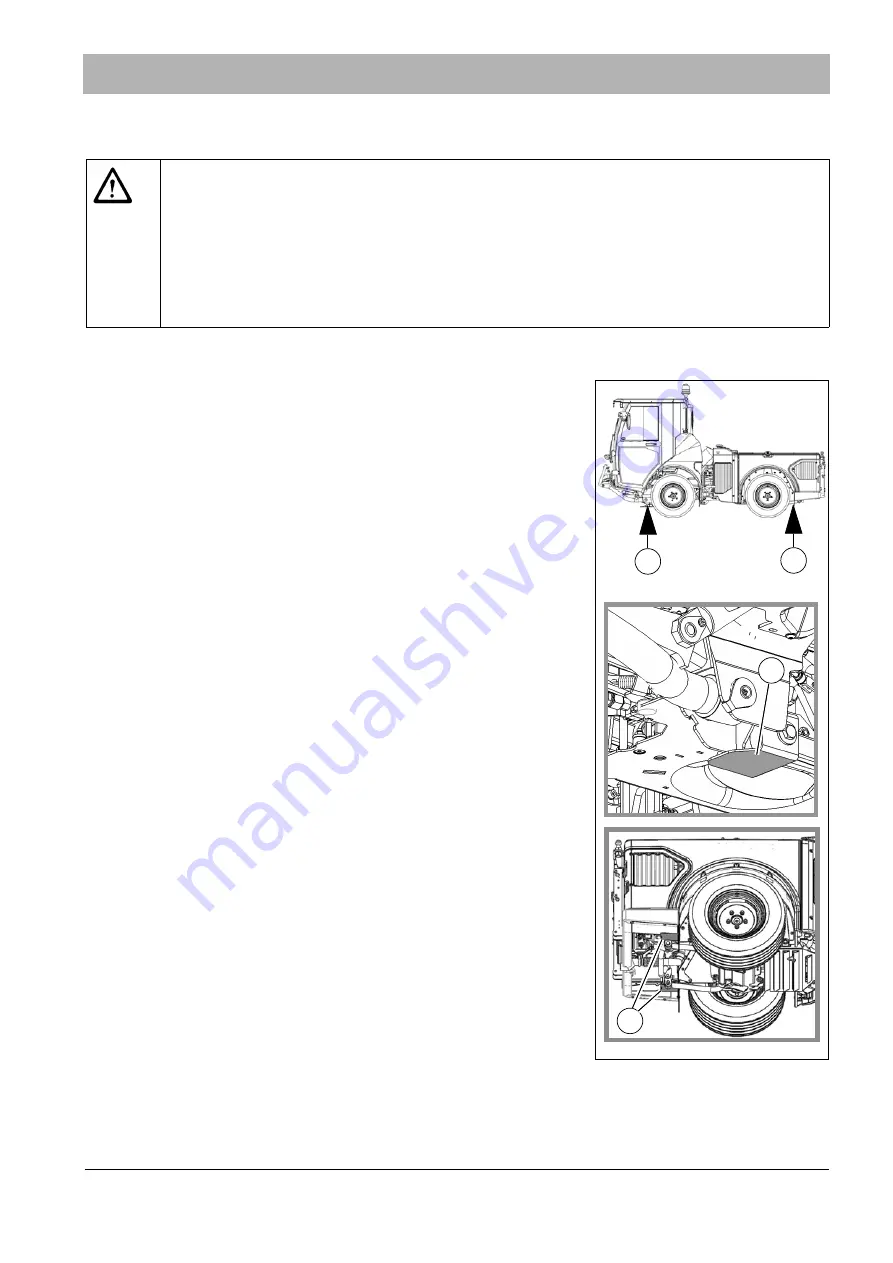
2. Attach the jack stably to the jacking point
Fig. 92-A
or
Fig. 92-B
.
3. Raise the corresponding axle side and check the vehicle once again for
stability.
4. Remove the wheel bolts and remove the wheel.
Assembly
1. Fit the wheel on the centring hub and tighten all wheel bolts slightly.
2. Jack the raised axle side down.
3. Tighten the wheel bolts crosswise with a torque wrench. The necessary
tightening torque is: 180 Nm
4. The wheel bolts must be tightened again as described above after
approx. 50 operating hours.
Warning
•
Risk of accident! Repair work on tyres and rims may be undertaken only by skilled personnel or
authorised workshops.
•
Use only tyres approved by Hako, see Technical data on page 87.
•
When changing wheels, make sure that the jack is applied to the specified jacking point.
•
Damaged tyres and/or incorrect tyre pressure reduce the operating safety of the vehicle. There is
a risk of an accident with tyres with too low or too high tyre pressure!
•
Check the wheel nuts regularly for firm seating. After a tyre change check the wheel nuts after
50 km and tighten them if necessary.
Fig. 92:
A
B
B
A
Содержание Citymaster 1600
Страница 22: ...22 01 1491 00 12 fm Safety Instructions G A B D E F Fig 3 C F C E C D G A B A...
Страница 26: ...26 02 1491 00 11 fm Operation Fig 5 25 23 16 18 17 19 22 21 20 24 26 27...
Страница 28: ...28 02 1491 00 11 fm Operation Fig 6 28 42 44 41 43 46 47 37 36 38 39 40 35 41 48 49 34 30 32 29 33 31 45...
Страница 30: ...30 02 1491 00 11 fm Operation Fig 7 62 63 61 67 55 50 51 54 53 52 58 57 59 60 65 64 66 68 56...
Страница 32: ...32 02 1491 00 11 fm Operation Fig 8 75 69 78 73 72 79 80 81 82 83 74 77 70 71 76 84...
Страница 85: ...04 1491 00 11 fm 85 Technical Data 4 Technical Data Fig 80 3830 1600 941 1210 975 1964...
Страница 146: ...146 06 1491 00 12 fm Attachments and Options 6 1 5 Technical data Fig 144 2215 4510 1580 2250...
Страница 220: ...220 06 1491 00 12 fm Attachments and Options...

