background image


11 

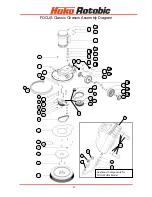
FOCUS Classic Chassis Assembly Diagram 


10 

11 

12 

13 

14 

15 

16 

17 

18 

17 

19 

20 

21 

22 

23 

24 

25 

26 

30 

31 

32 

33 

10 

11 

12 

13 

10 

11 

49


48


51


50


52


53


54


35 

34 

14 

36 

37 

38 

19 

39 

40 

41 

25 

42 

43 

44 

45 

46 

47 

55 

16 

17 

18 

19 

20 

19 

21 

22 

23 

24 

25 

26 

27 

28 

29 

12 

13 

14 

15 

Additional Components for 
FOCUS SUDS Model 

Содержание Focus CLASSIC

Страница 1: ...ited ABN 43 002 858 059 6 Pike Street Rydalmere NSW 2116 Australia PO Box 360 Rydalmere BC 1701 Telephone 61 2 9684 2433 Fax 61 2 9684 2278 Freecall within Australia 1800 257 221 Email hksales hakoaus...

Страница 2: ...upport lugs and reposition with additional heavy duty washers under both bolt head and fastening nut and between lugs and bar support ELECTRICAL CONNECTION For Focus Focus Hi Torque Classic models con...

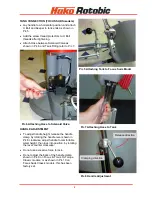
Страница 3: ...clamp by rotating the handle lever shown in Pic 8 clockwise adjust handle to comfortable waist height then lock into position by rotating the lever counter clockwise Do not use excessive force to lock...

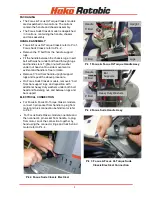
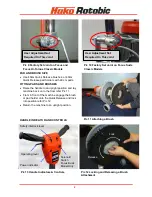
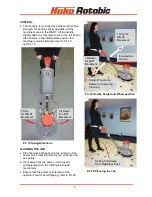
Страница 4: ...position refer Pic 12 Return the machine to an upright position HANDLE INDICATOR AND CONTROLS Pic 9 Factory Set Joint on Focus and Focus Hi Torque Classic Models Pic 11 Attaching a Brush Pic 12 Lockin...

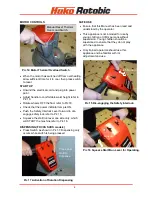
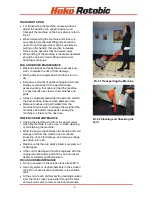
Страница 5: ...ug into power point Adjust handle to comfortable waist height refer to Pic 18 Rotate wheels OFF the floor refer to Pic 18 Check that the power indicator lamp is ON Push the Safety Interlock Lever forw...

Страница 6: ...n of the power point room furniture layout entrance and exit points Work away from the power cord to avoid entanglement with the rotating brush pad mechanism Ensure that the power cord is clear of the...

Страница 7: ...he floor surface Ensure clean pads are used Remove brushes and pad holders from the machine when stored In storage the weight of the machine can deform these parts causing the machine to vibrate on th...

Страница 8: ...chine Ensure the rear wheels are UP when in use Ensure the machine is in constant motion over the floor area Keeping the machine in a localized spot may result in friction burns to the floor Trips Sli...

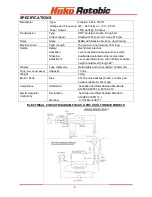
Страница 9: ...double pole micro switch Stopping Unattended automatic stop incorporated Adjustment Lever operated clamp with infinitely variable height adjustment through 90 Wheels Type diameter Retractable and non...

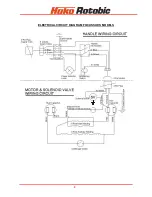
Страница 10: ...9 ELECTRICAL CIRCUIT DIAGRAM FOCUS SUDS MODELS...

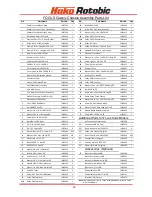
Страница 11: ...3380007 1 42 Guard Pulley Focus Classic 13260005 1 Plate Switch 726 5488A 13350016 1 43 Washer M4 x1 5 x 1 5 SQ Sect Sprg ZP 13420011 6 5 Cap 1 2 BSP Red Plastic 13220019 1 44 Screw No 8 x 3 8 Mush Ni...

Страница 12: ...17 18 17 1 19 20 21 22 23 24 25 26 1 9 30 31 32 33 1 2 3 4 5 6 7 8 9 10 11 12 13 10 11 49 48 51 50 52 53 54 35 34 14 36 37 38 19 39 40 41 25 42 43 44 45 46 47 55 16 17 18 19 20 19 21 22 23 24 25 26 2...

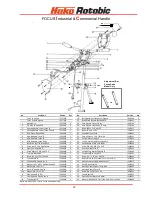
Страница 13: ...crew WN1412 K B 50 X 20 Z 13380048 6 10 Clamp Cord Handle IC 13220014 2 28 Housing Handle Lid IC 13270004 1 11 Screw WN1412 K B 40 X 16 Z 13380026 4 29 Lever Safety Interlock Handle IC 13310002 1 12 T...

Страница 14: ...ko Australia Pty Ltd is not responsible for costs or repairs performed by persons other than those specifically authorised by Hako Australia Pty Ltd This warranty does not apply to damage from transpo...

Отзывы: