background image

.10.

GB

Installation

Positioning the Appliance

Position the appliance in the desired location. The back should

rest against the wall behind it, and the sides, along the adjacent

cabinets or wall. The dishwasher is equipped with water supply

and drain hoses that can be positioned on the right or the left to

facilitate proper installation.

Levelling the Appliance

Once the appliance is positioned, adjust the feet (screw them in

or out) to level the dishwasher. In any case, the appliance should

not be inclined more than 2

. If the appliance is level, it will help

ensure proper performance.

Cold Water Connection

Connect the cold water supply hose to a threaded 3/4 (gas) con-

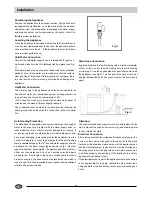
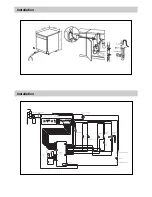
nector and make sure that it is fastened tightly in place (see Fig.

1).

If the water pipes are new or have not been used for an extended

period of time, let the water run to make sure that the water is

clear and free of impurities. If this precaution is not taken, there

is a risk that the water inlet can get blocked and damage the

appliance.

The connection must be made to the hot water line following the

same procedures as those for the connection to the cold water

line.

Anti-Flooding Protection

The dishwasher is equipped with a system that stops the supply of

water in the event of a problem with the water supply hose, or

leaks within the unit, in order to prevent damage to your home. If

for any reason the box containing the electrical components hap-

pens to get damaged, remove the plug for the appliance from the

socket immediately. In order to guarantee that the anti-flooding

feature operates properly, the "A" box with water supply hose must

be attached to the water supply tap as shown in Fig.1. No other

type of connection is acceptable. The water supply hose must not,

under any circumstances, be cut, as it contains electrical parts

which are live. If the length of the hose is not adequate to make a

proper connection, the hose must be replaced with one which is

long enough. This hose is available upon request from specialised

retailers and service centres.

Drain Hose Connection

Insert the drain hose into a drain pipe with a minimum diameter

of 4cm, or let it run into the sink, making sure to avoid bending

or crimping it. Use the special plastic support that comes with

the appliance (see Fig.2). The free end of the hose must be at

a height between 40 and 100 cm and must not be immersed in

water.

Attention:

The special plastic hose support must be solidly fastened to the

wall to prevent the drain hose from moving and allowing water

to spill outside the drain.

Electrical Connection

After making sure that the voltage and frequency values for the

current in the home correspond to those on the rating plate

(located on the stainless steel inner door of the appliance) and

that the electrical system is sized for the maximum voltage on

the rating plate, insert the plug into an electrical socket which

is earthed properly (the earthing of the appliance is a safety

requirement mandated by law).

If the electrical socket to which the appliance must be connected

is not appropriate for the plug, replace the plug, rather than

using adpators or the like as they could cause overheating and

burns.

Hot Water Connection

The water supply to the appliance can also be connected to the

house's hot water line (centralised system, heating system), as

long as it does not exceed a temperature of 60

.

In this case, the wash cycle time will be shortened by about 15

minutes and the wash efficiency slightly reduced.

Fig.2

Fig.1

Содержание WQP12-BFESS

Страница 1: ...Dishwasher WQP12 BFE SS GB Code 0120504101 ...

Страница 2: ...water supply to the appliance and disconnect the plug from the wall socket Then consult the section entitled Troubleshooting If you cannot solve the problem contact an authorised service agent Only authorised service agents can make repairs Appliances which are no longer being used must be made inoperable by cutting the power supply cord and removing the door lock If the supply cord is damaged it ...

Страница 3: ...ck F G H I Washing Filter Bottom Spray Arm Detergent and Rinse Aid Dispenser Third Sprayer Technical characteristics Width 60cm Depth 60cm Height 85cm Capacity 12 standard place settings Mains water pressure 0 03 0 6MPa Power voltage 220V 50Hz 2000W Total absorber power Salt Container Cap GB ...

Страница 4: ...ight located on the control panel comes on To prevent the formation of rust load the salt just before begin ning a wash cycle Adjusting Salt Consumption The dishwasher is designed to allow for adjusting the amount of salt consumed based on the hardness of the water used This is intended to optimise and customise the level of salt consumption so that it remains at a minimum Your local Water Board c...

Страница 5: ...is product makes dishes sparkle and helps them to dry with out spotting The dispenser is located on the inside panel of the door and should be filled after every 80 wash cycles or when the rinse aid indicator light comes on for those models with this feature Loading the Rinse Aid To open the dispenser turn the C cap in the anti clockwise direction and then pour in the rinse aid making sure you do ...

Страница 6: ...ted to allow the water to flow out The silverware basket can be doubled see Fig A so that only one section may be used when the silverware load is light This also makes space for additional pots and pans and it can also be placed in the upper rack Silverware should be placed in the silverware basket with the handles at the bottom if the rack has side baskets the spoons should be located individual...

Страница 7: ...ps for Setting the Wash Cycle with a delayed Start Time and setting and Starting a Wash Cycle must be repeated following the instructions contained in the correspond ing sections b If the door is opened during the delay period the indicator will blink and acoustic signal will sound and the countdown will stop It will begin again when the door is closed At the end of the wash cycle Six acoustic sig...

Страница 8: ...ys remove the plug from the socket Do not run risks No Solvents or Abrasive Cleaning Products To clean the exterior and rubber parts of the dishwasher do not use solvents or abrasive cleaning products Rather use only a cloth and warm soapy water To remove spots or stains from the surface of the interior use a cloth dampened with water and a little white vinegar or a clean ing product made specific...

Страница 9: ...ed on not very dirty dishes right after they are used No drying cycle Pre wash of dishes pots and pans while waiting for the load to be completed after the sub sequent meal Pre wash with cold water Extended wash at 50 K Rinse with cold water Rinse with hot water at 65 K Drying Short wash at 40 K Cold rinse Short cold wash to prevent food residue from drying on the dishes K 15g Second pre wash with...

Страница 10: ...irst have you forgotten to press one of the buttons or to perfom an essential operation The Dishwasher Does Not Start Have you checked whether the plug is pushed into the socket correctly the power is on in the house the door is closed properly the ON OFF switch is on ON the water supply is turned on A B The Dishwasher Does Not Load Water Have you checked whether the water is turned on and the hos...

Страница 11: ...supply tap as shown in Fig 1 No other type of connection is acceptable The water supply hose must not under any circumstances be cut as it contains electrical parts which are live If the length of the hose is not adequate to make a proper connection the hose must be replaced with one which is long enough This hose is available upon request from specialised retailers and service centres Drain Hose ...

Страница 12: ...Installation Installation ...

Отзывы: