Haier WM6002A Скачать руководство пользователя страница 6

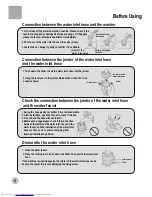
The drainage shall be smooth with the drain hose.

The height of the drain hose shall be less than 

10cm, or the drainage will not be smooth, and cost 
such long time that the machine may stop at mid 
way.

Do not step on or press the drain hose.

If extra drain hose is needed, please make separate

 purchase. The inner diameter of the extra  hose shall
 not less than 30mm, and the  length  shall not exceed 
1.5m.

      If the extra hose is too long,cut 
it either at A or at B point.

A

B

<10cm

A

>   30mm

<1.5m

 If the drain hose is too long, cut it at mid point. To make

 smooth drainage, cut the front end of the hose slantingly.

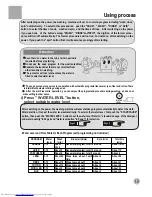
Useage the drain hose

Before Using 

Before Using 

How to change the direction of the drain hose

1. Dismount the back cover of the washing machine.
2. Put down the drain hose. Take off  the drain  hose 
frame.  As  indicated  in Figure 1,  put  the drain  hose 
into the cabinet. Then put one hand into the cabinet 
to nip the claw of the drain hose bushing to  release 
the  claw  from  original  position.  Take off the drain 
hose bushing  with the other hand.  (As indicated in 
Figure 2 and 3).

3. Dismount   the  protecting cover  of the  drain
outlet  at the other  side  ( method the  same  as 
the  drain  hose bushing). Install  the drain hose 
bushing as per indicatedin Figure 4.
4. Extend  the  drain  hose  from the other  side.
Fix  the  drain hose onto  the  cabinet  with  the 
drain  hose rack. (As indicatedin Figure 5)

Attention: To guarantee the proper installation, it is suggested to have the direction changing of drain
hose performed by the after-sales service technicians of our company.

drain hose frame

drain hose

Figure1

••••• •••• ••••••••••••

Fi gur e 2

hose bushing claw

cabinet

i nner

dr ai n hose bushing

t ake off

Figure 3

drain protecting cover

drain hose bushing

Fi gur e 4

Fi gur e 5

drain hose bushing

Fi gur e 6

Push

Push

Содержание WM6002A

Страница 1: ... washing 15 Trouble shooting 16 Packing list 17 Specification the back cover CONTENTS Before using Using process Please read this manual carefully before using Retain it for future reference Please check if the power receptacle has good earthing condition before using to guarantee your safety The manufacturer will not take responsibility for those risks occurred from not obeying this manual User s...

Страница 2: ... control board cabinet handle drain hose hang ing hole drain hose standby screws and nut for earth ing wire back cover drain hose jacket one piece Bottom plate 1 piece Water inlet hose 1 piece Water inlet hose joint 1 piece Fastening screws ST4X16 A 8 pieces the end connecting to the washing machine jointer connecting the water inlet hose and the water faucet the end connecting to the water Inner ...

Страница 3: ...rmit Do not press or clamp it with heavy items If the power cord and power plug are bad or the receptacle is loose be sure to have it replaced by the technicians of our special shop or our agent or the after sales service department to avoid any risk Keep the prong of the power plug clean If dust is found on the power plug please wipe it off with dry cloth In normal usage of the washing machine th...

Страница 4: ...urce like the heater The handicapped or children without care shall not use the machine Please keep the lint filter in good condition and install it to proper position during washing If the lint filter is lost or damaged please contact the local after sales service department of our company Benzene Before Using Before Using Safety precautions To protect your laundries and washing machine please ta...

Страница 5: ...tenthe nut After opening the package please lean the washing machine gently down on soft items like towel cloth blanket etc Installthe bottom plate to the bottom of the machine with eight screws by a cross screwdriver then lift the machine up gently See to the figure 1 Open the top lid of the washing machine 2 Put the inner cover component on the outer tub cover aiming the inner cover shaft to the...

Страница 6: ...e drain hose frame As indicated in Figure 1 put the drain hose into the cabinet Then put one hand into the cabinet to nip the claw of the drain hose bushing to release the claw from original position Take off the drain hose bushing with the other hand As indicated in Figure 2 and 3 3 Dismount the protecting cover of the drain outlet at the other side method the same as the drain hose bushing Insta...

Страница 7: ...e lower end of the lock lever and push down the slider Take off the water inlet hose jointer from the water inlet hose component See to Figure 1 3 Fasten the four screws evenly See to Figure 4 About 4mm before twisting remark Before installation the threading is 4mm above the upper surface of the nut After installation the threading is 2mm above the upper surface of the nut see to figure 6 About l...

Страница 8: ... Hang the lock lever to the jointer Release the slider till a click sound is heard Locking level Slider water absorption cushion nut of thewater inlet hose the jointer of the water inlet hose Slider Locking lever jointer of the water inlet valve 1 Close the water faucet 2 Press the locking lever Push down the slider Then pull of the water inlet hose If the machine is used frequently the jointer of...

Страница 9: ...ly Then insert the power plug into the receptacle Do not connect the earth terminal to the gas pipe and tap water pipe 3 Put down the drain hose a Check if the laundries are applicable for washing with machine b Divide the laundries with unfast color from other laundries c Put those laundries difficult to absorb water into water with hand d For those laundries with heavy soil please first remove t...

Страница 10: ...ll influence the actual washing capacity It is suitable to put in reasonable amount of laundries and the laundries can be turned round in washing for one time washing Do not select above 4 water level for laundries less than 1 0kg so as to avoid splashing of water shirt jacket single bed sheet socking underpants undershirt pajamas blanket cotton about 900g cotton about 300g cotton about 800g cotto...

Страница 11: ...out 60g About 37g About 38L About 51g About 32g About 28L About 37g About 23g About 20L About 27g About 17g About 47L About 42L About 56g About 35g About 32L About 43g About 27g About 24L About 32g About 20g About 16L About 21g About 13g About 67g About 42g About 63g About 39g Access for detergent and washing powder Access for softerner Directly dissolved in the machine not applicable for fuzzy pr...

Страница 12: ...ing fibre cotton woollen and silk programs push the wash button to select wash procedure but the wash time cannot change During quick posthaste programs push the wash button the machine have no reaction Push the rinse button to set the rinse procedure During normal and jean programs push the soak button to set different rinse times 0 1 2 times During fibre cotton woollen and silk programs push the...

Страница 13: ...of the buttons are locked and cannot make selection Release the child lock function push down the water level and spin button at the same time for more than 1 second After a beepsound the child lock function is released WM6002A During sensing it displays During reserve procedure it displays the remained reserve time in hours During operation of programs it displays the remained time minutes If the...

Страница 14: ...o select suitable automatic program POWER ON OFF Steps of using the operation buttons and description of the steps Using process Using process WM6002A 10 8 6 4 2 9 7 5 3 1 FIBRE COTTON WOOLLEN SILK POWER ON OFF START PAUSE PROGRAM RESERVE WATER LEVEL Time remained minutes Reserve hours later Minutes Minutes Times Minutes SOAK WASH RINSE SPIN NORMAL QUICK POSTHASTE JEAN Water saving 2 PROGRAM In se...

Страница 15: ...NSE or SPIN button to select the time of soak wash and spin and the times of rinse After switching on the power if you push one of the button among WASH RINSE and SPIN the digitron of the former proce dures will turn off automatically The former procedures will not run For instance after switching on the power If you push the spin button first it will execute spin singly after starting The soak pr...

Страница 16: ... rinsing and spinning In selecting pasthaste program the washing machine will set the complete procedures of water level selector washing rinsing and spinning automatically Push the RESERVE button to select suitable reserve wash program START PAUSE After switching on the power the reserve program is set to off mode automatically If you need to set the washing procedure to be finished at reserved t...

Страница 17: ...hinner petrol alcohol etc 1 After washing close the water faucet If needed you can dismantle the water inlet hose Thinner Petrol Alcohol Please first pull off the power plug from the receptacle before cleaning 5 Wipe off the water drops on the surface of the machine and inside the tub Open the top lid for some time about 1 hour then close the top lid 4 Hang up the power cord and drain hose 3 Be su...

Страница 18: ...e foreign materials Fasten the screw of the jointer properly The water tap leaks The digitron displays E8 The digitron displays E6 There s abnormal sound inside the machine Phenomenan The reason How to settle Trouble shooting Answer to question If there s breakdown please pull off the power plug before checking The following phenomena are not breakdowns sometimes Please confirm again before sendin...

Страница 19: ... upper cushion of the washing machine package and the upper seal of the package carton Inner cover component Components of the water inlet hose Inside the accessory bag Eight Tapping screws ST4x16 A Bottom plate One One Computerized Automatic washing machine One Inside the accessory bag Lint filter One Inside the document bag ...

Страница 20: ...andard dry cloth Water level Water quantity about Max water consumption Injection pressure 0 03MPa 0 78MPa Rated washing power 380W Rated spinning power 260W Weight About 36kg Dimension L 520 mm W 520 mm H 908 mm About 75L High water level Standard program 1 16L 2 20L 3 24L 4 28L 5 32L 6 38L 7 42L 8 45L 9 47L 10 50L ...

Отзывы: