background image

CC Mode                                


CC On

Basic Selection CC1

Advanced Selection Servicel

Option

OK

VGA Setting

H-Pos

V-Pos

Clock

Phase

Auto

50

38

50

17

OK

Cancel

1. PICTURE MENU


In this menu,you can adjust the picture options,
such as contrast, brightness, etc.
Press          to select, press OK to adjust.

1.1 VGA Setting

When a PC is connected, you can adjust the VGA settings.
1) H-Pos: Adjust the horizontal position of the screen.
2) V-Pos: Adjust the vertical position of the screen.
3) Clock: Fine tune the screen width.
4) Phase: Fine tune the phase of the screen. Usually  you 
don't adjust this item.
5) Auto: Auto adjust to fit the screen.

Note: 
1) If you want to adjust contrast, brightness, color, and 
sharpness, the picture mode 

 be set to 

.

will

user

2)

Cool to give the white colors 

a blue tint, Normal to give the white colors a neutral tint, Warm 
to give the white colors a red tint.

picture

Adjust the color tempertaure to 

Energy Saving 

 mode is the default setting, if you select 

some other options, the power consumption may change.

2.AUDIO menu

In this menu, you can ajust the sound options.
Press         to select, press 

 to adjust.

OK

3. 

In this menu, you can adjust the Menu language, 
Closed Caption, 

Press         to select, press 

 to adjust.

SETUP menu

adjust the sleep timer, time zone, 

Restore Default, etc.

OK

3.1 Closed Caption

Note:
1) 
2) 

Audio language is available in ATSC/TVmode only.
Auto volume is available only when the input signal 

volume is too large or there is distortion.

TV

Picture

Lock

Menu


Language

Closed


Caption

Steep


Timer

Time


Zone

DST
Time


Format

Clock
Restor


Default

Software


Update

English

off

Pacific

off

12

-

hour

Setup

Audio

1) CC Mode: Switch the closed caption mode.
2) Advanced selection: only available in  ATSC.
3) Option: Used to edit the CC font.

Note:
1) Restore Default: Restore Default will clear all the 

 and reset all   the settings to 

 default values.

saved channels

of

the 

factory

Setup

TV

Picture

Lock

Sound Mode 
Bass
Treble
Balance
MTS
Digital Output
Surround Sound
Audio 


Auto Volume

Only

Off

Standard

50
50
50

Stereo

RAW

Off

Off

Audio

Back 

Move 

ENTER

MENU 

OK

Back 

Move 

ENTER

MENU 

OK

Audio

Setup

TV

Picture

Lock

Picture Mode
Contrast
Brightness
Sharpness
Tint
Color
Color Temperature
Advaced Video

Energy Saving

50
50
50
50
50

Back 

Move 

ENTER

MENU 

OK

8.

Measurements and Adjustments

  Service Manual

 Model No.:

- 32 -

Содержание LEC24B3320

Страница 1: ...s or cautions to advise non technical individuals of potential dangers in attempting to service a product Products powered by electricity should be serviced or repaired only by experienced professiona...

Страница 2: ...assemble and Assemble 4 1 Remove the Pedestal 6 8 8 8 8 10 12 12 4 2 Remove the Back Cover 12 4 3 Remove the Adhesive Tape 12 4 4 Remove the Main Board 13 4 5 Remove the Speaker 13 4 6 Remove the Remo...

Страница 3: ...e Check 38 9 2 Main Board Failure Check 9 3 Panel Failure 39 48 8 1 How to enter into the factory model 8 2 How to update software 35 36 8 Measurements and Adjustments 32 8 3 How to enter into the Hot...

Страница 4: ...instructions in the literture accompanying the appliance 1 3 2 Be careful to the electrical shock 7R SUHYHQW GDPDJH ZKLFK PLJKW UHVXOW LQ HOHFWULF VKRFN RU UH GR QRW H SRVH WKLV 79 VHW to rain or exce...

Страница 5: ...UHFHLYHU RQO WKH WHVW WXUHV VSHFL HG LQ WKLV VHUYLFH PDQXDO CAUTION R QRW FRQQHFW WKH WHVW WXUH JURXQG VWUDS WR DQ KHDW VLQN LQ WKLV UHFeiver 3 Do not spray chemicals on or near this receiver or any...

Страница 6: ...static electricity Such components commonly are called Electrostatically Sensitive ES Devices Examples of typical ES devices are integrated circuits and some field effect transistors and semiconducto...

Страница 7: ...bed in the table below Note A note provides information that is not indispensable but may nevertheless be valuable to the reader such as tips and tricks Caution A caution is used when there is danger...

Страница 8: ...isplay 16 7M No of Preset Channels Cable 1 135 OSD Language English Color System NTSC Audio System DK BG I M L L Audio Output Power Built in W 3W 2 Audio Output Power outer W No Total Power Input W 30...

Страница 9: ...08 Service Manual Model No 3 Location of Controls and Components 3 1 Board Location No Description A Board Integration Mainboard 3 2 Main Board A Board...

Страница 10: ...anel can display RQQHFWRU GH QLWLRQ Main board connector Keypad andremote connector J2 Pin number Signal name Description 1 LED_R LAMP RED 2 LED_G LAMP GREEN 3 4 IR REMOTE CONTROL 5 GND GND 6 5V POWER...

Страница 11: ...3 3 LED Panel 10 Service Manual Model No V236BJ1 P01...

Страница 12: ...erential data input Channel 1 16 RX1 Positive LVDS differential data input Channel 1 17 GND Ground 18 RX2 Negative LVDS differential data input Channel 2 19 RX2 Positive LVDS differential data input C...

Страница 13: ...UHDU FRYHU faces upward 5HPRYH WKH WKUHH VFUHZ IURP WKH UHDU FRYHU LQGLFDWHG ZLWK 7KHQ UHPRYH WKH SHGHVWDO 4 2Remove the Back Cover 5HPRYH WKH WKHVH VFUHZ LQGLFDWHG RQ JXUH DERYH E 7KHQ UHPRYH WKH ED...

Страница 14: ...4 4 Remove the Main board 5HPRYH WKH 0DLQ ERDUG Service Manual Model No 13 J2 CN800 LVFRQQHFWHG WKH FRXSOHU J1 4 5 Remove the speaker Take out the speaker J17 CN403 CN402...

Страница 15: ...4 6 Remove the remote control take out the remote controlboard Service Manual Model No 14...

Страница 16: ...cable not included to the ANT IN jack on the back of your TV DVD combo then connect the other end of the cable into the antenna or cable TV wall outlet To improve picture quality from an antenna in a...

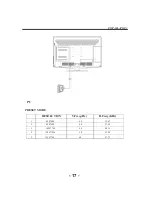
Страница 17: ...rial connections IEC female Input impendance 75 unbalanced STEPS PC Be sure both the TV and computer are powered off 1 Connect a VGA and audio cable 2 Connect the power cord 3 Turn on the TV switch to...

Страница 18: ...PC INSTALLATION PRESET MODE 1 2 3 4 5 640 480 800 600 1024 768 1280 1024 60 60 60 60 31 47 37 88 48 36 63 98 RESOLUTION V Freq Hz H Freq KHz 1366 768 60 47 71 17...

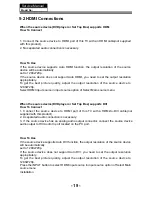
Страница 19: ...ipment to these jacks Please see the diagram below You may also need to refer to the owner s manual of the device that you are trying to connect The television s inputs can be connected to the followi...

Страница 20: ...menu When the source device DVD player or Set Top Box supports DVI How To Connect 1 Connect the source device to HDMI port of this TV with a HDMI to DVI cable not supplied with this product 2 A separa...

Страница 21: ...Cable sample HDMI Cable not supplied with the product HDMI to DVI Cable not supplied with the product Analog Audio Cable Stereo to RCA type not supplied with the product Service Manual Model No 20...

Страница 22: ...Use the attached power cord only I WKH SRODUL HG FRUG GRHV QRW W LQWR D QRQ SRODUL HG RXWOHW GR QRW DWWHPSW WR OH RU FXW WKH EODGH W LV WKH XVHUCV UHVSRQVLELOLW WR KDYH DQ electrician replace the obs...

Страница 23: ...tor LED BLUE POWER ON RED STANDBY 3 Side panel keys 1 Display the input source menu 2 MENU Display main MENU 3 CH CH In TV mode press CH or CH to change the channel up and down In MENU mode press CH o...

Страница 24: ...CH To access the next or previous Program 15 ASPECT To change picture aspect 16 CH LIST Used to display the channel list Eject or Insert the disc 17 EPG Display all the information of DTV programs 18...

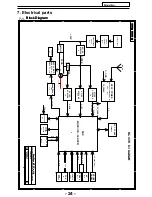
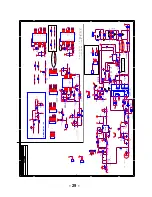
Страница 25: ...TRICT SHENZHEN Custom 2 12 Monday January 07 2013 0 1 PWM IC AC100V 240V TRANSFORMER T102 Q807 12V EFD25 BLOCK DIAGRAM 0B2273 RT8296A DC DC U2 5VSTB 5VA 12VA PWR ON OFF PANEL_ON OFF PANEL_POWER OR 601...

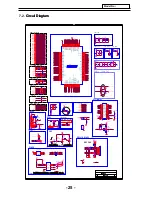
Страница 26: ...R117 68R C167 2 2uF C167 2 2uF C275 2 2uF C275 2 2uF R103 68R R103 68R R127 0R R127 0R RD57 NC 0R RD57 NC 0R C123 2 2uF C123 2 2uF RD47 10R RD47 10R R146 27R R146 27R RD52 1K RD52 1K R137 100R R137 1...

Страница 27: ...0 1uF Q2 AO3407 Q2 AO3407 RD146 100K RD146 100K RD62 270K RD62 270K LD25 600 1 5A 0805 LD25 600 1 5A 0805 RD145 100K RD145 100K C46 0 1uF C46 0 1uF CD103 100pF CD103 100pF RD143 47K RD143 47K CD53 0...

Страница 28: ...20R RD69 120R CD28 1uF CD28 1uF CD26 0 22uF CD26 0 22uF RD105 10K RD105 10K CD162 0 1uF CD162 0 1uF RD147 NC 0R RD147 NC 0R 10R R706 10R R706 R905 0R R905 0R RD148 NC 0R RD148 NC 0R R705 NC 100K R705...

Страница 29: ...2nH 1000mA LD27 2 2nH 1000mA RD160 430R RD160 430R CD138 6 8nF CD138 6 8nF CD152 33pF CD152 33pF CD135 120pF CD135 120pF C137 0 1uF C137 0 1uF C138 0 1uF C138 0 1uF CD163 1nF CD163 1nF RD161 22R RD161...

Страница 30: ...ND 10 12V 7 GND 9 11 5V 3 3 2 2 1 1 6 6 5 5 5V 12 4 4 D807 RL207 2A 60A 1KV 1 0V D807 RL207 2A 60A 1KV 1 0V RD39 10K RD39 10K EC5 220uF 16V EC5 220uF 16V 1 2 FB7 10 FB7 10 C34 0 1uF 50V C34 0 1uF 50V...

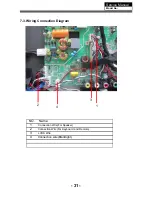
Страница 31: ...Connection wire Blacklight Service Manual Model No 7 3 Wiring Connection Diagram NO Name 1 2 3 4 Connection Wire For Keyboard and Remote Connection Wire For Speaker LVDS Wire 2 3 4 1 31...

Страница 32: ...ound options Press to select press to adjust OK 3 In this menu you can adjust the Menu language Closed Caption Press to select press to adjust SETUP menu adjust the sleep timer time zone Restore Defau...

Страница 33: ...sh Switching the English rating control level EXEMPT C C8 G PG 14 18 OK MPAA TV US 4 LOCK MENU In this menu you can change the password and adjust the vchip settings Enter the password to enter the lo...

Страница 34: ...Age E Exempt programming G General All ages and children contains minimal direct violence but may be integrated into the plot in a humorous or unrealistic manner 8ans General but inadvisable for youn...

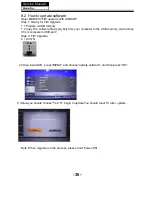
Страница 35: ...ce of each signal source 4 SSC to adjust the spectrum for passing the EMC test 5 special set 1 2hour off for Aging test 2 WDT watch dog 3 white pattern set pure color output for the panel used at the...

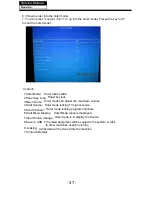
Страница 36: ...pdate You should reset TV after update Note When Upgrade on the process please don t Power Off Haier MSD3393 F W upgrade with USB SOP Step 1 Ready for F W Upgrade 1 1 Prepare a USB memory RS WKH VRIWZ...

Страница 37: ...annel 6 Start Menu Display 7 Input Source Change 8 Save to USB 9 Loaking 10 Volume Default Hotel mode switch Panel key lock Hotel mode can adjust the maximum volume Hotel mode locking TV signal source...

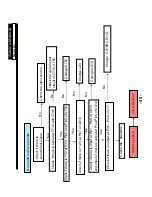
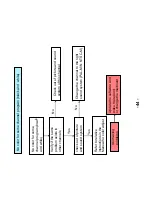
Страница 38: ...Service Manual Model No 9 Trouble shooting 9 1 Simple check 38...

Страница 39: ...Replace the QD6 Yes Check if there is 30V at C931 Yes No Check if U5 Pin2 0 72V Pin3 5V Pin4 12V Pin6 5 7V is normal Change LVDS wire No Check if Q103 D10 D9 Yes Replace Q103 D10 D9 No Service Manual...

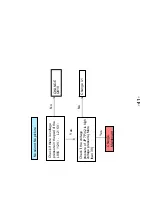
Страница 40: ...here is input at Pin1 Pin9 of UD10 Check if there is signal at C710 and C745 No check the signal input circuit of C710 C745 Yes Change UD10 No Check the speakers Service Manual Model No 40 No Yes Chec...

Страница 41: ...voltage pressure of JP7 Pin2 is high voltage pressure More than 3V Yes Change U1 No sound No picture Change Mainboard No Yes Check if there is voltage pressure in the pad of the L806 12V L2 5V CHANGE...

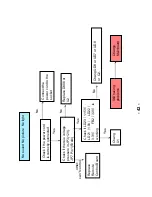
Страница 42: ...ord to the socket Check if there is voltage pressure in JP3 12V JP7 Pin1 5Vstb Replace Remote Control Board Yes Replace D806 or U2 Still having problems Change Mainboard Check if LD23 1 15V LD21 1 8V...

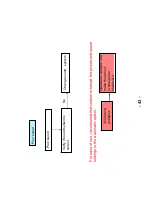
Страница 43: ...s correct Poor sound Change sound system No Update the software and make the reboot or change the Mainboard Still having problems For ease of use recommend that customer format the picture and sound s...

Страница 44: ...to relative instructions in the Manual for color adjust No No Yes Yes Check out of picture and sound system of this channel Change the channel to the right sound system PAL M N NTSC M No color for so...

Страница 45: ...Pin2 in JP7 Check JP3 voltage of 12V and JP8 of 5V No No Yes Yes Replace U1 How to know whether the Power board is broken Still having problems Check if Main board LVDS wire Panel are in good conditio...

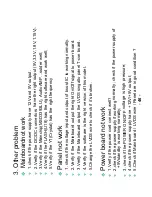
Страница 46: ...ly 2 Verify if the Mainboard output the right On Off signal to power board 3 Verify if the Mainboard output the LVDS singalto panel T con board 4 Verify if the software is the right version of this mo...

Страница 47: ...r cracking Dim or L D TCP Sunken TCP lead cracking ACF bonding short Awful environment and something electric enter into LCD Mis align between TCP and Panel Panel failure TCP failure V Dim Vertal gray...

Страница 48: ...r Bubble Bladder in Polarizer Bladder between Polarizer and top glass Polarizer Scratch Polarizer Scratch Tine or rigidity arose F M i n s i d e Polarizer Eyewinker inside Polarizer Eyewinker inside P...

Страница 49: ...isplay Maybe caused by surge current and EDS Black Screen B L normal only Black screen display FIIcker Crosstalk LCD Vcom imbalance Abnormal Color Only color abormal Capacitance improper bring crossta...

Страница 50: ...s between wire and electrode B L dark B L brightness darker than normal Connect badnessShort between wire and electrode B L wire damaged B L wire damaged Operation abnormal or systemic noise B L wire...

Страница 51: ...iption Phenomena Failure cause Mechanlcal or B L Light leakage Brightness at bottom of LCM brighter than normal B L unit badness Uniformity B L brightness asymmetric Sheet in B L unit is uneven Mount...

Страница 52: ...rights reserved 9 Multi angle Caution This DVD Player has a Class 1 laser which may be harmful to your eyes Do not attempt to disassemble the cabinet or make any adjustments Refer all servicing to a q...

Страница 53: ...elect the aspect ratio Notes TV System Select the TV system For more information on output format refer to the instructions or your TV set RATING SETUP Select Rating in the setup menu and display the...

Страница 54: ...and press the ENTER OK button Filter Select the categories of files that are displayed in the browser list Repeat Change the repeat playing mode Mode Select different play modes Normal Play chapters...

Страница 55: ...rol PBC ON OFF SETUP Press SETUP to enter the system setting menu Press the button again to exit the menu RETURN When a DVD SVCD VCD playing press the RETURN button to return to the menu PBC ON only D...

Страница 56: ...e the disc is not warped damaged or deformed Ensure the disc is not badly scratched or damaged Ensure the disc format is compatible with the player Please check whether you have tried to play a softwa...

Страница 57: ...WARRANTY 90 days labor 1 year parts 58...

Страница 58: ...Sincere Forever Haier Group Haier Industrial Park No 1 Haier Road 266101 Qingdao China http www haier com Printed in China...

Отзывы: