background image

1

1

2

2

3

3

4

4

5

5

6

6

7

7

8

8

D

D

C

C

B

B

A

A

1

3

7

2

4

6

5

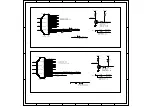
CNA2

PJ-339

ROUT+

LOUT+

LSPK

RSPK

ROUT-

LOUT-

RA10

NC/0ohm-0603-± 5%-1/10W

RA17

NC/0ohm-0603-± 5%-1/10W

EP-L

EP-R

1

2

3

4

CNA1

4PIN-2.54-D-H-G-B

12V

+

EA1

470uF-16V-± 20%-8× 9-105 -XL

AMP-AMP-RO

AMP-AMP-LO

SD

1

FAULT

2

LINP

3

LINN

4

GAIN0

5

GAIN1

6

AVCC

7

AGND

8

GVDD

9

PLIMIT

10

RINN

11

RINP

12

NC

13

PBTL

14

PVCCR

15

PVCCR

16

BSPR

17

OUTPR

18

PGND

19

OUTNR

20

BSNR

21

BSNL

22

OUTNL

23

PGND

24

OUTPL

25

BSPL

26

PVCCL

27

PVCCL

28

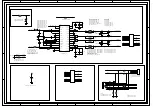
UA1

RT9108NBGCP

RA11

4K7ohm-0402-± 5%-1/16W

RA12

NC/3K3ohm-0402-± 5%-1/16W

CA3

NC/0.1uF-0402-Y5V-+80%-20%-25V

AMP-PVCCL

AMP-LOUT+

AMP-LOUT-

AMP-ROUT-

AMP-ROUT+

AMP-STB/

AVCC

AVCC

RA4

1Kohm-0402-± 5%-1/16W

RA7

1Kohm-0402-± 5%-1/16W

CA29

3300pF-0402-X7R-± 10%-50V

CA30

3300pF-0402-X7R-± 10%-50V

CA21

0.22uF-0402-X5R-± 10%-16V

CA6

0.22uF-0402-X5R-± 10%-16V

CA36

1uF-0402-X5R-± 20%-16V

CA37

1uF-0402-X5R-± 20%-16V

CA38

1uF-0402-X5R-± 20%-16V

CA39

1uF-0402-X5R-± 20%-16V

CA8

0.22uF-0402-X5R-± 10%-16V

CA20

0.22uF-0402-X5R-± 10%-16V

RA34

10ohm-0402-±5%-1/16W

CA2

1000pF-0402-X7R-± 10%-50V

CA24

1000pF-0402-X7R-± 10%-50V

CA35

0.1uF-0402-X5R-± 20%-16V

CA22

0.22uF-0402-X5R-± 10%-16V

CA13

0.22uF-0402-X5R-± 10%-16V

CA12

0.22uF-0402-X5R-± 10%-16V

CA7

0.22uF-0402-X5R-± 10%-16V

GAIN0

+

LA1

SLN54T-220K

AMP-PVCCL

AMP-PVCCR

FBA1

NC/UPZ2012E601-2R0TF 600ohm-2000mA

FBA2

NC/UPZ2012E601-2R0TF 600ohm-2000mA

FBA3

NC/UPZ2012E601-2R0TF 600ohm-2000mA

FBA4

NC/UPZ2012E601-2R0TF 600ohm-2000mA

AMP-PVCCL

RA15

100Kohm-0402-± 5%-1/16W

GAIN0

GAIN0

RA3

NC/0ohm-0402-± 5%-1/16W

+

LA2

SLN54T-220K

+

LA4

SLN54T-220K

+

LA3

SLN54T-220K

CA18

1uF-0402-X5R-± 20%-6.3V

CA15

1uF-0402-X5R-± 20%-10V

RA60

NC/10Kohm-0402-± 5%-1/16W

AMP-PVCCL

EP-IN

RA9

NC/120ohm-0402-±5%-1/16W

RA14

NC/120ohm-0402-±5%-1/16W

GND GND

RA23

1Kohm-0402-± 5%-1/16W

RA28

1Kohm-0402-± 5%-1/16W

GND

GND

GND

GND

AMP-GND

AMP-GND

GND

GND

GND

GND

GND

GND

GND

GND

AMP-AMP-STB

AMP-STB/

RA8

510ohm-0402-± 5%-1/16W

RA1

10Kohm-0402-± 5%-1/16W

GND

CA5

NC/0.1uF-0402-Y5V-+80%-20%-25V

LOUT-

LOUT+

ROUT+

ROUT-

12V

GND

GND

AMP-RO

GND

GND

AMP-LO

12V

AMP-STB

AMP-LOUT+

AMP-LOUT-

AMP-ROUT+

AMP-ROUT-

AMP-PVCCR

GND

GND

AMP-AMP-RO

AMP-AMP-LO

GND

GND

AMP-AMP-STB

AMP-PVCCL

CA25

1uF-0603-X5R-± 10%-25V

CA4

1uF-0603-X5R-± 10%-25V

CA9

NC/0.47uF-0603-X5R-± 10%-16V

CA11

NC/0.47uF-0603-X5R-± 10%-16V

CA14

NC/0.47uF-0603-X5R-± 10%-16V

CA19

NC/0.47uF-0603-X5R-± 10%-16V

1

2

3

4

5

6

7

9

8

11

10

13

12

14

CNA5

NC/BOARD-M

1

2

3

4

5

6

7

9

8

11

10

13

12

14

CNA6

NC/BOARD-M

GND

GND

Содержание LE39B9000

Страница 1: ...roduct Products powered by electricity should be serviced or repaired only by experienced professional technicians Any attempt to service or repair the product or products dealt with in this service information by anyone else could result in serious injury or death SERVICE MANUAL LED TV Model No LE39B9000 Main chipset TSUMV59XUS 2013 Qingdao Haier Electronics Co Ltd All rights reserved Unauthorize...

Страница 2: ...e Manual 6 Using icons 6 Chapter 2 Specification 2 1 Specification list 8 2 2 External pictures four faces 9 Chapter 3 Disassemble and Assemble 3 1 LE39B9000 11 3 1 1 Remove the Stand 11 3 1 2 Remove the Back Cabinet 11 3 1 3 Remove the Mainboard 11 3 1 4 Remove the Power Supply Module 11 3 1 5 Remove the Speaker 11 3 1 6 Remove the Remote Control Board 12 3 1 7 Remove the Key Board 12 Chapter 4 Loc...

Страница 3: ...bleshooting 34 9 2 Display Troubleshooting blank screen or shouw nothing 35 9 3 Display Troubleshooting white screen 36 9 4 Display Troubleshooting picture badness 37 9 5 Audio Troubleshooting no sound 38 9 6 Function Troubleshooting TV fault 39 9 7 Function Troubleshooting DVB S S2 40 9 8 Function Troubleshooting HDMI NO SOUND 41 9 9 Function Troubleshooting HDMI PICTURE 42 9 10 Function Troubles...

Страница 4: ... to make any king of contact with any inside part of this product This symbol indicates that there are important operating and maintenance instructions in the literture accompanying the appliance 1 3 2 Be careful to the electrical shock To prevent damage which might result in electric shock or fire do not expose this TV set to rain or excessive moisture This TV must not be exposed to dripping or sp...

Страница 5: ...the receiver AC power cord from the AC power source before a Removing or reinstalling any component circuit board module or any other receiver assembly b Disconnecting or reconnecting any receiver electrical plug or other electrical connection c Connecting a test substitute in parallel with an electrolytic capacitor in the receiver CAUTION A wrong part substitution or incorrect polarity installati...

Страница 6: ...s or circuit assembly into which the device will be installed CAUTION Be sure no power is applied to the chassis or circuit and observe all other safety precautions 17 Minimize bodily motions when handling unpackaged replacement ES devices Otherwise harmless motion such as the brushing together of your clothes fabric or the lifting of your foot from a carpeted floor can generate static electricity ...

Страница 7: ...LE39B9000 Warning A warning is used when there is danger of personal injury Reference A reference guides the reader to other places in this binder or in this manual where he she will find additional information on a specific topic ...

Страница 8: ...Time ms 8 Angel of View H 170 V 160 Color Display 16 7M OSD Language English Color System PAL Audio System BG Audio Output Power Built in W 8W 2 Audio Output Power outer W No Total Power Input W 74W Voltage Range V AC100V 240V Power Frequency Hz 50 60Hz Time of Sleep Timer MINS 240Min Net Weight KG 6 5 Gross Weight KG 8 5 Net Dimension MM 880 8 548 4 189 6mm Packaged Dimension MM 950 150 590mm ...

Страница 9: ...9 Service Manual Model No LE39B9000 2 2 External pictures four faces Front Side Up Side ...

Страница 10: ...10 Service Manual Model No LE39B9000 Right Side Back Side ...

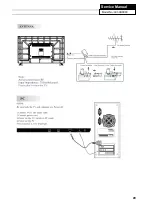
Страница 11: ... picture 2 Remove the Mainboard Module 1 Lay down the TV set 2 Remove the four screws from the stand which in the picture above 3 Remove the stand 3 1 4 Remove the Speaker Remove the Speaker indicated by red circle in below picture 3 1 2 Remove the Back Cabinet 1 Remove the thirteen screws indicated with red circles 2 Flip machine panel side up 3 Carefully raise the Front shell from bottom ...

Страница 12: ...12 Service Manual Model No LE39B9000 3 1 5 Remove the Remote Control Board And the Key Board Remove the Remote Control Board and the Key Board indicated by red circle in below picture ...

Страница 13: ... LE39B9000 Chapter 4 Location of Controls and Components 4 1 Board Location B Panel A With Power supply Main Board No Parts Type Description A Board TP VST59S PB813 With Power Supply Main board B Board AUO T390XVN01 0 LED Panel ...

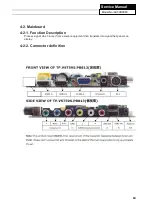
Страница 14: ... Service Manual Model No LE39B9000 4 2 Mainboard 4 2 1 Function Description Process signal which incept from exterior equipment then translate into signal that panel can display 4 2 2 Connector definition ...

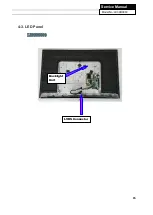
Страница 15: ...15 Service Manual Model No LE39B9000 4 3 LED Panel LE39B9000 Backlight Unit LVDS Connector ...

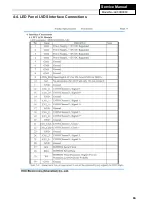
Страница 16: ...16 Service Manual Model No LE39B9000 4 4 LED Panel LVDS Interface Connections ...

Страница 17: ...17 Service Manual Model No LE39B9000 Chapter 5 Installation Instructions 5 1 Accessories ...

Страница 18: ...18 Service Manual Model No LE39B9000 5 2 Base Stand Assembly Instruction ...

Страница 19: ...19 Service Manual Model No LE39B9000 ...

Страница 20: ...20 Service Manual Model No LE39B9000 ...

Страница 21: ...21 Service Manual Model No LE43B7000 6 3 Setting Up Your Remote Controls These models do not support ...

Страница 22: ...TUNER IIC TUNER VS HS VSYNC0 HSYNC0 CVBS OUT MUTE AV2 IN USB2 panel on POWER PW ON 5V SB 5V P5V 12V LDO 3 3V STB LDO 2 5 1 8V VST59S PANEL USB AU1 CVBS2 AU3 RGB0 USB0 AU OUT 0 AU OUT 1 TAGC VIFM VIFP GPIO 0 1 GPIO 64 GPIO64 INT GPIO65 250mA 500mA 100mA 3 3V STB 1 2V VDDC 2 5 1 8V DDR RGB0 RGB YPbPr YPbPr RGB1 HDMI1 IN HDMI2 IN USB1 CVBS OUT AV1 IN USB1 Si TUNER 130mA CVBS0 AU4 HDMID HDMIA ...

Страница 23: ...GND GATE GND PIN4 PIN5 PIN6 OVP PIN8 PIN1 GND PWM REF VIN 1 GATE 2 GND 3 CS 4 COMP 8 REF 6 ISET 5 FB 7 OVP 9 DIM 10 UB802 CB811 RB816 VIN 1 GATE 2 GND 3 CS 4 PWM 8 COMP 6 FB 5 OVP 7 UB801 RB801 CB806 RB803 RB806 RB805 CB812 CB805 RB804 CB803 LB801 RB812 RB810 RB807 RB808 A K DB804 1 2 CNB801 1 2 3 1 2 3 4 5 6 7 8 CNB803 CB804 2 5 6 LB802 HS Mylar ML1 1 1 HS 2 2 HSB3 12V GD1 GD2 GD3 GB1 MB1 1 2 CNB...

Страница 24: ... X5R 20 6 3V RD15 22ohm 0402 5 1 16W RD12 30Kohm 0402 1 1 16W RD16 5K6ohm 0402 1 1 16W EE1 100uF 16V 20 5 11 105 GND CM23 NC 10uF 0805 X5R 20 16V CD15 NC 10uF 0603 X5R 20 6 3V RG17 NC 0ohm 0402 5 1 16W PI0102V0VDDC01 CO0102V0VDDC PI2V501V801 CO2V501V8 PI3V30STB01 CO3V30STB PI5V0STB01 CO5V0STB PIC101 PIC102 COC1 PIC601 PIC602 COC6 PICD1101 PICD1102 COCD11 PICD1201 PICD1202 COCD12 PICD1301 PICD1302 ...

Страница 25: ...0 DM USB0 DP USB0_DM USB0_DP RF4 5R1ohm 0402 5 1 16W RF3 5R1ohm 0402 5 1 16W GND GND 1 1 2 2 3 3 4 4 5 5 6 6 7 7 8 8 9 10 11 12 CN18 USB A F 90 USB 5V USB1_DM USB1_DP USB 5V USB0_DM USB0_DP RF2 0ohm 0402 5 1 16W RS11 NC 12Kohm 0402 5 1 16W AV2 LIN RS10 NC 8K2ohm 0402 5 1 16W SC LI CS7 NC 1uF 0402 X5R 20 6 3V L 4 5 SW 2 1 R 3 AV2 NC PJ 322A H 7 0mm GND AV2 IN AV2 RIN AV2 LIN 1 2 3 4 CN1 NC 2 2PIN 2...

Страница 26: ...02 5 1 16W K0 AD K1 K2 K3 K4 K5 K6 AD K7 RK4 12Kohm 0402 5 1 16W RK10 4K7ohm 0402 1 1 16W RK7 1K5ohm 0402 5 1 16W 5V IR GND 5V STB CK3 NC 0 1uF 0402 X5R 20 16V RK12 22ohm 0402 5 1 16W IR 14 13 12 11 10 9 8 7 6 5 4 3 2 1 CN8 14PIN 2 0 D H G B GND RK11 4K7ohm 0402 1 1 16W 3V3 STB 3V3 STB K0 S K1 C K2 C K3 V K4 V K5 M K6 P K7 N Rbt2 4K7ohm 0402 5 1 16W PWM R262 4K7ohm 0402 5 1 16W R263 4K7ohm 0402 5 ...

Страница 27: ...DMI2 SCL HDMI2 SDA GND GND GND GND GND HDMI2 5V CEC1 HOTPLUG2 GND GND GND HDMI2 SCL HDMI2 SDA RH37 NC 47Kohm 0402 5 1 16W RH36 0ohm 0402 5 1 16W RH35 0ohm 0402 5 1 16W HDMI2 SCL HDMI2 SDA GND GND HDMI2 RXC N HDMI2 RXC P HDMI2 RX0 N HDMI2 RX0 P HDMI2 RX1 N HDMI2 RX1 P HDMI2 RX2 N HDMI2 RX2 P RH18 NC 0ohm 0402 5 1 16W ARC HDMI ARC ARC CH1 NC 1uF 0402 X5R 20 6 3V PICH101 PICH102 COCH1 PICN1501 PICN15...

Страница 28: ...AMP AMP LO GND GND AMP AMP STB AMP PVCCL CA25 1uF 0603 X5R 10 25V CA4 1uF 0603 X5R 10 25V CA9 NC 0 47uF 0603 X5R 10 16V CA11 NC 0 47uF 0603 X5R 10 16V CA14 NC 0 47uF 0603 X5R 10 16V CA19 NC 0 47uF 0603 X5R 10 16V 1 2 3 4 5 6 7 9 8 11 10 13 12 14 CNA5 NC BOARD M 1 2 3 4 5 6 7 9 8 11 10 13 12 14 CNA6 NC BOARD M GND GND PICA201 PICA202 COCA2 PICA301 PICA302 COCA3 PICA401 PICA402 COCA4 PICA501 PICA502...

Страница 29: ...402 X5R 20 16V GND 3V3 STB 3V3 STB CT46 NC 4700pF 1206 X7R 10 1000V 3V3 STB M SCL M SDA 3V3 STB CT30 NC 33pF 0402 NPO 5 50V CT31 NC 33pF 0402 NPO 5 50V GND 1 2 3 4 CN9 NC 22 3 17 3 6 LHD GND GND GND GND CT4 NC 10uF 0603 X5R 20 6 3V CT40 470pF 0402 X7R 10 50V CT3 NC 10uF 0603 X5R 20 6 3V PICN901 PICN902 PICN903 PICN904 COCN9 PICT101 PICT102 COCT1 PICT301 PICT302 COCT3 PICT401 PICT402COCT4 PICT501 P...

Страница 30: ...e update 1 2 Copy the software files to a USB disk on the root directory 1 3 Insert the USB disk when the AC power is off 1 4 Turn on the AC power in turn to begin 1 5 Turn off the AC power After five minutes 1 6 Pull out the USB disk and power on the television Note Do not turn off the TV while it is updating ...

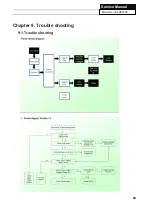
Страница 31: ...28 Service Manual Model No LE43B7000 Chapter 9 Trouble shooting 9 1 Trouble shooting ...

Страница 32: ...29 Service Manual Model No LE49B7000 ...

Страница 33: ...30 Service Manual Model No LE49B7000 ...

Страница 34: ...31 Service Manual Model No LE49B7000 ...

Страница 35: ...32 Service Manual Model No LE49B7000 ...

Страница 36: ...33 Service Manual Model No LE49B7000 ...

Страница 37: ...34 Service Manual Model No LE43B7000 Sincere Forever Haier Group Haier Industrial Park No 1 Haier Road 266101 Qingdao China http www haier com Printed in China ...

Отзывы: