background image

Operation

OK                                         

Greece

Nederlands


Germany

Portugal

Poland

Italy

Hungary

Luxembourg

Norway

18

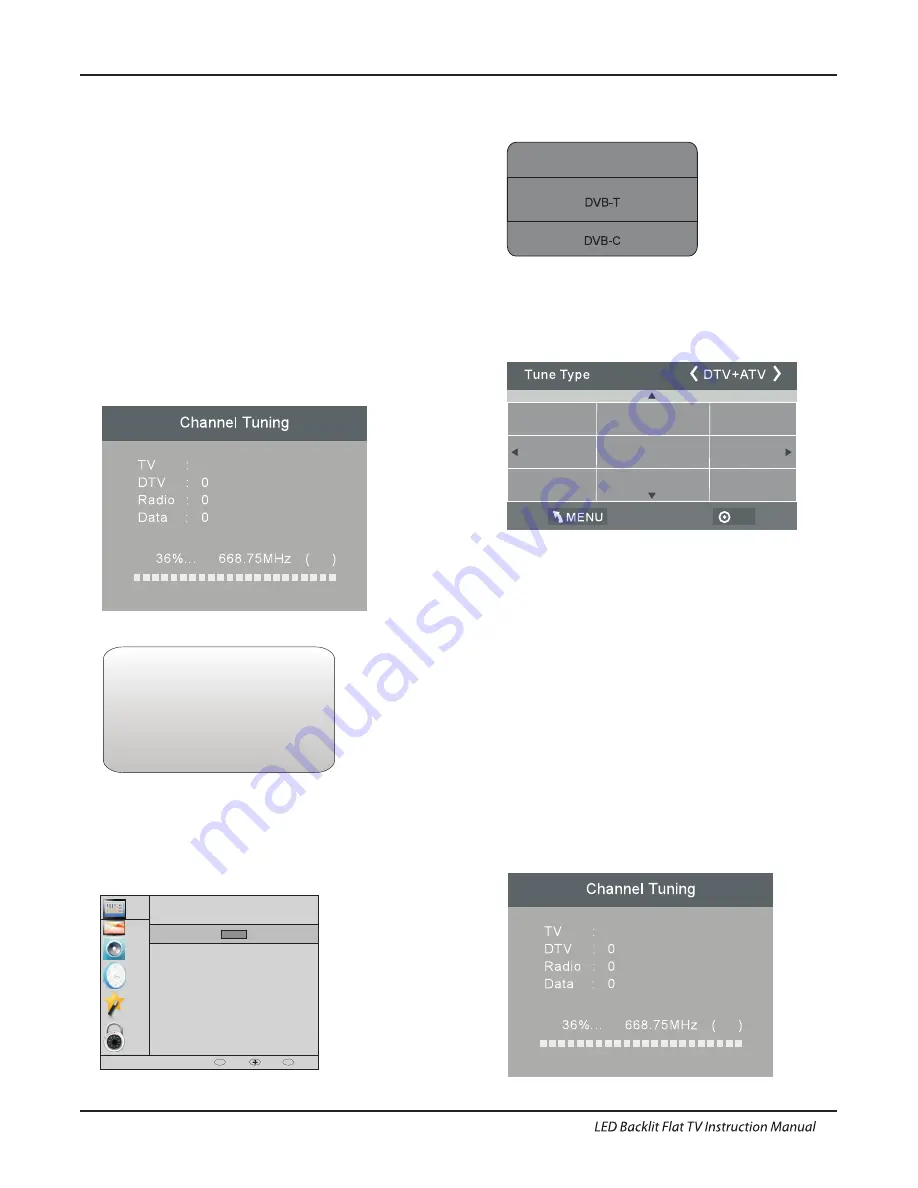
1. 1)Auto Tuning (DVB-T)

1. CHANNEL MENU

Programme(s)
Programme(s)

Programme(s)

Programme(s)

1

ATV

CHANNEL

PICTURE

SOUND

TIME

OPTION

LOCK

Auto Tuning

ATV Manual Tuning
Programme Edit
Signal Information

DTV Manual Tuning

Software Update(USB)

CI Information

OK

OK

BACK

MOVE

OK

MENU

1). Press the MENU button and then press the

buttons to 

select the CHANNEL menu and then press the OK button.

▼▲

2). Press the

buttons to select Auto Tuning and then press 

the OK button. 

▼▲

6) Congratulations

Congratulations!!!

Completed Initial Quick Setup.

Enjoy your Haier TV

Press OK to Exit

3). Press the

 buttons to select DVB-T/DVB-C,

select DVB-T and then press the OK button to confirm.

▼▲

4). In the Tune Type menu, press the

buttons to 

select ATV / DTV / DTV + ATV. Press the

button and 

then press the

buttons to select the country 

where you will operate the TV. Press the OK  button to 
confirm.

◀▶

◀▶

▼▲

5). After tuning is complete, the channels are arranged in a 

preset order. If you wish to skip channels, modify the preset 

order or rename channels, select Programme Edit under the

 Channel menu.   

5). Channel tuning will commence. This operation 

may take up to 

 minutes. The display  will show 

the progress of the tuning and the number of channels 

found. 

6). If you want to skip the ATV tuning, press the 

MENU button to interrupt the tuning half way. A pop-

up screen will be displayed, press the

button to select 

YES to confirm. You will then go straight to DTV 

tuning. You may repeat the above step if you also want 

to skip the DTV tuning. An installation reminder will 

appear the next time you turn on the TV.

7). After tuning is complete, the channels are arranged 

in a preset order. If you wish to skip channels, modify 

the preset order or rename channels, select P

rogramme 

Edit under the channel menu.

some

Programme(s)
Programme(s)

Programme(s)

Programme(s)

1

ATV

3). Channel tuning will commence. This operation may take 
up to

. The display will show the progress of the 

tuning and the number of channels found.
4). If you want to skip the ATV tuning, press the MENU 
button to interrupt the tuning half way. 

A pop-up screen will be displayed, press the

button to select 

YES to confirm. You will then go straight to DTV tuning. 
You may repeat the above step if you also want 
to skip the DTV tuning. An installation reminder will appear 
the next time you turn on the TV.

 some minutes

DVB Select type

Содержание LE32B8500T

Страница 1: ...LED LCD TV OWNER S MANUAL Please READ this manual carefully before operating your TV and retain it for future reference LE42B8500TF LE32B8500T ...

Страница 2: ...ng DVB T 18 Auto Tuning DVB C 19 DTV Manual Tuning DVB T DTV Manual Tuning DVB C ATV Manual Tuning 19 20 20 PICTURE MENU 21 22 SOUND MENU 21 TIME MENU 21 OPTION MENU LOCK MENU EPG Menu Electronic Program Guide 22 21 PVR function 23 Prepare to record the program 23 Record the program 24 Play the record 24 Timeshift function 25 Prepare to record the program 25 USB Drive Storage Format 25 Record a pa...

Страница 3: ...NCLUDED WITH THIS PRODUCT CAUTION TO REDUCE THE RISK OF ELECTRIC SHOCK AND FIRE DO NOT PUT THE TV SET NEAR SOURCES OF HUMIDITY DO NOT USE ANY ABRASIVE CLEANERS WHICH MAY SCRATCH OR DAMAGE THE LCD SCREEN AVOID CONTACT WITH OBJECTS THAT MAY SCRATCH THE LCD SCREEN NOTE SERVICING THE UNIT YOURSELF IS UNAUTHORISED AND COULD LEAD TO INJURY OR PRODUCT DAMAGE REFER ALL SERVICING TO THE CUSTOMER HELPLINE N...

Страница 4: ...ny injury caused by lean of the product please always ensure the whole product was placed within the table surface in horizontal CAUTION When the apparatus was in electrostatic circumstance it maybe malfunction and need to reset by user ...

Страница 5: ...tion Do not trap the power supply cord under the television receiver Caution Never stand on lean on or suddenly push the television or its stand You should pay special attention to children Serious injury may result if it should fall Caution Do not place your television on an unstable cart stand shelf or table Serious injury to an individual and damage to the television may result if it should fal...

Страница 6: ...N or CABINET or around any of the buttons or connectors the power cabled should be removed from the power socket Wipe the TV with a soft dry dust free cloth During thunderstorms unplug the power cable and aerial antenna cable to prevent damage to your TV and any other devices connected to it All repairs to this TV should only be performed by qualified TV service personnel 02 Introdution Introducti...

Страница 7: ...SUPPORTED MODE PC 3 5 1024x768 1280x1024 60 60 1 640x480 60 31 47 2 800x600 60 37 88 48 36 63 98 RESOLUTION V Freq Hz H Freq KHz 4 1366x768 60 47 7 Introduction 6 1920x1080 60 66 64 Only for 42 06 ...

Страница 8: ...slightly jiggle the metal base stands around in their holes to allow the screws to be correctly seated prior to being tightened INSTALLATION NOTES Locate the TV in a room where light does not strike the screen directly Total darkness or a reflection on the screen can cause eyestrain Soft and indirect lighting is recommended for comfortable viewing Allow enough space between the TV and the wall to ...

Страница 9: ...ESA standard holes on the back of the television Introduction This television can be wall mounted as follows 1 Place the LED LCD Television onto a solid surface Please place some soft material over the front of the screen to protect it from any damage 200mm 100mm M4X5MM M4X5MM M4X5MM M4X5MM 32 200mm 100mm M6X8MM M6X8MM M6X8MM M6X8MM 42 08 ...

Страница 10: ...tsourcemenu MENU Displaymain MENU 3 4 CH CH InTV mode press CH or CH to change the channel up and down In MENU press CH or CH to select items STANDBY 2 V V Adjust sound level In MENU adjust the item that you selected 5 Front control panel 32 42 SOURCE MENU V V CH CH Standby 1 2 3 4 5 09 3 2 30 30 1 8m ...

Страница 11: ...o output 12 13 input YPbPr input 15 input 2 digital audio output COAXIAL COMMON INTERFACE CI 9 input VGA INPUT RF PC AUDIO 14 input 5 input HDMI3 6 input output SCART 7 input USB 10 input HDMI1 VIDEO 10 2 1 3 5 4 AC INPUT 100 240V 50 60Hz VIDEO L R COAXIAL SCART 6 9 7 11 13 8 14 10 USB HDMI2 ARC RF HDMI1 COMMON INTERFACE CI HEADPHONE VGA YPbPr PC AUDIO 12 7 HDMI2 ARC input YPbYr 12 input 1 7 4 USB...

Страница 12: ...R Red AUDIO R Pr Cr Y Yellow VIDEO 11 VIDEO EQUIPMENT with YPbPr HDMI W R Y W R TO AUDIO OUTPUTS VIDEO EQUIPMENT TO VIDEO OUTPUTS Y W R W R G B R G B R G B R USB HDMI2 ARC RF HDMI1 COMMON INTERFACE CI HEADPHONE VGA YPbPr PC AUDIO AC INPUT 100 240V 50 60Hz VIDEO L R COAXIAL SCART ...

Страница 13: ...ed AUDIO R Pr Cr Y Yellow VIDEO 12 VIDEO EQUIPMENT with YPbPr HDMI W R Y W R TO AUDIO OUTPUTS VIDEO EQUIPMENT TO VIDEO OUTPUTS Y W R W R G B R G B R G B R USB HDMI2 ARC RF HDMI1 COMMON INTERFACE CI HEADPHONE VGA YPbPr PC AUDIO AC INPUT 100 240V 50 60Hz COAXIAL VIDEO L R HDMI3 SCART ...

Страница 14: ...o the DVD player or games console etc To select the device connected with the COMPONENT cable press the SOURCE button on the remote and use the keys to select and press the OK button Option 5 VGA 15pin Sub D Connect a VGA cable not supplied from the VGA socket on the TV to the PC Laptop To select the PC Laptop connected with the VGA cable press the SOURCE button on the remote and use the keys to s...

Страница 15: ...ce service provider to get more information about the modules and subscription Please noted that CA modules and smart cards are neither supplied nor optional accessories from us COMMON INTERFACE Introduction CHANNEL PICTURE SOUND TIME OPTION LOCK Auto Tuning ATV Manual Tuning Programme Edit Signal Information DTV Manual Tuning Software Update USB CI Information OK OK BACK MOVE OK MENU 14 ...

Страница 16: ...t No function P Press to change the channel Press to display the channel information In teletext mode press to revealthe hidden information Press to open the channel list In teletext mode press to switch the image to top bottom or full 3D WORLD These models do not support 3D feature Press to close the on screen menu In teletext mode press to hide the text 16 17 18 19 20 21 22 23 24 25 26 Press to ...

Страница 17: ...tically displayed successively This key is used to stop or resume sub page acquisition The indication appears top left To freeze the page To display or hide the concealed information games solutions This is used to call or exit teletext modes The summary appears with a list of items that can be accessed Each item has a corresponding 3 digit page number If the channel selected does not broadcast te...

Страница 18: ...Symbol KS S then press OK button to into the tune type and country select menu this step is the same as DVB T select the tune type DTV ATV Choose the right country press OK button to start tuning Note The default password is 0000 HOME or Shop modes 1 When the unit is turn on for the very first time it will show Initialization set up menu After the OSD language is set the user can choose between sh...

Страница 19: ...dit under the Channel menu 5 Channel tuning will commence This operation may take up to minutes The display will show the progress of the tuning and the number of channels found 6 If you want to skip the ATV tuning press the MENU button to interrupt the tuning half way A pop up screen will be displayed press the button to select YES to confirm You will then go straight to DTV tuning You may repeat...

Страница 20: ...ess of the tuning and the number of channels found 7 If you want to skip the ATV tuning press the MENU button to interrupt the tuning half way A pop up screen will be displayed press the button to select YES to confirm You will then go straight to DTV tuning You may repeat the above step if you also want to skip the DTV tuning An installation reminder will appear the next time you turn on the TV 8...

Страница 21: ... 2 Press the buttons to select DTV Manual Tuning and then press the OK button 3 The CADTV Manual Tuning screen will pop up Press the buttons to select Frequency Symbol ks s QAM Type QAM press the OK button to commence the search of that channel When the signal has been tuned the picture and signal strength will be displayed on the screen 4 Press the MENU button to return back to the main menu 5 Pr...

Страница 22: ...just the sound effect here such as treble bass balance etc Auto volume only available when the input signal volume is too large or distortion 4 TIME MENU The fourth item of the menu is the TIME MENU You can adjust the clock power on off time sleep timer etc The second item of the MENU is PICTURE MENU You can adjust picture effect here such as contrast brightness etc 2 PICTURE MENU Move Skip Pictur...

Страница 23: ...hanges have been made to the TV for example no channel or volume changes the TV will start the automatic power down sequence And pop up window will appear on screen After 150 seconds the TV will automatically switch to standby To override the automatic shutdown press any button on the remote control 2 To cancel the automatic power down On the Option Menu select Automatic power down 4H Press left r...

Страница 24: ...e Record Limit is 6 hour if the space on the disk is big enough If the space is not big enough the record time should be shorter depends on the room on the device During the check PVR File System checking please do not take any other operation until it finished The recordings must be done with the TV PVR system It can only be played in the same TV not in any other kind of device computer DVD etc w...

Страница 25: ...EC icon still on the left top It will disappear until you click stop The program recorded on the USB will be saved in the folder _MSTPVR on the device 1 The USB storage size can be between 128MB and 500GB in size but for practical use 2GB to 500GB is recommended 2 Video may become pixelated when Video bit rate is too low This can be caused by connecting a USB extension cable instead of plugging th...

Страница 26: ...ormat Select to format the USB device and allocate the amount of space for the Time Shift function The format process will take at least 2 minutes Please do not turn off the power or remove the USB device during formatting During formatting a speed test will be done on the USB device If it fails it means the USB device may not support the Time Shift function Record a paused DTV program to USB stor...

Страница 27: ...eo bit rate is too low 7 Not all USB devices are compatible The USB hard disk drive electricty should be 500MA Below is a list of recommended USB drvies Models that are not listed may be compatible but it is not guaranteed to work VOL VOL 8 This feature is not available for all digital TV such as scrambled or audio only channels San Disk Extreme Contour USB Flash Drive 8GB SDCZ8 8192 E75 San Disk ...

Страница 28: ...the control bar except for music You can adjust the audio track or program in the Info menu while Playing the video file Choose the Info icon and press OK can display the Info MENU USB playback is supported for the following photo file formats JPEG JPEG format files with the extension jpg BMP files with the extension bmp PNG files with the extension png USB playback is supported for the following ...

Страница 29: ...e TV present channel Press the or button to select the desired channel number Menu Button Main menu lock main menu will not display when set to No Input source change Source lock you can t change the source when set to No Volume default Power on default volume press the or button to select the desired volume HotelMenu Hotel Mode Maximum Volume VolumeDefault Panel Button MenuButton InputSourceChang...

Страница 30: ...re Mute Power cord is not inserted Power switch is not opened Contrast and brightness volume setup Press standby key on the remote control for inspecting No colour Normal audio Colour control Picture breaking up Normal audio or weak retune channel No colour Noise TVsystem Normal audio antenna position direction or connection Trouble phenomenon Symptom Ghost Normal audio Change aspect to zoom There...

Страница 31: ... at ATV and repeat the sequence below for all input sources ATV DTV SCART HDMI 1 and 2 as each input source is controlled separately Press TV Menu button Press Right Arrow to access Picture sub menu Press Down Arrow to select Aspect Ratio Select Auto Press Exit Repeat for all input sources I have just plugged in a DVD player or another item into my TV and it doesn t work This is applicable to any ...

Страница 32: ...g should be very close or touching the body of the TV or component When plugging in any HDMI cables you may experience problems if the HDMI cables are plugged in when the TV or the other component is switched on Always switch off both the TV and the component you are plugging in If you have checked the plugs and sockets switch off the TV and whatever you have plugged in to the TV and then switch t...

Страница 33: ... is updated Design and specifications are subject to change without notice UHF VHF tuner Sleep timer Picture and text Parental Guidance Remote control batteries required 2 x AAA included VESA Mount Size 200x100 mm Package Size WxHxD 802x137x505mm Set Size WxHxD with Stand 733x248x469mm Set Size WxHxD without Stand 733x68 5x439mm Package weight 6 2kg Set weight without stand 4 42 kg Set weight with...

Страница 34: ...ology is updated Design and specifications are subject to change without notice UHF VHF tuner Sleep timer Picture and text Parental Guidance Remote control batteries required 2 x AAA included VESA Mount Size 200x100 mm Package Size WxHxD 1030x137x635mm Set Size WxHxD with Stand 948x236x588 mm Set Size WxHxD without Stand 948x70x554 mm Package weight 10kg Set weight without stand 7 67kg Set weight ...

Страница 35: ......

Отзывы: