background image

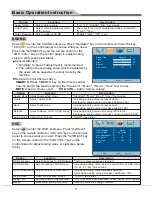
Press ''MENU'' key on the remote control or on the control 
panel. The TV will display  the main menu.
1. Press ''Left/Right'' key on the remote control or ''VOL+/
    VOL-''key on the control panel to select the adjustment 
    sort menu, which includes 4 sorts: 

2. Press ''Down''key on the remote control or ''CH-'' on the 
    control panel to enter the adjustment sort menu.
3. Press ''Up/Down'' key on the remote control or ''CH+/CH-'' 
    on the control panel to select what is needed to adjust in 
    sort menu.
4. Press ''Left/Right'' key on the remote control or ''VOL+/VOL-''on the control panel to adjust the 
    value or setting.
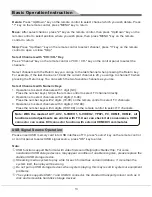
5. Press ''Menu'' key to exit  the main menu when the TV displays the Main Menu; Press ''Menu'' 
    key to return to previous menu when the TV displays the submenu; Press ''SOURCE'' key to 
    display the signal source menu or exit signal source menu.
6. During the operation, the selections which can not be adjusted at current mode will be hidden 
    automatically and the color of the selections will be changed into gray. 
7. Menu Operation Instruction in this manual is explained according to TV mode. The operations in 
    other modes are similar to the one in TV mode. Users can take it as reference. 

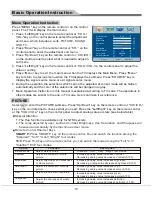
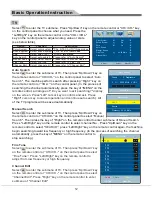
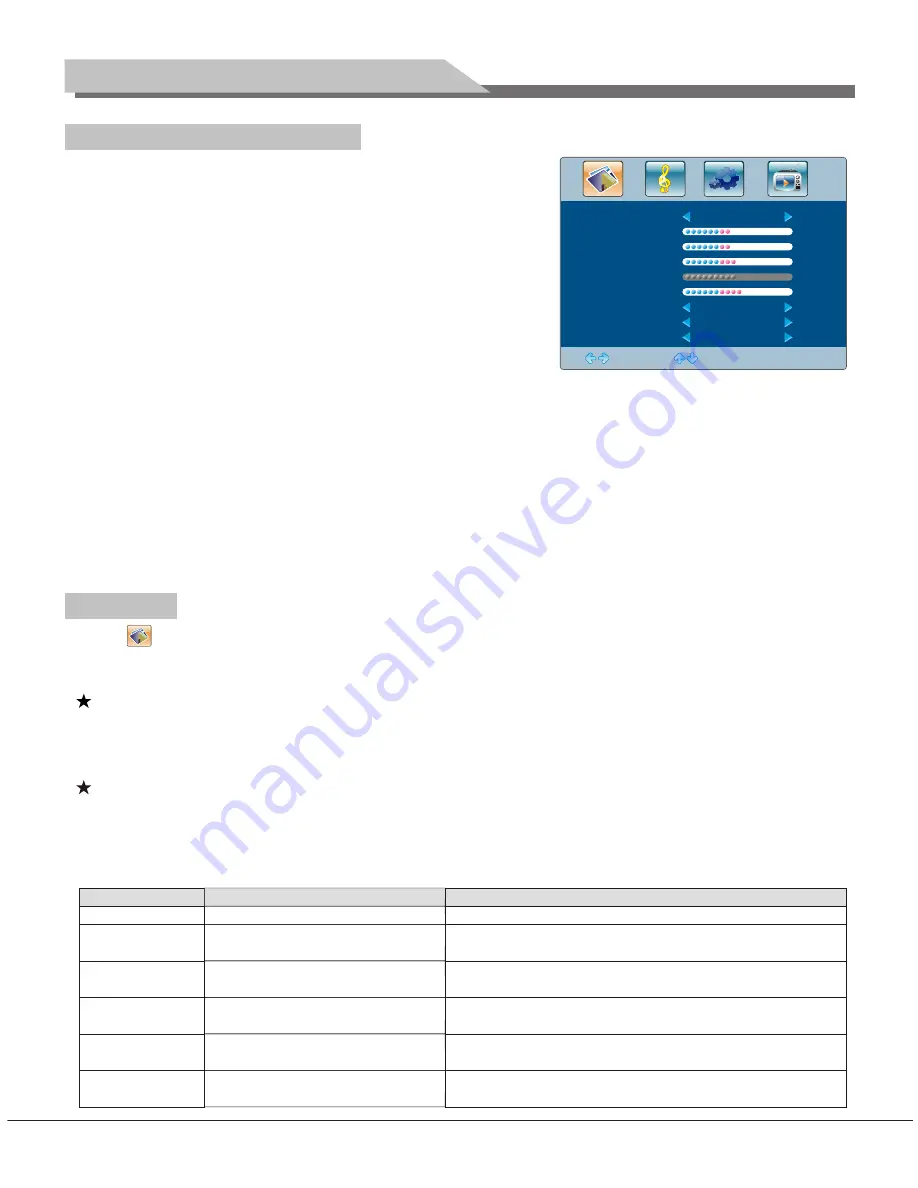
Select      to enter the PICTURE submenu. Press "Up/Down" key on the remote control or "CH+/CH-" 
key on the control panel to choose what you need. Press the "Left/Right" key on the remote control 
or the "VOL+/VOL-" key on the control panel to adjust analog value or state (see below table).

Special Attention 

    1. The Hue function is available only for NTSC system.

PICTURE, SOUND, 

    OSD, TV.

    2. The value adjusted by user, such as Contrast, Brightness, Hue, Saturation, and Sharpness will 
        be saved automatically by the machine as User mode.

Remote Control Shortcut Keys 


SMART P

: Press SMART P key on the remote control. You can switch the function among the 

    "Standard", "Soft", "User", "Bright" four modes .
    

16:9

: Press 16:9 key on the remote control, you can switch the mode among the "Full, "4:3",

    "Subtitle","Film" four modes.

Adjust

Select

Menu:Exit

Full

Standard

48

48

50

55

50

Picture Mode

Contrast

Brightness

Saturation

Sharpness

Aspect Ratio

Color Temp.

Noise Reduction

Hue

Soft

Off

Basic Operation Instruction

Picture Mode
Contrast

Brightness

Saturation

Hue

Sharpness

Select picture mode 
Adjust the contrast of whole
picture
Adjust brightness and blackness 
of whole picture
Adjust the saturation of whole
picture
Adjust the hue of whole picture 

Adjust the sharpness of whole
picture

"Standard", "Soft", "User," "Bright" four modes.
Increasing analog value increases Contrast;
Decreasing analog value decreases Contrast(0-100).
Increasing analog value increases brightness; 
Decreasing  analog value decreases brightness(0-100).
Increasing analog value increases color; 
Decreasing analog value decreases color (0-100).
Increasing analog value increases green; 
Decreasing analog value increases purple(0-100).
Increasing analog value increases definition;
Decreasing analog value decreases definition (0-100). 

Option

Function

Description

PICTURE

Menu Operation Instruction

10

Содержание LCD TV

Страница 1: ...Connection 6 Power Connection 7 Computer Connection 7 AV1 AV2 Video Signal Connection 7 I C 7 YPbPr YCbCr Input Connection 7 AV Output Connection 7 Position of Control Keys 8 Remote Control 8 Basic Operation Instruction 9 Power On 9 Standby 9 Signal Source Selection 9 Menu Operation Instruction 10 PICTURE 10 SOUND 11 OSD 11 TV 12 USB Signal Source Operation 13 Simple Troubleshooting 16 HDMI Digita...
Страница 2: ...tion 13 Power is designed to save energy 14 Input ports include VGA YPbPr HDMI S Video CVBS USB and TV 15 Output ports include AV and Earphone 16 Supports USB interface Characteristic Functions Thank you to choose the LCD TV made by our company a valuable product with excellent quality and multiple functions This machine will bring you more audiovisual enjoyment Its design can insure user s safety...

Страница 3: ...rain weather do not touch the power cord and antenna cable Please pull out the power line and aerial plugs for preventing thunder and lightning damage to this machine All cables can be connected or pull out only after power supply is turned off The power cord must be taken off before you clean the machine Do not use the liquid cleanser or aerosol cleanser It is recommended to use a wet soft cloth ...

Страница 4: ... 0 51075mm 0 51075mm 697 6845mm 392 256mm 16 7M 100V 240VAC 60 50Hz 8W 8W Unpacking 787 494 101mm or 787 494 93mm Packing 900 610 205mm or 900 610 195mm Unpacking 787 555 101mm or 787 555 93 Packing 1015 610 200mm or 1030 600 190mm Net Weight 10 0Kg Gross Weight 11 5Kg Net Weight 11 5Kg Gross Weight 13 0Kg Panel size Max Resolution Best Resolution Pixel Pitch Active Area Color Power Supply Power C...

Страница 5: ...mension L H W Weight Excluding base Including base Excluding base Including base 42 FHD 1920 1080 1920 1080 60Hz 0 4845mm 0 4845mm 930 24mm 523 26mm 40 1920 1080 1920 1080 60Hz 885 6 16 7M 100V 240VAC 60 50Hz 8W 8W Unpacking 977 603 99mm Packing 1090 725 215mm Unpacking 977 674 99mm Packing 1250 735 220mm Net Weight 16 0Kg Gross Weight 18 5Kg Net Weight 18 0Kg Gross Weight 20 5Kg 0 46125mm 0 46125...

Страница 6: ...7 113 5mm Packing 1270 875 255mm Unpacking 1126 757 113 5mm Net Weight 19 0Kg Gross Weight 24 5Kg 0 5415mm 0 5415mm mm 584 82mm Panel size Max Resolution Best Resolution Pixel Pitch Active Area Color Power Supply Power Consumption of Speaker Dimension L H W Weight Excluding base Including base Excluding base VGA Display Mode 32 FHD 37 FHD 40 42 FHD 47 VGA SVGA 70Hz 60Hz 60Hz 60Hz 60Hz 720 400 640 ...

Страница 7: ...e Control 4 Power Cable or the machine itself has power cable Details are listed as follows 47 320W 1W Installation Connection Packing Listing 6 Audio Video machine with HDMI interfaces CVBS DVD Player or other machine with CVBS S Video G Green Y B Blue Pb Cb W White AUDIO L R Red AUDIO R Pr Cr Y Yellow VIDEO AV machine CVBS DVD Player or other machine with YPbPr YCbCr G B R W R W R Y Y W R W R To...

Страница 8: ...nnect YPbPr or YCbCr output with the TV YPbPr YCbCr input In order to obtains the better picture quality at the same time please connect its audio output with TV audio input as shown in the following chart If you choose the YPbPr YCbCr signal please set signal source selection under YPbPr pattern Plug one end of the power cord into the input port of the machine s power supply and then insert the o...

Страница 9: ...rsor key VOL VOL MENU SOURCE CH CH INFO Time Return 16 9 Color P N AUDIO optional OK PLAY PAUSE STOP ROTATE PREV NEXT REV FWD Function Turn on or standby Eliminate sound Number input button Freeze picture Look through program list Intelligent sound mode selection Intelligent image mode selection Up or Down cursor button function select Left or right cursor button analog add or reduce Sound volume ...

Страница 10: ...the battery in order to avoid bringing the battery leakage to corrode the remote control and thus cause it out of commission 5 Do not use different batteries The mix use of new and old batteries is not allowed you should use battery pair 6 Do not throw battery into fire charge or disassembly especially do not charge assemble and disassemble heat or burn to the used battery Please observe the relat...

Страница 11: ...ust analog value or state see below table Special Attention 1 The Hue function is available only for NTSC system PICTURE SOUND OSD TV 2 The value adjusted by user such as Contrast Brightness Hue Saturation and Sharpness will be saved automatically by the machine as User mode Remote Control Shortcut Keys SMART P Press SMART P key on the remote control You can switch the function among the Standard ...

Страница 12: ...ght sound Select Auto Volume Standard Music Movie User four modes Increasing analog value increases treble Decreasing analog value decreases treble 0 100 Increasing analog value increases bass Decreasing analog value decreases bass 0 100 Increasing analog value decreasing left volume Decreasing analog value decreases right volume L50 R50 On Off two states Option Function Description Select to ente...

Страница 13: ...ialogue Do you want to exit searching display on the screen Press Left cursor key to confirm and exit Press Right cursor key to cancel operation and continue auto search Manual Search SEARCH Fine Tune Select to enter the submenu of TV Then press Up Down key on the remote control or CH CH on the control panel to select Fine Tune Press Left Right key on the remote control to adjust from low frequenc...

Страница 14: ... 99 Press the number keys with 2 digits 10 99 on the remote control to select TV channels 3 Operations to select channels with 3 digits 100 199 Press the number keys with 3 digits 100 199 on the remote control to select TV channels Basic Operation Instruction Note With the mode of all functions and adjustments are similar with TV User can check it at convenience AV1 AV2 S VIDEO1 S VIDEO2 YPbPr PC ...

Страница 15: ...os in the file in playlist automatically When photos are playing press Basic Operation Instruction Left Right key on the remote control to select this function OK key to play or pause Prev Left Right key on the remote control to select this function OK key to read previous photo Next Left Right key on the remote control to select this function OK key to read next photo Stop Left Right key on the r...

Страница 16: ...lay normally Step Left Right key on the remote control to select this function OK key to play one step by step Press PLAY key to play normally Zoom in Left Right key on the remote control to select this function OK key to enlarge picture if the document is larger than 1920 1080 this function is unsupported Zoom out Left Right key on the remote control to select this function OK key to reduce pictu...

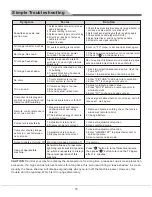
Страница 17: ...ystem CAUTION Don t let your machine display the same picture for a long time please set up a screen protection procedure If a high contrast picture remains for along time this picture will bring a leave shadow in screen Usually the leave shadow will disappear gradually when you turn off the machine power However this trouble can t be repaired Which isn t in range of warranty Electrical release at...

Отзывы: