


22
A NT.
VCR
AUD IO IN
L
R
S-VIDEO
IN
DVD
DVD
L
R
A UDI O I N
Y Cb/Pb Cr/Pr
You can connect outside signal source VCR, VCD
DVD, PC equipment to the TV set.
Antenna Input
1.Connect the VCR radio frequency input to
the back radio frequency input of the LCD.
2. Connect the antenna to VCR antenna input.
3. Press TV/AV button to select TV mode.
4. Press PLAY button in VCR to start watching.
AV input
1.Connect the VCD audio video output to
AUDIO IN and VIDEO IN in the TV set..
2. Press TV/AV button to select AV1,AV2 mode.
4. Press PLAY button in VCD to start watching.
S-VIDEO input
If you use S terminal as signal input source, the
image quality will be better than video (AV).
1.Connect S terminal output in DVD to S terminal
input in TV set.
2.Connect S terminal left/right audio output in DVD to
the relevant port in TV set.
3.Press TV/AV button repeatedly until the display
mode is S-VIDEO.
4.Press PLAY button in DVD to broadcast. At this time
the image programs in DVD will broadcast in TV set.
YPBPR input
1. Component terminal (Y/PbCb/PrCr) connect to the
component output of picture output device (such as
DVD, HDTV TUNER and so on), the sound is input
from AUDIO IN.
2. Press TV/AV button to select YPBPR mode.
3. Press PLAY button on the external device to start
watching.
HDMI input
1. Connect HDMI signal source output to the HDMI
input in this TV set.
2. Press TV/AV button to select HDMI mode.
3. Press PLAY button on the external device to start
watching.
EXTERNAL AUDIO AND VIDEO EQUIPMENT CONNECTION
DVD
HDMI
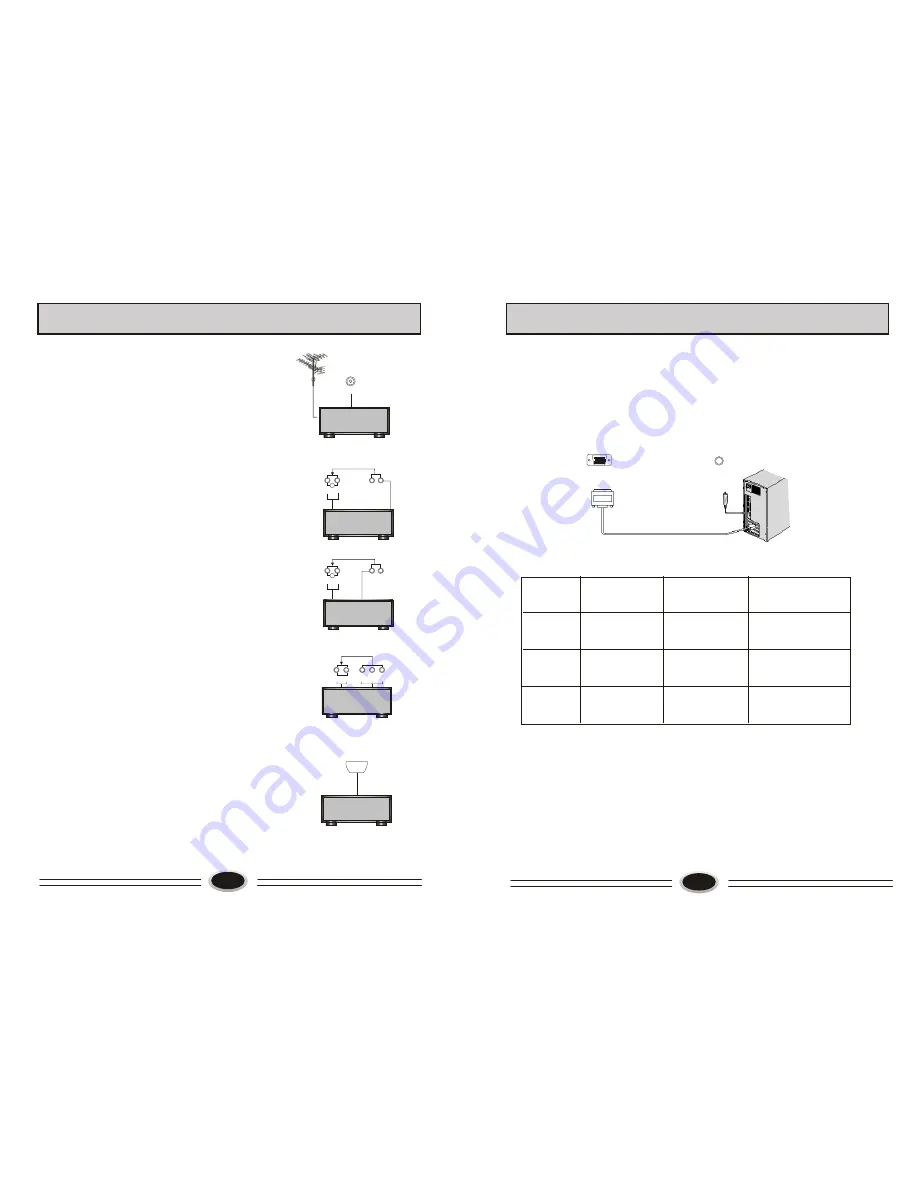
USING YOUR TV AS A COMPUTER DISPLAY
VG A- A U DIO I N
VGA
VGA input
1. Connect the VGA output port in the computer to the VGA port in the TV set.
2. Connect the audio cable in computer to VGA AUDIO IN port in TV set.
3. Press TV/AV button to select VGA mode.
4. Turning on the computer, the screen image of the computer will display on the
TV set.
At this time, the TV set can be used as a computer display.
Note:
1. If the temperature of the TV set is rather low, it is normal that there may be some
artifacts when the set is first turned on.
2. Nonconforming pixels may occur on the panel, but they have no influence on the
normal function of the display.
3. In the standard operation, It is normal if there is one bright dot or dark dot on the
screen.
VGA
SVGA
XGA
640
x
480
800
x
600
1024
x
768
31.5kHz
37.9kHz
48.4kHz
60Hz
60Hz
60Hz
Mode
Resolution
Horizontal
Frequency
Vertical
Frequency
RESOLUTION:
Note: The above parameters are VESA standard.
21
VIDEO
IN
AUD IO IN
L
R
S-VIDEO
IN
DVD
VIDEO
IN


