


10
1. Press in the corresponding knob and turn
counter-clockwise(fig. 2.3) to the full flame position
marked by the “ ” symbol (fig. 2.1) ;hold the knob in
until the flame has been lit.
In the case of a mains failure light the burner with a
match or lighted taper.
2.
Wait for a few seconds after the gas burner has been
lit before letting go of the knob (valve activation delay).
3. Adjust the gas valve to the desired position.
To ignite the burner, the following instructions are to be
followed:
If the burner flame should go out for some reason,the safety valve will automatically stop
the gas flow.
To re-light the burner,return the knob to the closed “ ”position,wait for at least 1 minute
and then repeat the lighting procedure.
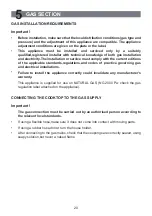
LIGHTING THE BURNERS
Firstly, install two pcs of No. 1 batteries in the battery box at the bottom of the gas hob, and
then perform the ignition and fire size adjustment according to the order of
illustration.(illustrated in fig. 2.3)
INSTALLING THE BATTERY
Battery
Fig. 2.3
Fig. 2.2
Note:
If your local gas supply makes it difficult to light the burner with the knob set to
maximum,set the knob to minimum and repeat the operation.
IMPORTANT:
T
After using the burner
check
the control
knobs
are
in
the closed “ ” position.
Battery
box