Haier HWM85-0713S Скачать руководство пользователя страница 13

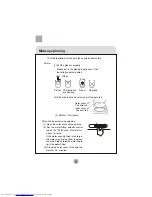
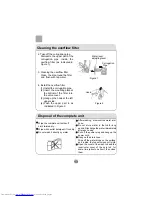
1.  Put  the  laundries  into  the  spin  tub
        evenly  and  smoothly.

2.  Press  the  gland  in  the  tub  properly. 
        Close  the  inner  and  outer  cover  of 
        the  spin  tub.

3.  Spin 
        Select  suitable  spin  time  according
        to  the  laundries,  and  do  spinning.

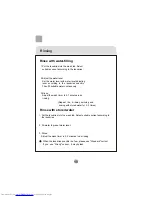
        During    spinning,    if    there's  abnormal
        sound,  it  is  generally  owing  to  slanting
        placement    of    the    laundries.      Please
        stop    the    machine    and    re-order    the
        laundries.

       
        In  spinning,  it  will  pause  the  work  if  you  open  the  outer  cover  of  the  spin
        tub.  Close  it  to  resume  the  spinning.
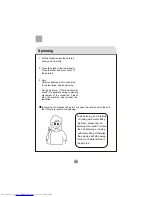
Spinning

To  do  spinning    and    draining
  or  rinsing  with    water-filling 
  together,    please  first  do   
spinning  for  around  1  minute, 
  then  do  draining    or  rinsing
  with  water-filling.  Otherwise
  the  spinning  will  stop  owing 
to  too  much  water  stored  in 
the  spin  tub.

11

Содержание HWM85-0713S

Страница 1: ...a User s manu l This manual is for HWM85 0713S W Please read this manual carefully before using Retain it for future reference Semi Automatic Washing Machine 0030807906 ...

Страница 2: ...y precautions 2 Installation and adjustment 4 Preparation before washing 6 The musts in washing 7 Usage of the detergent 7 Washing sequence 8 Disposal after washing 12 Trouble Shooting Answer to question 14 Packing list Specification 16 ...

Страница 3: ...the machine or injure the personal safety of the user Please check if the power receptacle has good earthing condition before using to guarantee your safety Names of the parts Major frame Base frame Water filling entrance Wash selector Wash timer Control panel Water level adjusting lever Pulsator Wash tub Wash tub cover Drain hose Overflow filter Valve cover Protecting cover Outer cover of the spi...

Страница 4: ...quired to replace it by the technicians of our special shop or the after sale service department Keep the pin of the power plug clean Do not put the machine at damp place like the bathroom Never wash it with water Do not place wet laundries on the control panel Do not use water hotter than 50 C In case the washing machine is installed on ground with carpet do not block the ventilation hole with ca...

Страница 5: ...he drain hose before washing and connect the water inlet pipe properly Do not stretch hands into the working machine It is dangerous even if the rotation is slow Take special care of the children Safety precautions Do not put any hot or heavy items such as the kettle with hot water on the washing machine Do not decompose repair or alter the machine by yourself Handicapped or children without care ...

Страница 6: ...hose If the extra hose is too long cut it either at point A or B B A 30mm 1 5m The drainage shall be smooth with the drain hose 1 The height of the drain hose shall be less than 10cm or the drainage will not be smooth enough and cause incomplete drainage 2 Do not tramp or press the drain hose 3 If the drain hose is too long cut it at mid point To make smooth drainage cut the front end of the hose ...

Страница 7: ...out into the installation hole at the other side of the base frame to aim at the installation hole accurately you can lean the washing machine forward slightly Then rotate for 90 As per Figure 4 Then hang the drain hose into the hanging hole at the spin tub side As per Figure 5 Pull the fixing hook outwards slightly Inlay the drain hose into the fixing hooks reliably along the groove at spin tub s...

Страница 8: ... is running the buttons of the laundries may cause noise For the sake of discretion please put the laundries with buttons into other laundries The quantity of the laundries shall not be too large Stretch and loosen the laundries before putting them in the tub a Check if the laundries are applicable for washing with machine b Divide the laundries that are not colorfast from other laundries c Put th...

Страница 9: ... washing tub Avoid using whitener on laun dries with color or pattern as they are prone to lose color The whitener shall not touch the laundries directly Direct dissolved in the machine 1 Fill small quantity of water 2 Add the powder Run for 30 seconds to dissolve it completely 3 Put it in the laundries Select suitable water level The instant dissolving of the washing powder 1 Prepare warm water o...

Страница 10: ...e 1 2 Adjust water level rod to a position as needed 2 Fill water and add solved powder detergent until water reaches a suitable level Figure 2 It begin to wash to dispense detergent uniformly 3 Put in the wash load and supplement water as necessary 4 Select the current Select the strength of the current according to the laundries Figure 3 5 Select the washing time Select the washing time accordin...

Страница 11: ...e If the water quantity filled is too large the water may flow out from the wash tub side Please twist the water tap to limit the water filling 3 Close the outer cover of the spin tub Spin for 1 2 minutes 1 Put the laundries into the spin tub evenly and smoothly 2 Spin 1 Put the gland in properly Please put in the gland properly even if the laundries quantity is small 2 Close the inner and outer c...

Страница 12: ...y is a few please use Standard current If you use Strong current it may splash Rinsing Repeat the midway spinning and rinsing with stored water for 2 3 times 1 Put the laundries into the wash tub Select suitable current according to the laundries 2 Adjust the water level Set the water level with water level adjusting lever according to the laundries quantity Then fill suitable water continuously 3...

Страница 13: ... generally owing to slanting placement of the laundries Please stop the machine and re order the laundries In spinning it will pause the work if you open the outer cover of the spin tub Close it to resume the spinning Spinning To do spinning and draining or rinsing with water filling together please first do spinning for around 1 minute then do draining or rinsing with water filling Otherwise the ...

Страница 14: ...luence the normal usage of the machine Please clean it every two months Elastic fixing claw Figure 2 Figure 3 Figure 1 1 Take off the lint filter Put hand at the indicated position Push down to take it off See to Figure 1 2 Clean the lint Put it in water and clean while it is still wet See to Figure 2 3 Install the lint filter After cleaning insert the bottom of the lint filter marked with down si...

Страница 15: ...e bottom of the filter into the valve cover 3 Hang up the hook at the left upper side 4 Push the upper part in as indicated in Figure 2 Corrugation Pipe Hook Figure 1 Figure 2 Water level adjusting lever After washing dismount the water inlet hose Do not store water in the tub for long period Discharge the water immediately after each using Pull off the power plug and hang up the power cord Hang u...

Страница 16: ... water completely after using After complete draining set the WASH SELECTOR at STRONG or STANDARD If it is set at DRAIN it will be rather difficult for the frozen water to melt When the water is frozen Pour hot water below 50 into the wash tub to soak it completely Then turn the pulsator with hands gently Please confirm the drainage can work normally before next using 2 3L Below 50 c 14 Trouble sh...

Страница 17: ...d by foreign materials Is the drain hose put down Is the drain hose frozen Is the drain hose blocked by foreign material Are there laundries falling to the outer side of the spin tub The draining does not work Are there hair pin coins or metal items brought inside the tub Is the machine slanting Is the gland pressed evenly Are there laundries falling to the outer side of the spin tub Are the laund...

Страница 18: ...Water inlet hose Gland Lint filter Packing list Twin tub washing machine Name Quantity User s manual One piece One piece One piece One piece One set 16 Guarantee One piece ...

Страница 19: ...17 Water level Water quantity L about Maximum 58 Medium 49 Minimum 43 Injection pressure MPa Washing spinning capacity kg 8 5 6 0 0 02 0 2 Speciafication Dimensions mm L 786 W 455 H 945 ...

Отзывы: