
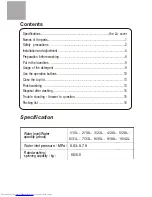


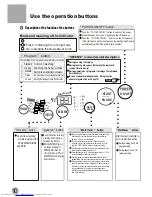


Procedure button
Program
button
Push it to select one
or more programs from
SOAK WASH RINSE
and SPIN
Reserve button
Water level
button
Push the button to select
washing finishing time
between 2-24 hours.
Push the
POWER ON/OFF
POWER ON/OFF
button to switch on the power.
When the power is on, push it again to switch off the power.
Push the
button to switch on the power.
If the start/pause button is not pushed, the washing machine will
automatically switch off the power after 5 minutes.
During sensing, it displays
During reserve procedure, it displays the remained
reserve time (in hours)
During operation of programs, it displays the remained
time (minutes).
In case of abnormal phenomenon, it displays the
abnormal symbol (see to Page 15)
Start/Pause
button
10
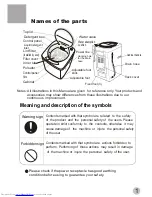
Use the operation buttons
Description of the function of the buttons
"POWER ON/OFF"button
SPIN
WASH
RINSE
SOAK
STANDAR
D
GENTLE
HEAVY
FAST
JEANS
POWER
ON/OFF
START
PAUSE
WATER
LEVEL
RESERVE
SURPLUS
(MIN)
RESERVE(HOURS LATER)
PROCEDURE
PROGRAM
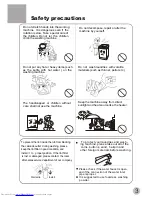
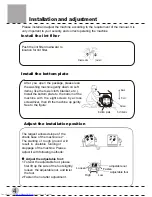
Page15
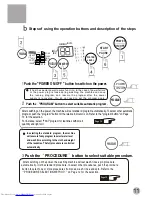
RESERVE
remain time indicator digitron
After the power is switched on,
push it to Start the machine
During working, push it to
pause working.
During pause, push it to
resume working.
When the RESERVE function
is activated, the digitron of
TIME REMAIN is flash. The
other indicators are off. Push
the RESERVE button to display
the reserve mode.
P
R
O
G
R
A
M
The following five programs are available for your option
Standard
Heavy
Gentle
Fast
Common washing
Washing the heavy clothes
Washing the woolen textiles or underwear
10-minute quick washing of laundries with light soil
Jeans Washing the relatively big and thick laundries
Mode and meaning of the indicator
Flash : indicating the running mode
On: indicating the mode about to run
The washing machine can detect the laundries automatically.
After detection, it will set the water level to suitable value
among 4, 6, 8,and 10 automatically.
You can also set water level by self. After the machine
is started, it will not set water level automatically. You shall
push the START/PAUSE button to make new setting.
If there's water inside the tub, the machine cannot detect the
laundries and will display water level 6 .
If wet laundries are put in, it may display water level 10 . You
must set suitable water level by yourself.
. And you cannot change the water level by yourself..
During operation of wash and rinse program, you can push
down the water level button to add water. When you release
the button, or it reaches the overflow water level, the machine
will stop adding water. The water level decided may be
different from actual value because of the different moisture
level of the laundries.
If quick program is selected, the water level will be set to 2
automatically