


Connection between the water inlet hose and the washer
Dismantle the water inlet hose
Connection between the jointer of the water inlet hose and the
water inlet hose
Check the connection between the jointer of the water inlet hose
and the water faucet
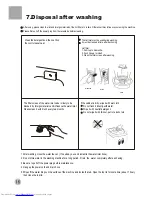
1.
Do not take off the water absorption cushion. Please check if the
cushion is dropped or damaged before each usage. If it happens
please contact our after-sale department immediately.
1.
Swing the hose gently to confirm if it is fastened stable.
2.After installation, open the faucet to check if it leaks.
3.Do not bend the hose with overstrain.
1.
Push down the slider. Insert the water inlet hose into the jointer.
2 Hang the lock lever to the jointer. Release the slider till a click sound is heard.
Locking level
Slider
water absorption cushion.
nut of the water inlet hose
the jointer of the water inlet hose
Slider
Locking level
jointer of the water inlet valve
1.
Close the water faucet.
2. Press the locking lever. Push down the slider. Then pull of the water inlet hose.
If the machine is used frequently, the jointer of the water inlet hose can be kept
on the faucet to prevent damaging the fixing screw.
2 Put the nut of the water inlet hose on the valve jointer.
3 Fasten the nut. Swing it gently to confirm if it's suitable.
4.Before each usage please check if the connection
between the jointer of the water inlet hose and the
water faucet, and the installation of the water inlet
hose are firm, so as to prevent dropping from
improper installation position.