Use
Use
Notice
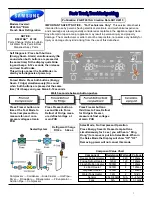
When the appliance is switched on after disconnection from the main power supply, it
may take up to 12 hours for the correct temperatures to be reached.
Notice
The control panel is automatically blocked against
activation if 30 seconds no button is pressed. For any
settings the control panel must be unlocked.
Select the working mode
You may need to select one of the following two ways to set the appliance:
1) SMART mode
Under SMART mode, the appliance can automatically adjust the temperature setting ac-
cording to the ambient temperature and temperature change in the appliance. If you do
Adjust the temperature
The indoor temperatures are influenced by the following factors:
▶
Ambient temperature
▶
Frequency of door opening
▶
Amount of stored foods
▶
Installation of the appliance
not have any special requirements, we recommend that you use SMART mode (refer to
SMART FUNCTION).
2) Manual adjusting mode:
If you want to manually adjust the temperature of the appliance in order to store a par-
ticular food, you can set the temperature via a temperature adjusting button (refer to
ADJUST THE TEMPERATURE).
12
13
L
ock/unlock panel
▶
Touch button “F” for 3 seconds to block all panel
elements against activation. An acoustic signal
sounds .The related indicator “f” is now displayed
and the lightening of the panel is switched off. The
icon flashes if a button will be pressed, when the
panel lock is activated. The change is not running.
▶
For unlocking press again the button.
Hold on
3sec.
unlock
Switch on /of the appliance
The appliance is in operation as soon as it is connected to the power supply.
When the appliance is powered on for the first time, freezer temperature is shining on the
display “b”until the temperature reaches -5°C or after 1 hour working. The temperatures
displayed will shown the actual temperatures in the compartment.
Maybe the panel lock is active.
Empty the appliance before switching off. To switch off the appliance,pull the power cord
out off the power socket.
Standby-mode
The display screen turns off automatically 30 seconds after pressing a key or if one of the
doors is open longer than 30 seconds. The display will be automatically locked. It lights up
automatically when pressing any key or opening one of the doors.
Door opening alarm
When one door is opened for more than 3 minutes, the door opening alarm will sound.
The alarm can be silenced by closing the door. If the door is left open for more than 7 min-
utes, the light inside the compartment will automatically switch off.
Adjust the temperature for fridge
1. Unlock the panel by pressing button “F” if it is
locked.
2. Press button “A” (Refrigerator) to select the refrig-
erator compartment. The actual temperature in
the refrigerator compartment is displayed.
3. Press button “A” (Refrigerator) to set the refrig-
erator temperature.
A signal will sound at each key press. The tem-
perature increases in sequences of 1°C from
a minimum of 1°C to a maximum of 9°C. The
optimum temperature in the refrigerator is 5 °C.
Colder temperatures mean unnecessary energy
consumption.
4. Press any key except “A“ (Refrigerator) to confirm,
or the setting confirms automatically after 5 sec-
onds. Displayed temperature stops flashing
Freezer
SMART
holiday function
Hold on 3 sec.
Power Cool
Power Freeze
1.
2.
3.
4.
Refrigerator
Refrigerator
Hold on
3sec.
unlock
Adjust the temperature for freezer
1. Unlock the panel by pressing button “F” if it is
locked.
2. Press button “B” (Freezer) to select the freezer
compartment. The actual temperature in the
freezer compartment is displayed.
Hold on
3sec.
unlock
1.
Freezer
2.
Содержание HSBS555AWH
Страница 1: ...User Manual Refrigerator Freezer HSBS555A Colour code WH SA BL SS...
Страница 17: ......


