background image

Before you start

Safety and compliance

These instructions are intended as a guide only. It is the responsibility of the installer to ensure that 
installation complies with applicable regulations and local government by-laws. 

Installation must be performed by a suitably qualified person. Incorrect installation or malfunctioning 

resulting from incorrect installation are not covered by warranty. 
Carefully read through the ‘Safety and warnings’ section of this document. 
The dishwasher must not be connected to the electrical supply while it is being installed. Ensure all 
domestic wiring is properly earthed. 
If an old appliance is being replaced, make sure it is disposed of properly. To avoid children getting 
trapped or injured while playing with an old appliance, ensure you remove any doors, door locks and 
cables from it. 
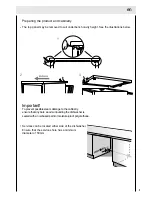
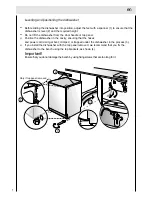
In order to ensure that the dishwasher is stable, it must be installed under a continuous surface which is 
attached to adjacent cupboards.

Unpacking and handling


Check packaging and dishwasher for signs of transport damage. If the dishwasher is in any way 
damaged, do not install it. Contact the dealer the dishwasher was purchased from. 
Disposal of packaging: some of the packaging is recyclable. Check the symbols and labels and recycle if 
possible. 
Never lift the dishwasher from the door handle or the top panel. Doing so may cause damage. Always 
be careful with the hoses and power cord at the back of the dishwasher. Careful handling will prevent 
damage and malfunction from squashing, kinking or cuts. 
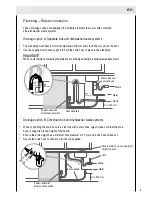
While installing the dishwasher, check the drain hose is not restricted or kinked.

Connections and services


Check that the power cord is long enough to reach the outlet. If it isn’t, it must be replaced by a Haier 
authorised technician. Extension cords or multi-outlet power boards should not be used to connect the 
dishwasher to the power supply. 
Check that the hoses are long enough to reach the services. If a hose needs extending, ensure that the 

extension hose is new and of equal quality and diameter to the one already fitted. 

Note: the drain hose should not be longer than 4 m, as a longer drain hose will cause reduced 
performance. 
The dishwasher should not be connected to a water system where the temperature exceeds 60oC, or 

where there is no temperature control, e.g. wetback system, unless the system is fitted with a suitable 

tempering valve. 
The dishwasher must not be connected to an undersink high-pressure “push-through” type hot water 
system, as damage to the system will result.

Installation

4

en

Содержание HDW9TFE3WH HA AA

Страница 1: ...Dishwasher TFE3 Series Instructions for Use HDW9 TFE3WH HDW9 TFE3SS 0120505889A en POWER 3 in 1 DELAY HEAVY NORMAL LIGHT GLASSWARE PRE RINSE RINSE QUICK 30 1 2 3 4 5 6 7...

Страница 2: ...ch could otherwise be caused by inappropriate waste handling of this product For more detailed information about recycling of this product please contact your local council your household waste dispos...

Страница 3: ...the dishwasher when barefoot or with wet hands or feet Do not use extension cords and multiple sockets If the appliance is not operating properly or maintenance must be performed disconnect the appli...

Страница 4: ...cturer or a manufacturer approved service engineer To maintain the EFFICIENCY and SAFETY of this appliance we recommend Call only the service centres authorised by the manufacturer or the approved ser...

Страница 5: ...al of packaging some of the packaging is recyclable Check the symbols and labels and recycle if possible Never lift the dishwasher from the door handle or the top panel Doing so may cause damage Alway...

Страница 6: ...height of product with top panel in place with top panel removed 850 min 870 max 820 min 840 max B overall width of product 450 C overall depth of product 600 D depth of open door measured from front...

Страница 7: ...ions below Important To prevent possible steam damage to the cabinetry ensure that any bare wood surrounding the dishwasher is sealed with an oil based paint or moisture proof polyurethane Services ca...

Страница 8: ...e or top panel Position the dishwasher in the cavity ensuring that the hoses and power cord don t get bent crimped or trapped under the dishwasher in the process 3 If you install the dishwasher with t...

Страница 9: ...sal unit Drainage option B Combined sink and dishwasher waste systems When connecting the drain hose to a sink trap with a drain hose spigot make sure that the drain hose is supported to the height of...

Страница 10: ...eduction valve must be installed Contact a qualified plumber 3 Connect the water inlet hose to an accessible water tap with a BSP connector Ensure that there is no kink in the inlet hose that could re...

Страница 11: ...replaced This should only be done by a Haier authorised technician Do not modify or cut the plug Do not use an adaptor extension cord or multi outlet power board to connect the dishwasher to the power...

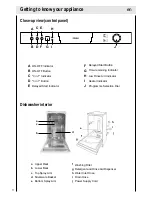
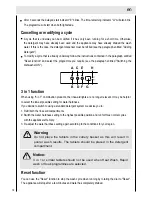
Страница 12: ...ashing Filter Water Inlet Hose Drain Hose Power Supply Cord 3 in 1 Indicator Heater Indicator Time remaining Indicator F G H I J A B C D E ON OFF Indicator ON OFF Button Delayed Start Button Delayed S...

Страница 13: ...n the cap 2 in an anti clockwise direction see Fig B and then pour in the rinse aid making sure not to overfill The amount of rinse aid used for each cycle can be regulated by turning the dose adjusto...

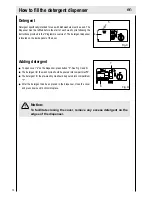
Страница 14: ...ed on the inside panel of the door To open cover 4 on the dispenser press button 5 See Fig C and D The detergent for the wash cycle should be poured into compartment 6 The detergent for the pre wash c...

Страница 15: ...her Highly absorbent materials such as sponges and towels should never be placed in the dishwasher Important Items that have been soiled by tobacco ash wax lubricating grease or paint should not be pu...

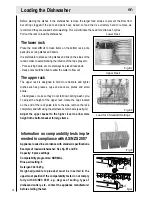
Страница 16: ...The upper rack is designed to hold more delicate and lighter dishes such as glasses cups and saucers plates and small bowls Stand glass or cups so they do not fall down during wash cycle To adjust the...

Страница 17: ...residue from drying on the dishes Pre wash use cold water Extended wash at 45 C Rinse with cold water Rinse with hot water Drying Wash at 45 C Rinse with cold water Hot rinse Drying HEAVY NORMAL LIGHT...

Страница 18: ...data are based on standard operating conditions The values can vary considerably according to Amount of dishes Temperature of mains water supply Pressure of mains water supply Ambient temperature Fluc...

Страница 19: ...There is a risk of water coming out from inside the appliance Do not open the door fully until spray arm has stopped rotating When you open the door the dishwasher will beep ten times every thirty se...

Страница 20: ...iance will stop after a few minutes and water has completely drained Warning Do not place the tablets in the cutlery basket as this will result in poorer wash results The tablets should be placed in t...

Страница 21: ...leaning product made specifically for dishwashers Moving the appliance If the appliance must be moved try to keep it in a vertical position If absolutely necessary it can be positioned on its back Sea...

Страница 22: ...tergent solution Rinse aid Check the LOW RINSE AID indicator H on the front panel Top up with rinse aid if required Filters The filters 8 and 9 prevent larger particles of food in the water from reach...

Страница 23: ...under running water Refit the spray arms Ensure that the lower arm has locked into place and the upper one is screwed in tight Ensure that the power supply is turned off prior to removal and cleaning...

Страница 24: ...hen the appliance is switched on Appliance does not start up Trouble shooting Fault with fuse in mains electricity supply Plug not inserted in wall socket Appliance door not closed properly Programme...

Страница 25: ...tes with difficulty Spray arm is blocked by small items or food residue Detergent compartment lid cannot be closed Detergent compartment has been overfilled Mechanism is clogged with remnants of deter...

Страница 26: ...ed properly inside the appliance Knocking sound coming from inlet valves This is caused by the way the water pipes have been laid and it has no effect upon the way the appliance functions There is no...

Страница 27: ...not include drying function Amount of rinse aid was set too low Items were removed from dishwasher too soon Dishes cutlery etc have not been dried Amount of rinse aid was set too low Glasses have a d...

Страница 28: ...d the end of its working life unplug it from the mains Cut through the mains cable and dispose of it together with the plug Destroy the door locking mechanism This will ensure that children cannot bec...

Отзывы: