


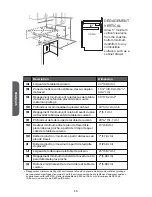


6. Insert the long clamping screw (provided) into the outermost hole of the
clamping bracket. Repeat for the other side of the cooktop.
b
a
c
d
e
f
A
Glass Cooktop
B
Countertop
C
Clamping Screw
D
Cooktop Base
E
Clamping Bracket Attachment
Screw
F
Clamping Bracket (extends from
the cooktop base to underneath
the countertop)
7. Using a screwdriver, tighten the clamping screws against the countertop. Do
not overtighten the screws.
STEP 4 - MAKE DIRECT WIRE ELECTRICAL
CONNECTION
To properly install your cooktop, complete electrical connections according to local
codes and ordinances.
WARNING
Electrical Shock Hazard
Disconnect power before servicing.
Use 8 gauge copper wire.
Electrically ground cooktop.
Failure to do so can result in death, fire or electrical shock.
Be sure your appliance is properly installed and grounded by a qualified
technician. Ask your dealer to recommend a qualified technician or an authorized
repair service.
This appliance is manufactured with a green GROUND wire connected to the
cooktop chassis. After making sure that the power has been turned off, connect the
flexible conduit from the cooktop to the junction box using a UL listed conduit
connector.
8
ENGLISH
Содержание HCC2220BEB
Страница 2: ......
Страница 7: ...2 5 08 cm...
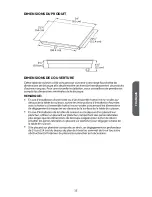
Страница 17: ...DIMENSIONS DU PRODUIT DIMENSIONS DE L OUVERTURE REMARQUE FRAN AIS...
Страница 21: ...TAPE 3 INSTALLATION DE LA TABLE DE CUISSON 1 REMARQUE a b c A B C 2 REMARQUE travail 3 4 FRAN AIS...
Страница 22: ...5 a c b A B C 6 b a c d e f A B C D E F 7 TAPE 4 RACCORDEMENT LECTRIQUE DIRECT FRAN AIS...
Страница 31: ...DIMENSIONES DEL PRODUCTO MEDIDAS DE LA ABERTURA NOTA ESPA OL...
Страница 35: ...PASO 3 INSTALE LA SUPERFICIE DE COCCI N 1 NOTA a b c A cocci n B C 2 NOTA 3 4 ESPA OL...
Страница 42: ......
Страница 43: ......