background image

English

Electrical Requirement

• Make sure there is a suitable power Outlet (115 volts, 15 amps outlet)

with proper grounding to power the beverage center. 

• Avoid the use of three plug adapters or cutting off the third grounding in

order to accommodate a two plug outlet. This is a dangerous practice
since it provides no effective grounding for the beverage center and
may result in shock hazard.

• Avoid the use of an extension cord because of potential safety hazards

under certain conditions. If it is necessary to use an extension cord, use
only a 3-wire extension cord that has a 3-blade grounding plug and a
3-slot outlet that will accept the plug. The marked rating of the extension
cord must be equal to or greater than the electrical rating of the
appliance.

• Do not install your beverage center in any location not properly

insulated or heated e.g. garage etc. Your beverage center was not
designed to operate in temperature settings below 55˚ Fahrenheit. 

• Select a suitable location for the beverage center on a hard even surface

away from direct sunlight or heat source e.g. radiators, baseboard
heaters, cooking appliances etc. Any floor unevenness should be 
corrected with the leveling legs located at the bottom.

Install Limitations

6

Use of Extension Cords

Содержание HC125F

Страница 1: ...Y SERVICE IMPORTANT Ne pas Réexpédier ce Produit au Magasin Pour tout problème concernant ce produit veuillez contacter le service des consommateurs Haier Customer Satisfaction Center au 1 877 337 3639 UNE PREUVE D ACHAT DATEE EST REQUISE POUR BENEFICIER DE LA GARANTIE IMPORTANTE No regrese este producto a la tienda Si tiene algún problema con este producto por favor contacte el Centro de Servicio...

Страница 2: ...Minibar User Manual Guide de l Utilisateur Las funciones pueden variar según el modelo Manual del Usuario Features may vary by model Les caractéristiques peuvent varier en fonction du modèle Model Modèle Para Modelo de Refrigerador de Bebidas ...

Страница 3: ...l electric service cords that have become frayed or otherwise damaged Do not use a cord that shows cracks or abrasion damage along its length the plug or the connector end 5 Unplug your beverage center before cleaning or before making any repairs Note If for any reason this product requires service we strongly recommend that a certified technician performs the service 6 If your old beverage center...

Страница 4: ...rial number They are on a label in back of the beverage center Model number Serial number Date of purchase Staple your receipt to your manual You will need it to obtain warranty service DANGER Risk of child entrapment Before you throw away your old beverage center take off the doors Leave the shelves in place so that children may not easily climb inside English ...

Страница 5: ...ation 5 Electrical Requirements 6 Use of Extension Cords 6 Install Limitations 6 Door Alignment 7 Door Reversal 8 Beverage Center Features And Use 10 General Features 10 Beverage Center Interior Shelves 10 Normal Operating Sounds 12 Proper Beverage Center Care and Cleaning 13 Cleaning and Maintenance 13 Power Interruptions 14 Vacation and Moving Care 14 Troubleshooting 15 Warranty Information 16 E...
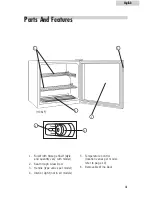
Страница 6: ... style and quantity vary with model 2 See through Glass Door 3 Handle type varies per model 4 Interior Light not in all models 5 Temperature Control location varies per model refer to page 10 6 Removable Wine Rack English 4 1 2 3 4 HC61F 6 5 4 5 6 ...

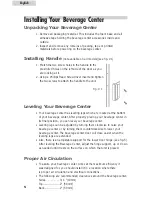
Страница 7: ...be adjusted by turning them clockwise to raise your beverage center or by turning them counterclockwise to lower your beverage center The beverage center door will close easier when the leveling legs are extended Also there is an adjustable support for the lower door hinge see fig 5 After leveling the Beverage Center adjust the hinge support up or down as needed until it rests on the surface on wh...

Страница 8: ... cord use only a 3 wire extension cord that has a 3 blade grounding plug and a 3 slot outlet that will accept the plug The marked rating of the extension cord must be equal to or greater than the electrical rating of the appliance Do not install your beverage center in any location not properly insulated or heated e g garage etc Your beverage center was not designed to operate in temperature setti...

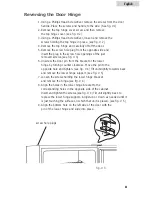
Страница 9: ...Remove the top hinge cover 3 Loosen the top hinge screws using a Phillips Head Screwdriver 4 Adjust the door or put a spacer in between and then tighten the screws 5 Replace the top hinge cover Door Alignment see fig 2 fig 2 English ...

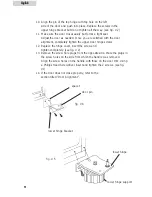
Страница 10: ...Unscrew the door pin from the bracket of the lower hinge by turning counter clockwise Move the pin to the opposite hole and tighten see fig 4 Tilt unit slightly towards back and remove the lower hinge support see fig 5 7 Loosen the screws holding the lower hinge bracket and remove the hinge see fig 4 8 Align the holes in the lower hinge bracket to the corresponding holes in the opposite side of th...

Страница 11: ...er door hinge screws 12 Replace the hinge cover insert the screw and tighten completely see fig 2 13 Remove the screw hole plugs from the opposite side Place the plugs in the screw holes on the side from which the handle was removed Align the screw holes on the handle with those on the door trim Using a Phillips Head Screwdriver insert and tighten the 2 screws see fig 1 14 If the door does not clo...

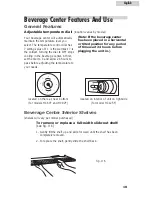
Страница 12: ... off 1 is the warmest 7 is the coldest Turning the dial to OFF stops cooling in the beverage center At first set the dial to 4 and allow 24 hours to pass before adjusting the temperature to your needs Note If the beverage center has been placed in a horizontal or tilted position for any period of time wait 24 hours before plugging the unit in Beverage Center Interior Shelves shelves will vary per ...

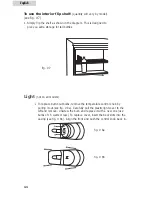
Страница 13: ...screw the bulb and replace it with a new one use bulbs of 15 watts or less To replace cover insert the back slots into the casing see fig 8b Align the front and push the control knob back in 6 5 4 fig 8a fig 8b To use the interior flip shelf quantity will vary by model see fig 7 1 Simply flip the shelf as shown in the diagram This is designed to give you extra storage for tall bottles fig 7 ...

Страница 14: ...g water gurgling sounds or slight vibrations that are the result of the refrigerant circulating through the cooling coils The thermostat control will click when it cycles on and off Normal Operating Sounds You May Hear ...

Страница 15: ... soft cloth Do not use harsh chemicals abrasives ammonia chlorine bleach concentrated detergents solvents or metal scouring pads SOME of these chemicals may dissolve damage and or discolor your beverage center Clean door gaskets every three months according to general instructions Gaskets must be kept clean and pliable to assure a proper seal Petroleum jelly applied lightly on the hinge side of ga...

Страница 16: ...ions or absences empty contents from beverage center move the temperature DIAL to the OFF position and clean the beverage center and door gaskets according to General cleaning section Prop doors open so air can circulate inside When moving always move the beverage center vertically Do not move with the unit lying down Possible damage to the sealed system could occur English 14 Power Interruptions ...

Страница 17: ...cold adjust to a warmer setting and allow several hours for temperature to adjust Beverage Center runs too frequently This may be normal to maintain constant temperature during high temperature and humid days Doors may have been opened frequently or for an extended period of time Check gasket for proper seal Check to see if doors are completely closed Moisture build up on interior or exterior of t...

Страница 18: ...items during the initial 12 month period Beyond this period only parts are covered in the remaining warranty Labor is not provided and must be paid by the customer 3 Contact your nearest authorized service center For the name of the nearest service center please call 1 877 337 3639 THIS WARRANTY COVERS APPLIANCES WITHIN THE CONTINENTAL UNITED STATES PUERTO RICO AND CANADA IT DOES NOT COVER THE FOL...

Страница 19: ...cer immédiatement tous les câbles électriques usés ou endommagés Ne pas utiliser de cordon d alimentation présentant des craquelures ou des dommages dus à des frottements sur le câble lui même sur la fiche ou sur le connecteur 5 Débrancher le minibar avant de le nettoyer et avant toute réparation Remarque si pour une quelconque raison vous devez faire réparer cet appareil nous vous conseillons viv...

Страница 20: ...à l arrière de votre minibar Numéro de modèle Numéro de série Date d achat Veuillez agrafer votre facture avec votre manuel Vous en aurez besoin pour bénéficier de la garantie DANGER Cet appareil présente un risque d enfermement pour les enfants Avant de vous débarrasser de votre ancien minibar veuillez enlever les portes Laissez les étagères en place afin que les enfants ne puissent pas grimper à...

Страница 21: ...ectriques 6 Utilisation de rallonges 6 Restrictions à l installation 6 Alignement de la porte 7 Inversion de la porte 8 Caractéristiques et Utilisation du Minibar 10 Caractéristiques générales 10 Étagères intérieures du minibar 10 Bruits de fonctionnement normaux 11 Entretien et Nettoyage du Minibar 12 Entretien et nettoyage 12 Coupures de courant 13 Conseils en cas d absence et de déménagement 13...

Страница 22: ...ent selon les modèles 2 Porte vitrée transparente 3 Poignée le type varie selon les modèles 4 Lumière intérieure sur certains modèles uniquement 5 Contrôle de la température l emplacement varie selon les modèles se reporter à la page 10 6 L Etagère détachable de Vin 1 2 3 4 HC61F 6 5 4 5 4 Français 6 ...

Страница 23: ...niveau peuvent être réglés en les tournant dans le sens des aiguilles d une montre pour lever l appareil et dans le sens inverse pour abaisser l appareil La porte de votre minibar se fermera plus facilement si les pieds sont réglés plus hauts Il existe également un support réglable pour la charnière inférieure de la porte voir le schéma p 5 Après avoir mis le minibar à niveau régler le support de ...

Страница 24: ... uniquement une rallonge possédant une fiche male à deux broches plus terre à une extrémité et une prise femelle de même type à l autre extrémité La capacité électrique de la rallonge doit être égale ou supérieure à la capacité de l appareil Ne pas installer votre minibar dans un endroit insuffisamment isolé ou chauffé ex un garage etc Cet appareil n a pas été conçu pour fonctionner à une températ...

Страница 25: ...ère supérieure 3 Desserrer les vis de la charnière supérieure à l aide d un tournevis Phillips 4 Ajuster la porte ou placer une cale au besoin puis resserrer les vis 5 Remettre en place le couvercle de la charnière supérieure Alignement de la Porte voir le schéma N 2 N 2 7 Français ...

Страница 26: ...la dévissant dans le sens contraire des aiguilles d une montre Introduire la broche dans l orifice opposé et la serrer voir le schéma N 4 Faire légèrement basculer l appareil vers l arrière puis déposer le support de la charnière inférieure 7 Desserrer les vis qui maintiennent en place la fixation de la charnière inférieure puis déposer la charnière voir le schéma N 4 8 Aligner les orifices présen...

Страница 27: ...tisfaisant serrer complètement les vis de la charnière supérieure 12 Remettre en place le couvercle de la charnière poser la vis et la serrer complètement voir le schéma N 2 13 Déposer les bouchons de vis du côté opposé Mettre les bouchons dans les orifices laissés par la suppression de la poignée Aligner les orifices de la poignée avec ceux qui se trouvent sur l habillage de la porte À l aide d u...

Страница 28: ...la température la plus chaude et 7 à la température la plus froide Mettre l ap pareil en position OFF interrompt le refroidissement de votre minibar Mettre tout d abord le bouton en position 4 puis attendre 24 heures avant de régler la température à vos besoins Remarque si le minibar a été placé en position horizontale ou penchée ne serait ce qu un instant attendre 24 heures avant de le brancher É...

Страница 29: ...N 8b Aligner la partie frontale et remettre le bouton de réglage en place en appuyant dessus 6 5 4 N 8a N 8b Les bruits d eau qui bout les gargouillements ou les légères vibrations proviennent du fluide frigorigène qui circule à travers la grille de refroidissement Le bouton de thermostat émet un clic lorsqu il s allume ou qu il s éteint Bruits de Fonctionnement Normaux que Vous Pouvez Entendre Ut...

Страница 30: ...mais utiliser des produits abrasifs de l ammoni aque domestique de l eau de Javel des détergents concentrés des dissolvants ou une éponge à récurer en métal CERTAINS de ces produits chimiques peuvent dissoudre détériorer et ou décolorer votre minibar Nettoyer les joints de la porte tous les trois mois conformément aux instructions générales Les joints doivent rester propres et souples pour assurer...

Страница 31: ...du thermostat en position OFF puis nettoyer l appareil et les joints conformément aux instructions de la section Généralités de la rubrique Entretien et nettoyage Ouvrir ensuite les portes afin que l air puisse circuler à l intérieur Lors d un déménagement de l appareil toujours le déplacer à la verticale Ne jamais le déplacer en position horizontale cela pourrait endommager le système frigorifiqu...

Страница 32: ...érature plus élevée et attendre plusieurs heures que la température se stabilise Le minibar se met en marche trop fréquemment Cela peut être tout à fait normal les jours où il fait chaud et humide afin que la température à l intérieur de l appareil soit constante Il se peut que les portes aient été trop souvent ouvertes ou pendant trop longtemps Vérifier la bonne étanchéité des joints Vérifier que...

Страница 33: ... la garantie pendant la période initiale de 12 mois 3 Veuillez contacter votre centre de ser vices agréé le plus proche Pour obtenir le nom de votre centre de services le plus proche veuillez appeler le 1 877 337 3639 CETTE GARANTIE COUVRE LES APPAREILS ÉLECTROMÉNAGERS SUR LE CONTINENT NORD AMÉRICAIN ÉTATS UNIS ET CANADA ET À PORTO RICO ELLE NE COUVRE PAS CE QUI SUIT Les dommages dus à une mauvais...

Страница 34: ...4 Repare o reemplaze inmediatamente todos los cables de corriente que estén percudidos o dañados No utilice cables que estén rasgados o presenten daños a lo largo del mismo en el enchufe o en la conexión 5 Desenchufe la unidad antes de la limpieza o antes de hacer alguna reparación Nota si por algún motivo esta unidad requiere reparación nosotros recomendamos que sea realizado por un técnico calif...

Страница 35: ...cuentran en la etiqueta en la parte trasera de la unidad Número de modelo Número de serie Fecha de compra Adjunte su recibo o factura a su manual Esta será necesaria para utilizar los servicios de la garantía PELIGRO Riesgo para los niños Antes de deshacerse de su viejo refrigerador de bebidas asegúrese de quitarle las puertas Deje los estantes en su lugar de modo de evitar que algún niño entre fa...

Страница 36: ... Alargues 6 Limitaciones de la Instalación 6 Alineación de la Puerta 7 Reversión del eje de la Puerta 8 Uso y Características del Refrigerador de Bebidas 10 Características Generales 10 Estantes internos del Refrigerador 10 Sonidos Normales de la Operación 11 Cuidado y Mantenimiento Apropiado 12 Limpieza y Mantenimiento 12 Interrupciones de la Corriente de Energía 13 Vacaciones y Cuidados en el Tr...

Страница 37: ...ilo y cantidad varía por modelo 2 Puerta de vidrio transparente 3 Manija el tipo varía según los modelos 4 Luz interior no en todos los modelos 5 Control de temperatura la ubicación varía en los modelos ver pagina 10 6 El Botellero movible 1 2 3 4 HC61F 6 5 4 5 Español 4 6 ...

Страница 38: ...as agujas del reloj para levantar la unidad o en dirección con traria para bajar la unidad La puerta del refrigerador de bebidas cer rará más fácil cuando los pies niveladores estén extendidos Existe también un soporte ajustable para el ángulo inferior de la puerta ver figura 5 Luego de nivelar la unidad ajuste el soporte del ángulo hasta que repose en la superfiice donde la unidad fue ubicada Par...

Страница 39: ...e un alargue de tres cables que posea un enchuefe de tres patas No instale la unidad en lugares no lo propiamente aislados o de mucho calor por ej Garage etc Su refrigerador de bebidas no fue diseñado para operar en niveles de temperatura inferiores a 55 grados fahrenheit Seleccione una ubicación adecuada para su unidad en una superficie fuerte lejos de la luz directa de sol o fuentes de calor com...

Страница 40: ...l eje superior 3 Utilizando un destornillador philips retire los tornillos del eje superior 4 Ajuste la puerta o coloque un espaciador en el medio y ajuste los tornillos nuevamente 5 Coloque nuevamente el eje superior en su lugar Alineación de la Puerta ver figura 2 fig 2 7 ...

Страница 41: ... la puerta que se encuentra en el eje inferior girando en sentido contrario a las agujas del reloj Mueva el pin al orificio opuesto y ajuste ver figura 4 Incline la unidad de a poco hacia atrás y retire el soporte del eje inferior 7 Retire los tornillos que sostienen la placa del eje inferior y retire el eje ver fig 4 8 Alinee los orificios de la placa del eje inferior con los correspondientes ori...

Страница 42: ...alineación de la misma ajuste los tornillos del eje 12 Coloque nuevamente el cobertores del eje inserte el tornillo y ajuste ver fig 2 13 Retire los tapones de los orificios del otro lateral Colóquelos en los agujeros del lado donde fue retirada la manija Coloque la manija del lado correspondiente y ajuste con un destornillador philips los dos tornillos restantes 14 Si la puerta no cerrara correct...

Страница 43: ... OFF 1 es la opción más cálida 7 la de mayor frío Cuando lleve el selector a Off la unidad dejará de enfriar En principio lleve la temperatura al nivel 4 y deje pasar unas 24hs antes de ajustar a otro nivel Nota Si el refrigerador de bebidas ha sido apoyado verti calmente o en una posición incli nada por un tiempo determina do por favor espere 24 hs antes de hacer funcionar Estantes Interiores del...

Страница 44: ... 8b Alinee el frente coloque y presione la perilla de control en su lugar 6 5 4 fig 8a fig 8b Burbujeo sonido de agua hirviendo o pequeñas vibraciones que son el resultado de la circulación del líquido refrigerante El termostato hara un click cuando se encienda y apague Sonidos de la Operación Normal Para utilizar la canasta o estante interior la cantidad varía según el modelo ver figura 7 1 Simpl...

Страница 45: ...sivos amoníaco cloro detergentes concentrados solventes o esponjas de metal Algunos de estos materiales pueden dañar corromper o decolorar se unidad Limpie las juntas cada tres meses mínimo de acuerdo a las instrucciones generales de limpieza Las juntas deben mantenerse limpias para permitir un correcto sellado de la puerta mientras esté cerrada Puede pasarse en la junta un poco de vaselina para m...

Страница 46: ... o este ausente vacíe el refrigerador de bebidas mueva el dial de temperatura a Off y limpie la unidad de acuerdo a las instrucciones generales de limpieza Deje la puerta abierta de modo que el aire pueda circular Cuando necesite transladar la unidad siempre mueva verticalmente No la mueva en forma horizontal puede causar daños al sistema Interrupciones de Energía Vacaciones y cuidados en el trasl...

Страница 47: ...ste el nivel de temperatura a una posición más cálida y permita un tiempo para que la misma se ajuste El Motor Trabaja muy Seguido Puede ser normal para mantener la temperatura en días cálidos y de humedad La puerta es abierta frecuentemente por un largo tiempo Controle las juntas de la puerta para que cierre correctamente Controle si la puerta cierra completamente Formación de Vapor en el Interio...

Страница 48: ...petando el período de 12 meses Luego de ese período sólo los componentes estan cubiertos por la garantía La labor deberá ser abonada por el cliente 3 Contacte su service autorizado más cercano Para averiguar el nombre del service mas cercano llame al 1 877 337 3639 ESTA GARANTI A CUBRE EN LOS EEUU PUERTO RICO Y CANADA NO CUBRE LO SIGUIENTE Daños por instalación impropia Daños en el embarque y tran...

Отзывы: