OPERATING INSTRUCTIONS
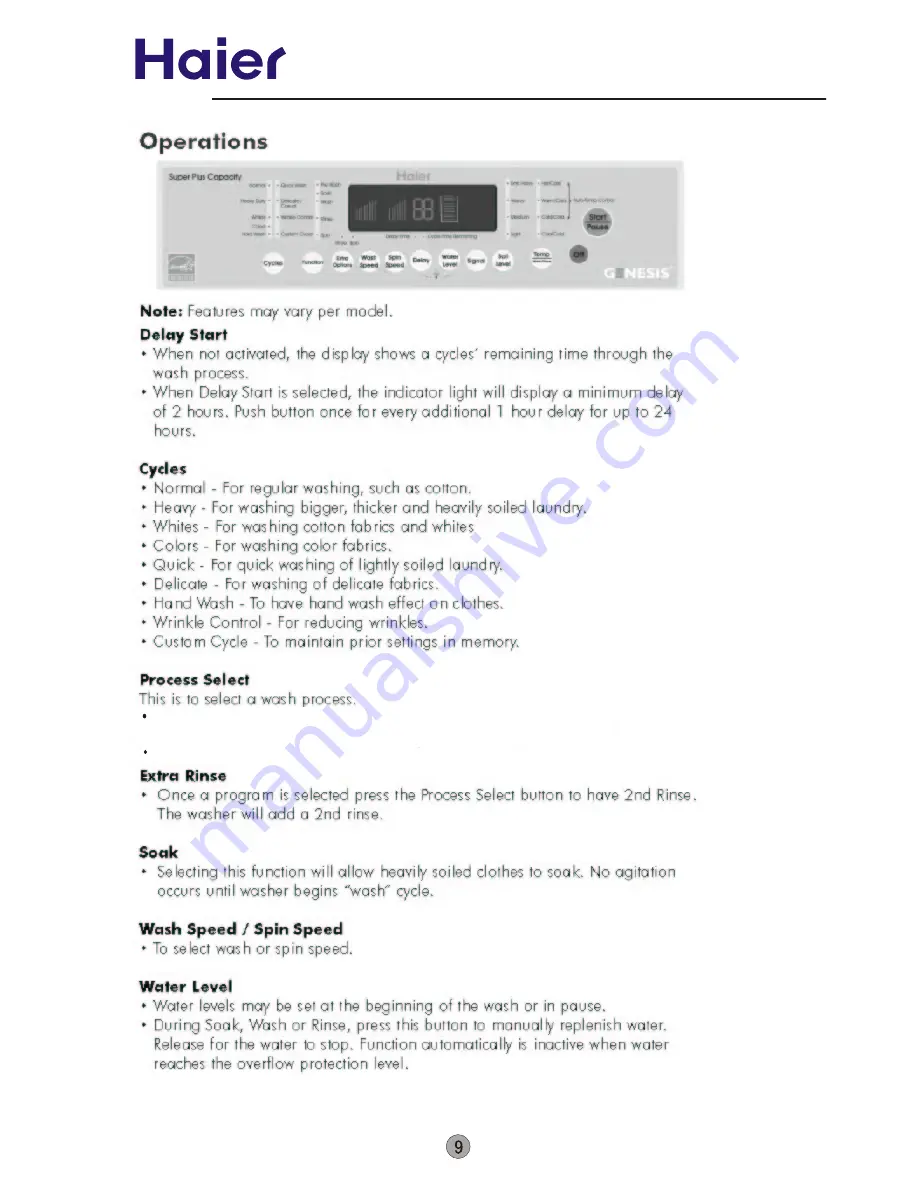
Water level indicator will shut off if only Spin is selected.
Soak or Pre-wash will not work in the Cycles: Hand Wash,Quick Wash, Delicate Casual and Wrinkle Control.
Страница 1: ...GWT800AW WD 8888 92 Edition 2006 06 27 Full automatic washing machine Models HLT364XXQ SERVICE MANUAL ...
Страница 2: ... 6 Net dimension 6 7 6 8 Operating instructions 8 9 Maintenance service and trouble shooting 14 10 Wiring diagram 18 11 19 Features 2 3 Safety precautions 4 Warning and cautions Installation and accessory parts How to disassemble washing machine 1 ...
Страница 3: ...ive blanket washing easily Shift washing shift spinning VFD Display Cold warm water inlet selection Drain up function Cabinet with the door open in the front Super capacity for more clothes Pulsator type for wash efficiency twist free and low wear 2 ...
Страница 4: ...washing and rinse water temperure selection Spinning cycle selector Spinning cycle variable Start Pause Preset H 2 24 2 24 Automatic balancing Aesthetics V L H S H T Cabinet material P Plastic Z Zincking C Cold Z Z r drum stainl steel s plastic p S S Drain type U drain up D drain down Drain up Drain up Door glass g plastic p Adjustable feet Special function inner cycle Feet wheel Double driver Two...
Страница 5: ...r special shop or the after sale service department Keep the pin of the power plug clean Be sure to earth the earthing wire reliably Do not put the machine at damp place like the bathroom Never wash it with water Do not let the machine share one receptacle with other electric appliances If the power plug is damaged or the plugging into the receptacle is loose do not use the plug any more Do not in...
Страница 6: ...een used for such a period before using the washing machine turn on all hot faucets and let the water flow from each for several minutes This will release any accumulated hydrogen gas As the gas is flammable do not smoke or use an open flame during this time Keep the machine away from direct sunlight and heat source like the heater Do not wash articles that have been previously cleaned in washed i...
Страница 7: ...ntal Adjust the adjustable feet 1 To twist the adjustable foot please first lift up the side of the foot slightly and twist the foot 2 Fasten the nut after adjustment Adjust the Installation position High Low Adjustable foot 2 Please install and adjust the machine according to the requirement of the manual It is very important to your security and correct operating the machine Shiping bar Pull out...
Страница 8: ...eck for leaks Asmall amount of water might enter the washers You will drain this later 3 Attach the hose connected with hot water faucet to the HOT water inlet valve sign with H Attach the hose connected with cold water faucet to the COLD water valve sign with C As figure 2 NOTE Do not over tighten 2 Run water through both faucets and inlet hoses into a bucket or laundry tub to get rid of particle...
Страница 9: ... Bleach injection inlet Cabinet Control panel Control panel seat Top lid Adjustable foot four pieces Door switch Front door Inner tub cover Power line Water inlet valve Drain hose joint Back cover OPERATING INSTRUCTIONS ...
Страница 10: ...OPERATING INSTRUCTIONS Water level indicator will shut off if only Spin is selected Soak or Pre wash will not work in the Cycles Hand Wash Quick Wash Delicate Casual and Wrinkle Control ...
Страница 11: ...luding soak Normal About54 78 About44 58 Heavy Duty About57 91 About47 61 Whites About53 89 About43 59 colors About50 86 About40 56 Hand Wash About26 38 Quick Wash About24 30 Delicate Casual About25 35 Wrinkle control About25 34 Program Total time ...
Страница 12: ...illustrated in the drawing Please do not use softener in the following cases Selected rinsing times more than two Choosing rinse spin two in one program Softener inlet SOFTENER Try to avoid adding softener in if you do not intend to wash immediately The softener may harden and may cause a poor flow Use the manufacturer s chart on product container for recommended use of liquid or powder bleach Be ...
Страница 13: ...pens when the Washer tub spins at very high RPM Wash and Rinse cycles going on and off will also make clicking sounds Note Use only liquid bleach in dispenser Warning Be careful not to spill undiluted bleach on the washer cabinet or your clothes As it is a strong chemical it may damage some of your clothes or the finish of the washer if not properly diluted Use the manufacturer s chart on product ...
Страница 14: ...er tub cover shaft groove 3 Firstly insert the inner cover shaft of one side into the corresponding outer tub cover shaft groove then push the another inner cover shaft into the corresponding outer tub cover shaft groove Please install to designated position to guarantee there are no dropping or abnormal sound in opening and closing of the inner cover and the operation shall be smooth Do not dismo...
Страница 15: ...e between the white wire terminal in the white plug on top of the wire unit and the N pin on the power receptacle Replace the sequencer Replace the power cord Replace the wire unit Replace the computer sequencer Connect the fuse and the wires of the two ends The resistance is 0 The resistance is 0 The resistance is 0 Infinite Infinite Yes Infinite No Pull off the power plug Not exist Exist Check i...
Страница 16: ...e unit is normal No Yes No No Check if the wire unit is normal Replace the sequencer Replace the sequencer Repair or replace the wire unit Yes Yes Yes Keep filling water Open the water faucet without switching on the power If the water can fill into the water inlet valve check if the gas guide system such as gas cell leaks gas Replace the water inlet valve Replace the water level sensor It leaks g...
Страница 17: ...ashing machine is set horizontally If the noise of the gear case is large If the hanger is wrongly used If the noise of the motor is too much If the motor is fastened tightly Set the machine horizontally Replace the retarder Replace the hanger Replace the motor Fasten the motor No No Yes Yes Yes Too much noise in washing If the noise of the motor is too much If the pulsator is rubbing the bottom o...
Страница 18: ...p lid Close the top lid Are the laundries put slantingly Re order the laundries Close the top lid The water faucet is not open or supplying water is stoped The water inlet valve is blocked Clean the water inlet valve Push the Start Pause button Open the water faucet Push the Start Pause button Is the drain hose blocked by foreign material Is the spout blocked by foreign Clean the foreign material ...
Страница 19: ... is overload protector installed in the motor In case that the motor is overload or meets breakdown in working the protector will act and stop the motor When the breakdown is removed the motor will resume normal working 18 ...
Страница 20: ...MACHINE 19 No Component Step Picture 1 dismantle the tapping screw 2 dismantle the fasten button 3 dismantle the screw of the back cover 4 push the control panel 5 take off the controlpanel The back cover dismantle control panel ...
Страница 21: ...nt Step Picture 6 top lid dismantle the screw of the top lid 7 dismantle the screw of the lid switch 8 take off the lid switch dismantle the connector of the part dismantle the wire connector dismantle the lid switch dismantle the wire module 9 20 ...
Страница 22: ...icture dismantle the earth wire remove the clamp of the wire modul dismantle the screw of the front door 11 take off the front door 12 the connector pipe dismantle the connector pipe lamp and take off the pipe dismantle the wire module 9 the front door 21 ...
Страница 23: ...ntle the water filling pipe clamp 14 pull the control panel seat 15 take off the control panel seat 16 dismantle the inner cover pull the inner cover to dismantle the inner cover 17 dismantle the pulsator unfasten the pulsator screw and take off the pulsator dismantle the control panel seat 22 ...
Страница 24: ...icture 18 dismantle the screw of the drain pipe dismantle the pipe clamp 22 the tub component take out the tub component from the front side of the cabinet dismantle the connector of the drive board dismantle the connector of the drive board drain pipe 23 ...
Страница 25: ...ottom of the cabinet 24 take out the drive board 25 dismantle the motor unfix the bolt of the motor 26 unfasten the line of the retractor 27 dismantle the retractor 28 unfasten the bolt by spanner 29 take off the support arm component dismantle the drive board dismantle the retractor the support arm component 24 ...
Страница 26: ...Group Haier Industrial Park No 1 Haier Road 266101 Qingdao China http www haier com Sincere Forever ...