background image

Indoor Unit Installation

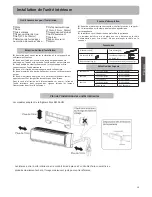
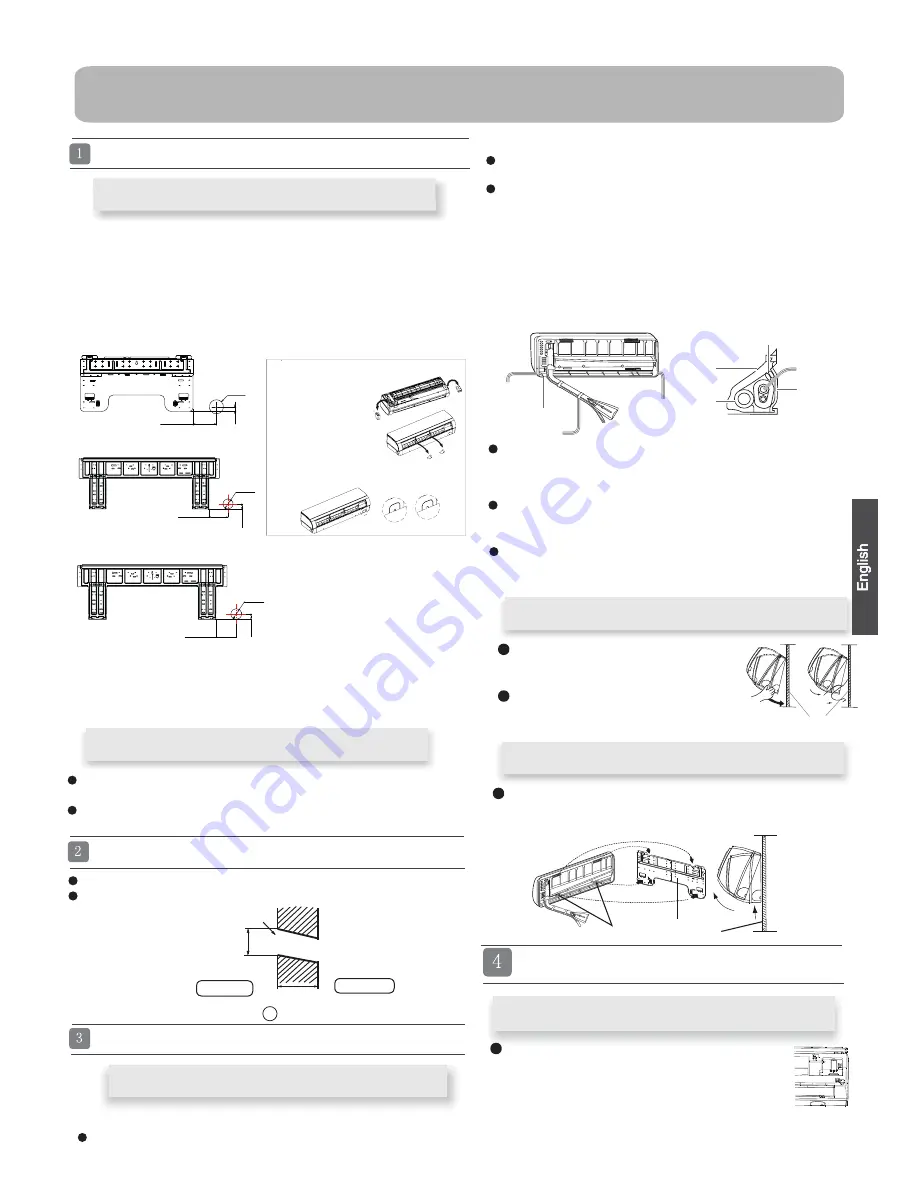
Fix to side bar and lintel a mounting bar, Which is separately sold, and

then fasten the plate to the fixed mounting bar.

Refer to the previous article, “ When the mounting plate is

position of wall hole.

Make a hole of 70 mm in diameter, slightly descending to outside the wall
Install piping hole cover and seal it off with putty after installation

1. Carry out, based on the neighboring pillars or lintels, a 

to be fixed against the wall, then temporarily fasten the plate

with one steel nail.

2. Make sure once more the proper level of the plate, by hanging a thread

with

   a weight from the central top of the plate, then fasten securely the

plate with the attachment steel nail.

3. Find the wall hole location A using a measuring tape

When the mounting plate is fixed side bar and lintel

Fitting of the Mounting Plate and Positioning of the wall Hole

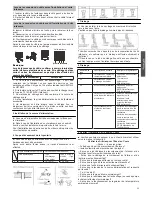
Lid for right
piping

Lid for under piping pipe

Fix with adhesive tape

Lid for left piping

Indoor/outdoor electric cable and drain hose must be bound with

efrigerant piping by protecting tape.

[ Other direction piping ]

Cut away, with a nipper, the lid for piping according to the piping

direction and then bend the pipe according to theposition of wall

hole. When bending, be careful not to crash pipes.

Connect beforehand the indoor/outdoor electric cable, and then

pull out the connected to the heat insulation of connecting part
specially.

proper leveling

for the plate

first fixed “,

for the

Making a Hole on the Wall and Fitting the Piping Hole Cover

Drawing of pipe

Installation of the Indoor Unit

[ Rear piping ]

Draw pipes and the drain hose, then fasten them with the adhesive tape

[ Left

‡ ‡

Left-rear piping ]

In case of left side piping, cut away, with a nipper, the lid for left

piping.

In case of left-rear piping, bend the pipes according to the piping

direction to the mark of hole for left-rear piping which is marked on
heat insulation materials.

1. Insert the drain hose into the dent of heat insulation materials of

indoor unit.

2. Insert the indoor/outdoor electric cable from backside of  indoor

unit, and pull it out on the front side, then connect them.

3. Coat the flaring seal face with refrigerant oil and connect pipes.

Cover the connection part with heat insulation materials closely,
and make sure fixing with adhesive tape

Hang surely the unit body onto the upper

notches of the mounting plate. Move the body
from side to side to verify its secure fixing.

In order to fix the body onto the mounting

plate,hold up the body aslant from the
underside and then put it down perpendicularly.

Remove terminal cover at right bottom corner of 

indoor unit, then take  off wiring cover by removing
its screws.

mounting plate

When you unload the indoor unit,please use your hand to arise 

slightly and lift the unit aslant until it leaves the mounting plate. 

agraffe

mounting plate

 the body to leave agraffe,then lift the bottom of the body outward

Heat insulation
material

Drain hose

Piping

Pipe supporting
plate

Indoor/outdoor electric cable

Indoor side

Outdoor side

Ø70mm

Wall hole

Thickness of wall

(Section of wall hole)

 Piping hole pipe

G

When the mounting plate is first fixed

Fixing the indoor unit body

Unloading of indoor unit body

Connecting the indoor/outdoor Electric Cable

Removing the wiring cover

A=100mm

20mm

% ĭPP

30mm

% ĭPP

A=120mm

30mm

% ĭPP

A=113mm

18k

09/12/15k

24k

Pay attention to the following points before installation 
of machine: 

1. Take out cushion blocks on 
    the left and right angle beads 
    as shown in the following 
    Figure. 

2. Remove 2 gaskets under the 
    cross-flow fan.

3. Clean the burr on the surface of fracture to avoid the power 
    wire from being scratched after removing the virtual opening 
    of the outgoing line slot on the case by hands in indoor 
    power-on process.

9

Содержание AS07NS3HRA

Страница 1: ...NAMENTO 27 INSTALLAZIONE DELL UNIT INTERNA 30 MANUTENZIONE 33 Indice Italiano ADVERTENCIA Y PRECAUCIONES 34 COMPONENTES Y FUNCIONES 37 FUNCIONAMIENTO 38 INSTALACI N DE UNIDAD INTERIOR 41 MANTENIMIENTO...

Страница 2: ......

Страница 3: ...t is leak proof 1 Applicable ambient temperature range Specifications The machine is adaptive in following situation The power plug and connecting cable acquired the local 2 If the power supply cord i...

Страница 4: ...TION PROHIBITION PROHIBITION PROHIBITION Do not start or stop the operation by disconnecting Do not channel the air flow directly at people especially at infants or the aged Do not try to repair or re...

Страница 5: ...ential Please fill in with indelible ink WKH IDFWRU UHIULJHUDQW FKDUJH RI WKH SURGXFW WKH DGGLWLRQDO UHIULJHUDQW DPRXQW FKDUJHG LQ WKH ILHOG and WKH WRWDO UHIULJHUDQW FKDUJH on the refrigerant charge...

Страница 6: ...ton 22 TIMER OFF ON 23 1 Mode display Operation mode AUTO FAN COOL DRY Remote controller 2 Signal sending display 4 FAN SPEED display 5 LOCK display 6 TIMER OFF display TIMER ON display 7 TEMP display...

Страница 7: ...each press of button remote controller displays as follows remote controller For each press of button remote controller displays as follows remote controller Cautions Remote controller Press button E...

Страница 8: ...her The unit will run for further 6 hours then stops Temp is higher than temp setting so that room temperature won t be too low for your sleep O C 1O C Press button the remote controller will show and...

Страница 9: ...F TIME ON TIME OFF TIME ON Loading of the battery 1 2 3 4 Remove the battery cover Load the batteries as illustrated 2 R 03 batteries resetting key cylinder Be sure that the loading is in line with th...

Страница 10: ...onne cted with the outdoor unit Place where cold air can be spread in a room entirely Place nearby a power receptacle with enough space around Place where the distance of more than lm from televisions...

Страница 11: ...ng bend the pipes according to the piping direction to the mark of hole for left rear piping which is marked on heat insulation materials 1 Insert the drain hose into the dent of heat insulation mater...

Страница 12: ...onal flare tool Clutch type clutch type Rigid type Wing nut type Imperial type A 0 0 5mm 1 0 1 5mm 1 5 2 0mm rth leakage breaker Lean Damage of flare Partial Too outside t c e r r o c n I t c e r r o...

Страница 13: ...ious stains use a neutral detergent diluted with water Wring the water out of the cloth before wiping then wipe off the detergent completely Indoor Body Once every two weeks 1 Open the lnlet Grille 2...

Страница 14: ...l n est pas destin tre utilis par des personnes y compris les enfants ayant des capacit s physiques sensorielles ou mentales r duites ou qui manquent d exp rience et de connaissances moins qu elles so...

Страница 15: ...outon de fonctionnement et contacter le magasin de vente Utiliser une source d alimentation exclusive avec un disjoncteur de circuit V rifier l installation correcte du drainage en toute s curit Conne...

Страница 16: ...s dispositions europ ennes suivantes Directive relative aux Basses Tensions 2006 95 CE Compatibilit Electromagnetique 2004 108 CE ROHS Les produits sont remplis avec les exigences de la directive 2011...

Страница 17: ...IVEE Affichage MINUTERIE ACTIVEE 7 Affichage TEMP 8 Affichage des fonctions suppl mentaires 9 Touche TURBO SILENCIEUX 10 Touche CHAUFFAGE 11 Touche REFROIDISSEMENT 12 Touche BALAYAGE HAUT BAS 13 Touch...

Страница 18: ...selon la temp rature ambiante En mode VENTILATEUR le mode NOCTURNE n est pas disponible 16 Fon onnement d urgence et mode de test Fo nt d urg h lisez ce mode de fo onnement uniquement en cas de perte...

Страница 19: ...is la fonction Nocturne configur e si I utilisateur r initialise la fonction MINUTERIE la fonction NOCTURNE est annul e et l appareil passe l tat MINUTERIE ACTIVEE Remarque concernant la reprise apr s...

Страница 20: ...l e Le g n rateur d anions dans le climatiseur peut g n rer beaucoup d anions qui peuvent efficacement quilibrer la quantit de la position et l anion dans l air peut galement tuer les bact ries et acc...

Страница 21: ...escentes dans la salle s allument Les mod les adoptent le r frig rant libre R410A HFC Source d alimentation z Avant de mettre la prise sous tension v rifier la tension coup s r Clef dynamom trique 1 T...

Страница 22: ...e lectrique int rieur ext rieur au dos de l unit int rieure et le tirer sur la face avant puis les connecter 3 Enduire la surface tanche d vasement avec de l huile frigorig ne et raccorder des tuyaux...

Страница 23: ...is e avec un coupe tube et les bardanes doivent tre enlev es Apr s avoir ins r l crou vas le travail d vasement est effectu Outil d vasement pour R410A Outil d vasement traditionnel Type d embrayage T...

Страница 24: ...ltres droite et gauche ne sont pas correctement fix s ce qui peut causer des malformations 5 Fermer la grille d admission Remplacement du Filtre Purificateur d Air REMARQUE le filtre purificateur d ai...

Страница 25: ...dotte capacit fisiche sensoriali o mentali o da persone inesperte solo se preventivamente istruite all utilizzo in sicurezza e solo se informati dei pericoli legati al prodotto stesso Non lasciar gioc...

Страница 26: ...acqua sull apparecchio 24 In caso di anomalie quali odore di bruciato arrestare immediatamente l apparecchio staccare l alimentazione e contattare il servizio assistenza Usare esclusivamente una sorge...

Страница 27: ...imitazione dell uso di alcune sostanze pericolose nei dispositivi elettrici ed elettronici Direttiva RoHS UE WEEE In conformit alla direttiva 2012 19 EU del Parlamento Europeo informiamo il consumator...

Страница 28: ...rossi 3 Indicatore deflettori 4 Indicatorei velocit ventilatore 5 Indicatore Lock blocco tasti 6 Visualizzazione TIMER disattivato Visualizzazione TIMER attivato 7 Visualizzazione temperatura 8 Visual...

Страница 29: ...ando viene premuto il tasto del funzionamento d emergenza si sente un Piii una volta sola che segnala l inizio di questa operazione Nel funzionamento d emergenza il sistema seleziona automaticamente l...

Страница 30: ...maticamente a bassa velocit 5 Se la modalit SLEEP impostata per 8 ore non possibile regolare il tempo di tale funzione Quando la funzione Timer attiva non possibile impostare la modalit SLEEP Se si ri...

Страница 31: ...ona scompare e la modalit viene disattivata Lo ionizzatore all interno del condizionatore pu generare una grande quantit di ioni e bilanciarne la quantit e la posizione nell aria contribuendo all elim...

Страница 32: ...in cui l aria fredda possa diffondersi agevolmente in tutto il locale Posizione vicina ad una presa di corrente con sufficiente spazio intorno vedi disegni Posizione in cui vi sia una distanza superio...

Страница 33: ...e venduta separatamente alla quale applicare la dima di montaggio fare riferimento alla sezione precedente FISSAGGIO 2 POSIZIONAMENTO DEL FORO NELLA PARETE Praticare nella parete un foro di 70m inclin...

Страница 34: ...do inst interruttore differenziale con sensibilit adeguata 6 Metodo per il taglio e la flangiatura dei tubi Tagliare il tubo con il tagliatubi ed eliminare eventuali sbavature nserire poi il dad I co...

Страница 35: ...il lavaggio asci completamente il filtro all ombra 4 Rimettere il ltro al proprio posto e chiudere il pannello a Sostituzione dei filtri purificatori il ltro puri catore una parte opzionale 4 Fissare...

Страница 36: ...nas incluidos ni os con facultades f sicas sensoriales o mentales reducidas o con falta de experiencia y conocimiento a menos que se les haya dado supervisi n o instrucci n acerca del uso del aparato...

Страница 37: ...como una peque a quemadura detenga inmediatamente el funcionamiento del aparato y p ngase en contacto con su punto de venta Utilice una fuente de alimentaci n exclusiva equipada con un interruptor de...

Страница 38: ...ientes normas europeas Directiva de Baja Tensi n 2006 95 EC Compatibilidad Electromagn tica 2004 108 EC ROHS Los productos satisfacen los requisitos de la directiva 2011 65 UE establecida por el parla...

Страница 39: ...r de BLOQUEO 6 Indicador de TEMPORIZADOR DE APAGADO Indicador de TEMPORIZADOR DE ENCENDIDO 7 Indicador de TEMPERATURA 8 Indicador de funciones adicionales 9 Bot n TURBO Silencioso 10 Bot n CALOR 11 Bo...

Страница 40: ...TOMATICO del ventilador el aire acondicionado ajusta autom ticamente la velocidad del ventilador de acuerdo con la temperatura de la habitaci n En el modo SOLO VENTILADOR el funcionamiento en modo SUE...

Страница 41: ...la funci n TEMPORIZADOR la funci n de sue o se cancelar la m quina activar el estado de temporizaci n Nota para reanudar despu s de un fallo de alimentaci n Pulse el bot n de sue o diez veces en meno...

Страница 42: ...n modo SALUDABLE El generador de iones con el que est equipado el aparato de aire acondicionado permite generar gran cantidad de iones destinados a equilibrar con eficacia la cantidad y posici n de lo...

Страница 43: ...inen las l mparas fluorescentes en la sala Los modelos adoptan el refrigerante libre de HFC R410A Fuente de alimentaci n Antes de insertar la alimentaci n en toma de corriente mpruebe el voltaje sin f...

Страница 44: ...do que est marcada sobre los materiales de asilamiento t rmico 1 Inserte el manguito de drenaje en la abolladura de los materiales de aislamiento t rmico de la unidad interior 2 Inserte el cable el ct...

Страница 45: ...de ensanchamiento lleve a cabo el ensanchamiento Herramienta para ensanchar para R410A Herramienta para ensanchar convencional Tipo de embrague Tipo de embrague Tipo r gida Tipo de embrague A 0 0 5mm...

Страница 46: ...l mando con un trapo seco sin agua No utilice un limpiador de cristales ni pa o qu mico Reemplazo del Filtro Purificador de Aire NOTA El filtro purificador de aire es pieza opcional 1 Abra la Rejilla...

Страница 47: ...ndere Dinge in den Ein Ausla und schwenken Sie nicht die Klappen Dieses Ger t kann von Personen einschlie lich Kindern mit eingeschr nkten physischen sensoriellen oder mentalen F higkeiten oder mangel...

Страница 48: ...t 46 Schalten Sie beim ungew hnlichen Ph nomen gerade den Druckknopf ab und kommunizieren Sie mit dem Verkaufsladen Verwenden Sie bitte eine teure Stromquelle mit einem Stromunterschater berpr fen Si...

Страница 49: ...eachten die Anforderungen in der Richtlinie 2011 65 EU des Europ ischen Parlaments und des Rates zur Beschr nkung der Verwendung bestimmter gef hrlicher Stoffe in den elektrischen und elektronischen A...

Страница 50: ...e nicht geeignet 6 Zeitmesser OFF Anzeige Zeitmesser ON Anzeige 7 Temperatur Anzeige 8 Zus tzliche Funktionen Anzeige 9 TURBOMOTOR Ruhig Druckknopf 10 Heizungsdruckknopf 11 K hlungsdruckknopf 12 Wiege...

Страница 51: ...betrieb Notfall Betrieb Verwenden Sie diesen Betieb nur wenn die Fernbedienung defekt oder verloren ist Und mit dieser Funktion kann die Klimaanlage automaisch noch f r einige Zeit laufen Wenn der Not...

Страница 52: ...rochen und das Ger t in den Zeitwahlmodus versetzt Hinweis zum Neustart nach einem Stromausfall Dr cken Sie die Taste RUHEMODUS zehn Mal innerhalb von f nf Sekunden und geben Sie die Funktion ein nach...

Страница 53: ...n beseitigt Der Anion Generator in dem Klimager t kann effektiv Anion in gro er Menge erzeugen und die Quantit t der Position und Anion in der Luft balancieren Es kann auch Bakterien t ten und die Sed...

Страница 54: ...l adoptiert HFC freies K hlmittel R410A 52 Stromquelle Bevor Sie den Strom in den Beh lter einf gen berpr fen Sie die Stromspannung Schraubenschl ssel f r all 17mm 22mm 26mm Dr Schneidewerkzeug f r it...

Страница 55: ...rmeisolierstoff markiert ist 1 F gen Sie den Ablassschlauch in der Beule von W rmeisolierstoff des Innenger ts ein 2 F gen Sie das innere au ere elektrische Kabel aus der R ckseite von Innenger t ein...

Страница 56: ...Leitung durchgef hrt und die Grate m ssen beseitigt werden Nach der Einf gung von flackernder Schraubenmutter ist die flackernde Arbeit fertig Flackernde Werkzeug f r R410A Konventionelle flackernde W...

Страница 57: ...n Dann wischen Sie das Reinigunsmittel v llig weg Fernbedienung Putzen Sie bitte die Fernbedienung nicht mit Wasser sondern einem trockenen Tuch Benutzen Sie keinen Reiniger f r Glas oder kein chemisc...

Страница 58: ...osoby w tym dzieci o obni onej sprawno ci fizycznej sensorycznej lub umys owej a tak e osoby bez odpowiedniej wiedzy i do wiadczenia chyba e odbywa si to pod nadzorem lub po uzyskaniu wskaz wek dotycz...

Страница 59: ...ch wazon w ani naczy z wod 57 W sytuacji wyst pienia nieprawid owo ci takich jak wypalona plama nale y natychmiast wy czy urz dzenie i skontaktowa si ze sprzedawc Urz dzenie powinno by zasilane z oddz...

Страница 60: ...godno ci elektromagnetycznej 2004 108 WE ROHS Te produkty spe niaj wymogi dyrektywy Parlamentu Europejskiego i Rady 2011 65 UE w sprawie ograniczenia stosowania niekt rych niebezpiecznych substancji w...

Страница 61: ...K Niekt rych urz dze nie wyposa ono w funkcj zdrowego nawiewu 59 6 Lampka wy czenia zegara TIMER OFF Lampka w czenia zegara TIMER ON 7 Lampka temperatury TEMP 8 Lampka dodatkowych funkcji 9 Przycisk T...

Страница 62: ...w trybie ch odzenia COOL ani ogrzewania HEAT lecz wy cznie w trybie wentylatora FAN W trybie wentylatora FAN tryb AUTO jest niedost pny a ustawianie temperatury wy czone W trybie wentylatora FAN tryb...

Страница 63: ...y si automatycznie wtedy gdy zako czy si czas dzia ania kt rego z nich a w wczas drugi tryb zostanie anulowany Uwaga Podczas pracy w trybie zegara TIMER nie mo na aktywowa funkcji snu SLEEP Z kolei je...

Страница 64: ...atorze mo e wytworzy du o ujemnych jon w skutecznie zr wnowa y ich umiejscowienie w powietrzu zabi bakterie i przyspieszy osadzanie si kurzu w pomieszczeniu a ponadto r wnie oczy ci powietrze w danym...

Страница 65: ...ych modelach stosuje si czynnik ch odniczy R410A niezawieraj cy fluorow glowodoru HFC r d o zasilania z Przed pod czeniem urz dzenia do r d a zasilania nale y sprawdzi napi cie z Napi cie pr du musi o...

Страница 66: ...ronnego co jest zaznaczone na materiale izolacyjnym 1 W odp ywowy umie ci w szczelinie materia u izolacyjnego jednostki wewn trznej 2 Umie ci wewn trzno zewn trzny kabel elektryczny z tylnej strony je...

Страница 67: ...e rur nast puje samoczynnie Narz dzie do rozszerzania rur dla Konwencjonalne narz dzia rozszerzaj ce R410A Typu ciskowego Typu ciskowego sztywne Nakr tki skrzyde kowe imperialne A 0 0 5mm 1 0 1 5mm 1...

Страница 68: ...ki spos b eby napis FRONT by zwr cony w kierunku pomieszczenia Filtr musi by ca kowicie wsuni ty za ogranicznik Niedok adne zamontowanie filtr w z lewej i prawej strony mo e spowodowa uszkodzenia 5 Za...

Страница 69: ......

Страница 70: ......

Страница 71: ......

Страница 72: ......

Страница 73: ...COOL DRY HEAT...

Страница 74: ......

Страница 75: ......

Страница 76: ......

Страница 77: ......

Страница 78: ......

Страница 79: ......

Страница 80: ...m 1 D B W B 32 C 23 C D B W B 21 C 15 C D B W B 43 C 26 C D B 18 C D B 27 C D B 15 C D B W B 24 C 18 C D B W B 7 C 8 C INVERTER D B W B 24 C 18 C D B 15 C 78 2 3 3 15A 250V T 25A 250V 4 5 6 7 8 9 30 1...

Страница 81: ...79 1 2 3...

Страница 82: ...3 3 swishing 2 3 COOL DRY DRY 2 C 15 80 Climate T1 Voltage 230V CE 2006 95 EC 2004 108 EC ROHS 2011 65 RoHS WEEE 2012 19 EU R410A GWP 1975 GWP global warming potential 1 2 1 2 B C D E F...

Страница 83: ...SPEED 5 81 6 TIMER OFF TIMER ON 7 TEMP 8 9 TURBO QUIET 10 HEAT 11 COOL 12 SWING UP DOWN 13 HEALTH 14 TIMER 15 SLEEP 16 LOCK 17 LIGHT LED 18 19 POWER ON OFF 20 DRY 21 TEMP 22 SWING LEFT RIGHT 23 24 EX...

Страница 84: ...TEMP TEMP 1 TEMP 3 L EXTRA FONCTION CONFIRMER ANNULER FAN AUTO COOL DRY DRY 2 C HEAT HEAT FAN FAN AUTO FAN COOL HEAT FAN AUTO FAN 82 Pi temp s ng DRY 16oC 5 Pi Hi 1 2 COOL DRY Timer 23 26 AUTO COOL 23...

Страница 85: ...NE la fonction nocturne sera annul e 1 COOL DRY 1 SLEEP 2 1 2O C 3 1O C 3 2 HEAT 1 SLEEP 2 1 2O C 3 1O C 3 3 AUTO SLEEP 4 FAN SLEEP 5 8 TIMER TIMER TIMER TIMER 3 3 1 2 EXTRA FONCTION CONFIRMER ANNULER...

Страница 86: ...Minuterie Activ e ON 0 5 10 ON 0 5 10 OFF 0 5 10 Minuterie D sactiv e TIMER TIMER ON TIMER OFF ON OFF 3 Minuterie Activ e Minuterie d sactiv e 12 0 5 12 1 4 CONFIRMER ANNULER FF 5 CONFIRMER ANNULER TI...

Страница 87: ...17 19 26 lm HFC R410A R 03 4 04 25 4 1 1 6 35x0 8mm 09K 12K 9 52x0 8mm 6 35x0 8mm 18K 12 7x0 8mm 9 52x0 8mm 24K 15 88x1 0mm 85 17 22 26 2...

Страница 88: ...1 1 2 3 2 70 mm 3 86 1 2 3 4...

Страница 89: ...1 2 Indoor unit To Outdoor unit 4G0 75mm 1 H05RN F H07RN F 2 T 3 15A 250VAC 3 4 5 3mm 5 6 R410A A 0 0 5mm 1 0 1 5mm 0 0 5mm 7 8 E1 E2 PCB E4 EEPROM EEPROM EEPROM PCB E7 E14 PCB 9 87...

Страница 90: ...88 40 C 1 2 3 4 FRONT stopper 5 1 2 3 4 5 6...

Страница 91: ...ju ni kabel o te en mora ga zamijeniti proizvo a ili ovla teni servis ili sli na kvalificirana osoba 3 Ako je osigura unutarnje jedinice neispravan zamijenite ga tipom 3 15A 250V 3 Ako je osigura vanj...

Страница 92: ...em teku ine Ne stavljajte ivotinje ili biljke pred mlaz puhanog zraka Ne stavljajte nikakve predmete i ne penjite se na ure aj Ne stavljajte vaze sa cvije em ili posude s vodom na ure aj 90 Uti nicu n...

Страница 93: ...pomo i ete sprije iti nastanak ne eljenih posljedica za okoli i zdravlje ljudi Molimo vas da se obratite svojem instalateru ili lokalnim vlastima za daljnje informacije Javljaju se neugodni mirisi Kl...

Страница 94: ...zaklju anosti tipki Funkcija HEALTH Zdravlje nije dostupna kod nekih modela 6 Prikaz isklju enosti timera Filter za pro i avanje zraka Prikaz uklju enosti timera 7 Indikator temperature 8 Prikaz doda...

Страница 95: ...vH anH za 2 C urH aj H privUHPHno prijH i na LOW nisku brzinu bH obzira na postavNH brzinH vHQWilatora HEAT U na inu UDGD HEAT grijanjH topli zrak H zapuhati nakon kra Hg vUHPHQa kako bi VH izbjHglo p...

Страница 96: ...tura e biti ni a nego to je pode ena temperatura kako vam ne bi bilo odvi e toplo za spavanje 3 U AUTO na inu rada Ure aj radi u odgovaraju em na inu rada za spavanje prilago enom automatski odabranom...

Страница 97: ...TH zdravi na in rada bit e isklju en Stvaranjem anionskih estica ure aj mo e u inkovito pove ati broj iona i tako pobolj ati omjer pozitivnih i negativnih estica u prostoriji djelovati baktericidno a...

Страница 98: ...usisu i ispuhu Mjesto koje je lako za odvod teku ine i na kojem je mogu e spojiti cijevi s vanjskom jedinicom Mjesto s kojega se hladni zrak mo e to bolje rasporediti Mjesto koje je u blizini uti nice...

Страница 99: ...tvora kroz zid i zatvaranje rozetom Napravite rupu od 70 mm u promjeru koja se blago spu ta prema vanjskom zidu Postavite rozetu za zatvaranje otvora i zabrtvite je nekim prikladnim sredstvom 3 Monta...

Страница 100: ...i razmak izme u kontakata ne bi smio biti manji od 3 mm 5 Postavljanje izvora elektri ne energije Izvor napajanja mora biti isklju ivo namijenjen klima ure aju U slu aju ugradnje klima ure aja u vla n...

Страница 101: ...da je filter u potpunosti iza jezi ca Ako lijevi i desni filter nisu pravilno postavljeni mo e do i do o te enja 5 Zatvorite usisnu masku Zamjena filtera za pro i avanje zraka Opaska Filter za pro i a...

Страница 102: ...jado para usar pelas pessoas incluindo crian as com as capacidades fisicais reduzidas sensorias ou mentais ou falta de experi ncia e conhecimento mesmo que eles sejam dados supervis o ou instru o resp...

Страница 103: ...de unidade 101 Quando anormalidade tal como queimado cheiro procurado pare imediatamente a tecla de opera o e contacte com a loja de vendas Use um recurso de pot ncia exclusivo com um quebrador de ci...

Страница 104: ...inte Directiva de Voltagem Baixa 2006 95 EC Compatibilidade Electromagn tica 2004 108 EC ROHS Os produtos s o cumpridos com as necessidades na directiva 2011 65 EU de Parlamento Europeu e de conselho...

Страница 105: ...PORIZADOR DESLIGAR display TEMPORIZADOR LIGAR display 7 TEMPERATURA display 8 Fun es adicionais display 9 TURBO Sil ncio tecla 10 AQUECIMENTO tecla 11 FRESCO tecla 12 BALAN AR CIMA BAIXO tecla 13 VELO...

Страница 106: ...e quarto No modo de VENTILADOR a opera o de DORMIR n o dispon vel 104 Opera o de emerg ncia e opera o de teste Opera o de Emerg ncia Use esta opera o apenas quando o controlador remoto defectivo ou pe...

Страница 107: ...o outro modo ser cancelado NOTA Quando a fun o de TEMPORIZADOR ajustada a fun o de dormir n o pode ser ajustada Depois de fun o de dormir ser ajustada se o usu rio reajusta a fun o de TEMPORIZADOR a f...

Страница 108: ...r condicionado pode gerar uma quantidade de nion efectivamente balan a a quantidade de posi o e nion no ar e tamb m para matar as bact rias e acelera o sedimento de sujo no quarto e limpar finalmente...

Страница 109: ...uarto s o iluminadas Os modelos adoptam ao HFC refrigerante livre R410A Recurso de Pot ncia Antes de inserir a pot ncia no recept culo verifique a voltagem sem falha O fornecimento de pot ncia mesmo c...

Страница 110: ...nto 1 Insera a mangueira de drenagem no dente de materiais de insula o de aquecimento de unidade interior 2 Insera o cabo el ctrico interior exterior de lado traseiro de unidade interior e puxe o no l...

Страница 111: ...ois de inserir a porca de alargamento o trabalho de alargamento realizado Ferramenta de alargamento para R410A Ferramenta de alargamento convencional Embreagem tipo Embreagem tipo r gido tipo Embreage...

Страница 112: ...um tecido seco N o use limpador de v dro nem tecido qu mico Substitui o de Filtrode Purifica o do Ar NOTA O filtro de purifica o do ar parte opcional 1 Abra a Grelha de Entrada Escore a grelha de entr...

Страница 113: ...F 3 1 1 D B W B 32 C 23 C D B W B 21 C 15 C D B W B 43 C 26 C D B 18 C D B 27 C D B 15 C D B W B 24 C 18 C D B W B 7 C 8 C D B W B 24 C 18 C D B 15 C 2 3 T 3 15A 250V T 25A 250V 4 5 6 7 8 9 30 10 WiFi...

Страница 114: ...112 1 2 3...

Страница 115: ...3 3 2 3 2 15 1 230 V CE 2006 95 2004 108 2011 65 RoHS 2012 19 R410A GWP 1975 GWP 1 2 1 2 B C D E F 113...

Страница 116: ...CK 6 TIMER OFF TIMER ON 7 TEMP 8 9 TURBO Quiet 10 HEAT 11 COOL 12 SWING UP DOWN 13 FAN SPEED 14 HEALTH 15 SLEEP 16 LOCK 17 LIGHT 18 Auto 19 POWER ON OFF 20 DRY 21 TEMP 22 SWING LEFT RIGHT 23 TIMER OFF...

Страница 117: ...1 ON OFF 2 TEMP TEMP TEMP 1 TEMP 1 3 FAN FAN AUTO AUTO COOL DRY 2 HEAT FAN 16 5 Hi 1 2 115 23 26 AUTO COOL COOL DRY HEAT...

Страница 118: ...SLEEP 1 COOL DRY 1 SLEEP 1 1 1 6 2 HEAT 1 SLEEP 2 1 2 3 1 3 3 AUTO 4 FAN SLEEP 116 5 8 TIMER TIMER TIMER TIMER 3 3 1 2 3 1 2 3...

Страница 119: ...1 2 TIMER ON 0 5 10 OFF 0 5 10 TIMER TIMER ON TIMER OFF ON OFF 3 12 0 5 12 1 4 ON OFF 5 TIMER ON TIMER OFF HEALTH HEALTH HEALTH TURBO Turbo Quiet Turbo Quiet Turbo Quiet 1 2 2 R 03 3 4 x 7 x x 117...

Страница 120: ...17 19 26 x x x x x x 1 x R410A HFC 118 x x x 17 22 26 x 1 1 R 03 2 4 4 25 4 1 1 6 35 0 8 09 12 9 52 0 8 6 35 0 8 18 12 7 0 8 9 52 0 8 24 15 88 1 2...

Страница 121: ...1 1 2 3 x x 2 x 70 x 3 x x 1 2 3 x x x x 4 119...

Страница 122: ...1 2 x x 4G0 75mm 1 H05RN H07RN F 2 T 3 15A 250VAC 3 4 5 3 5 x x 6 x R410A A 0 0 5 1 0 1 5 0 0 5 120 7 x x 8 E1 E2 PCB E4 EEPROM EEPROM EEPROM PCB E7 PCB E14 PCB 9 9...

Страница 123: ...121 1 2 3 4 FRONT 5 40 C 104 F 1 2 3 4 5 x 6 x...

Отзывы: