background image

11

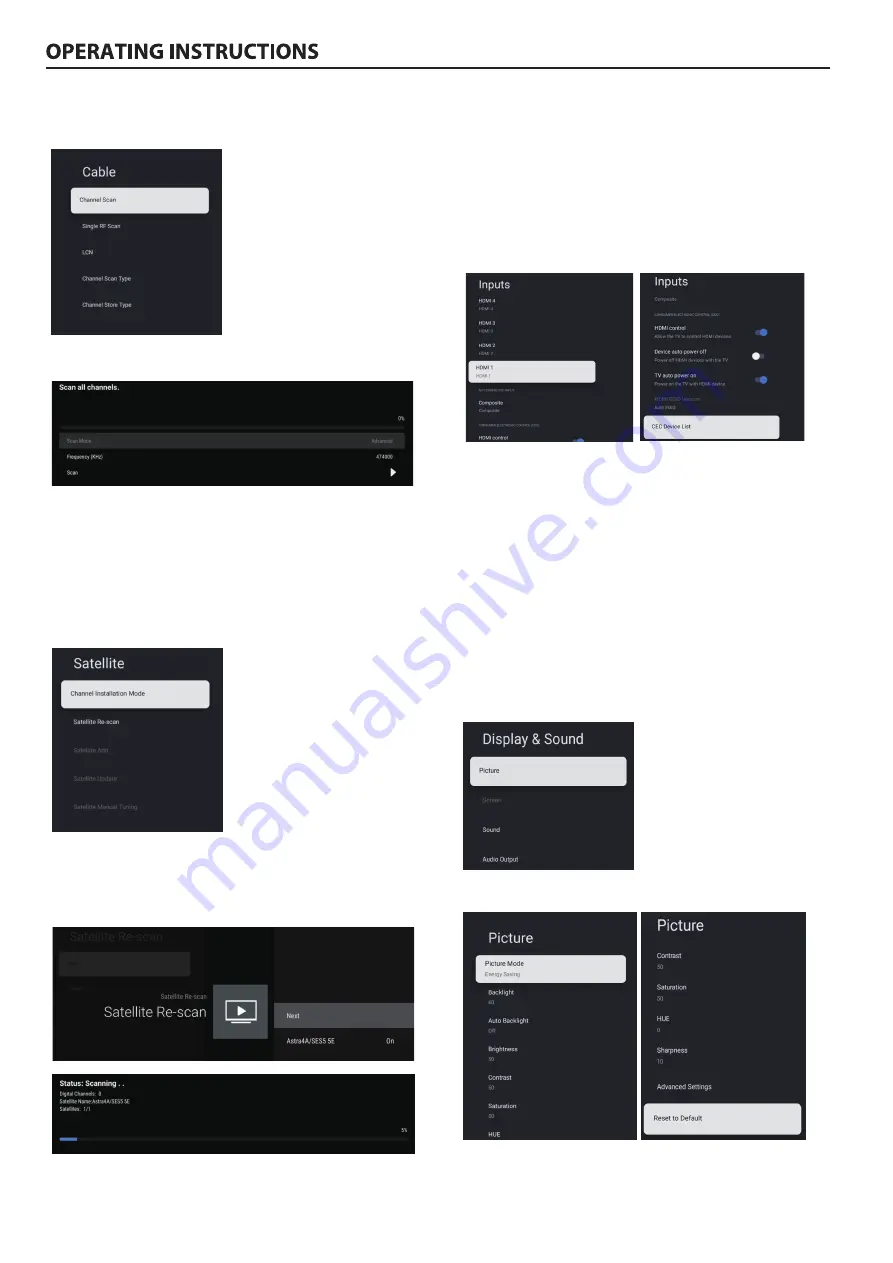
2. Enter Menu->Se�ngs->Channel->Channels->

Channel Scacn.

2. Enter Menu->Se�ngs->Channel->Channels->

Satellite Re-scan.

3. Press OK to enter Satellite parameter Se�ngs, which 

include LNB POWER,LNB Frequency, DiSEqC Set, 22K 

and other parameters. Then return to Satellite re-scan 

and right click to enter the search menu.Then return to 

Satellite re-scan and right click to enter the search menu.

Satellite Add: 

Add a star broadcast signal.

Satellite Manual Tuning: 

manually search for a certain 

TP which can be added by Satellite Add if needed.

Inputs - 

Press

/

bu�on to select the op�on then 

press OK bu�on to enter the sub-menu.

HDMI control - 

Press

/

bu�on to select the op�on 

then press OK bu�on to choose ON/OFF.

Device auto power off -

 Press

/

bu�on to select the 

op�on then press OK bu�on to choose ON/OFF.

TV auto power on - 

Press

/

bu�on to select the op�on 

then press OK bu�on to choose ON/OFF.

HDMI EDID Version -

 show EDID version.

CEC Device List -

 Press

/

bu�on to select the op�on 

then press OK bu�on to enter the sub-menu.

3. Enter Channel Scan, where Akado, Divan TV, Online 

and Rostelecom (SPB)are the local operators, and the 

default Scan Mode is Advance; Others have Advance, 

Quick and Full Scan modes.

Single RF Scan:

 manual search sta�on.

1. Menu->Se�ngs->Channel->Channels.

Channel Installa�on Mode:

 Press 

/

▼ 

bu�on to select 

Preferred Satellite/General Satellite

.

1. Menu->Se�ngs->Channel & Inputs->Antenna->

Channels.

Antenna(Cable)

Inputs

Antenna(Satellite)

Display & Sound

Press 

/

▼ 

bu�on to select “Display & Sound” set.

Picture

Содержание 55 Smart TV S7

Страница 1: ...55 Smart TV S7 65 Smart TV S7 ...

Страница 2: ...Illustration in this guide are provided for reference only and may differ from actual product appearance Product design and specification may be changed without notice 17 18 ...

Страница 3: ......

Страница 4: ......

Страница 5: ...12 ...

Страница 6: ...RJ45 OPTICAL HDMI4 HDMI3 eARC ARC VIDEO L R HDMI2 USB1 EARPHONE USB2 COMMON INTERFACE CI ANT IN ANTENNA CABLE LNB IN SATELLITE 19V 500mA Max HDMI1 4K 60Hz L I N R VIDEO RJ45 ...

Страница 7: ...USB1 USB2 ANT IN ANTENNA CABLE LNB IN SATELLITE 19V 500mA Max HDMI1 4K 60Hz L I N R VIDEO RJ45 ...

Страница 8: ...ing the MEDIA or to pause playing Press to open the кинопоиск Press this button to mute or restore sound Press this button adjust the volume Press to open the EVO Switch Google accounts in Google TV mode Press to enter start a voice search Press to open the Media Center ...

Страница 9: ...rms of Service to improve the product experience select Accept to accept this condi on Used to set your device s password to ensure security and privacy Press OK to pop up the so keyboard and use the remote control to enter the 4 digit password auto ma cally jump to the next interface Confirm the password again and keep it consistent Use the remote control to enter the password and complete the pas...

Страница 10: ... Google Account Sign in Once in the user interface you can switch from basic TV to Google TV se ngs For selec ng the mode press key to select Home mode and press Yes For selec ng the mode press key to Kaliningrad me mode and press Yes Select On to respond to cast commands select Off to exit To select the Tuner mode for searching press to select and press OK to confirm Press to select and press OK to...

Страница 11: ...atch TV and go to the home screen NAVIGATING THE ON SCREEN MENU There are two ways to enter First in live TV press the menu bu on to display TV op ons press to select the se ngs menu and press oK to confirm Second in the HOME interface press the key to select the icon of the circular se ngs menu press OK to confirm Press bu on to select what you want set Press OK to enter se ng Press BACK to return ...

Страница 12: ...ate channels a er 5 minutes of standby Channel Update Message Press OK bu on to choose ON OFF When selec ng ON the system will show you the update message 3 Channel Scan directly enters the automa c search pla orm interface Update Scan Re automa cally search for frequency points outside the sta on Analog Manual Scan Manual ATV search sta on A er input the frequency point you can select up or down ...

Страница 13: ...o select the op on then press OK bu on to choose ON OFF Device auto power off Press bu on to select the op on then press OK bu on to choose ON OFF TV auto power on Press bu on to select the op on then press OK bu on to choose ON OFF HDMI EDID Version show EDID version CEC Device List Press bu on to select the op on then press OK bu on to enter the sub menu 3 Enter Channel Scan where Akado Divan TV ...

Страница 14: ... on to choose Auto OFF Speaker Delay Press bu on to select the op on Press to decrease the parameter Press to increase the parameter eARC Press bu on to select the op on then press OK bu on to choose Auto OFF Auto Volume Control Press bu on to select the op on then press OK bu on to choose ON OFF Downmix Mode Press bu on to select the op on then press oK bu on to enter the sub menu Op onal Stereo ...

Страница 15: ...o select the op on then press OK bu on to enter the sub menu Set me zone Press bu on to select the op on then press OK bu on to enter the sub menu Use 24 hour format Press bu on to select the op on then press OK bu on to choose ON OFF Language Press bu on to select the op on then press OK bu on to enter the select language 13 Apps About Date Time Language System Accessibility Cap ons Press bu on t...

Страница 16: ... 2 Press OK bu on to adjust 3 A er finishing your adjustment Press BACK bu on return to the previous menu In this menu you can set Power on behavior Energy saver Power Timer 1 Press bu on to select what you want set 2 Press OK bu on to adjust 3 A er finishing your adjustment Press BACK bu on return to the previous menu Press bu on to select the op on then press OK bu on to choose Always While cas ng...

Страница 17: ...s at the bo om of the remote control for 5 seconds to repeat the previous steps 5 Press bu on return to the previous menu 1 In the HOME interface select the icon in the APP column to add the applica on and click OK Press up and down to select the Mul MediaPlayer applica on and click OK to add it to the HOME interface 2 Select OK key to enter Mul Media Player and display Video Photo Audio A er inse...

Страница 18: ...16 ...

Страница 19: ...17 ...

Страница 20: ...2x13 5 dbx tv 18 17 4 ...

Страница 21: ...19 2x13 5 dbx tv ...

Страница 22: ......

Страница 23: ...55 65VX PRO 280201033110 Ru Thomas Chang 18 DEC 2022 55 65 Smart TV S7 英 ...

Отзывы: