background image

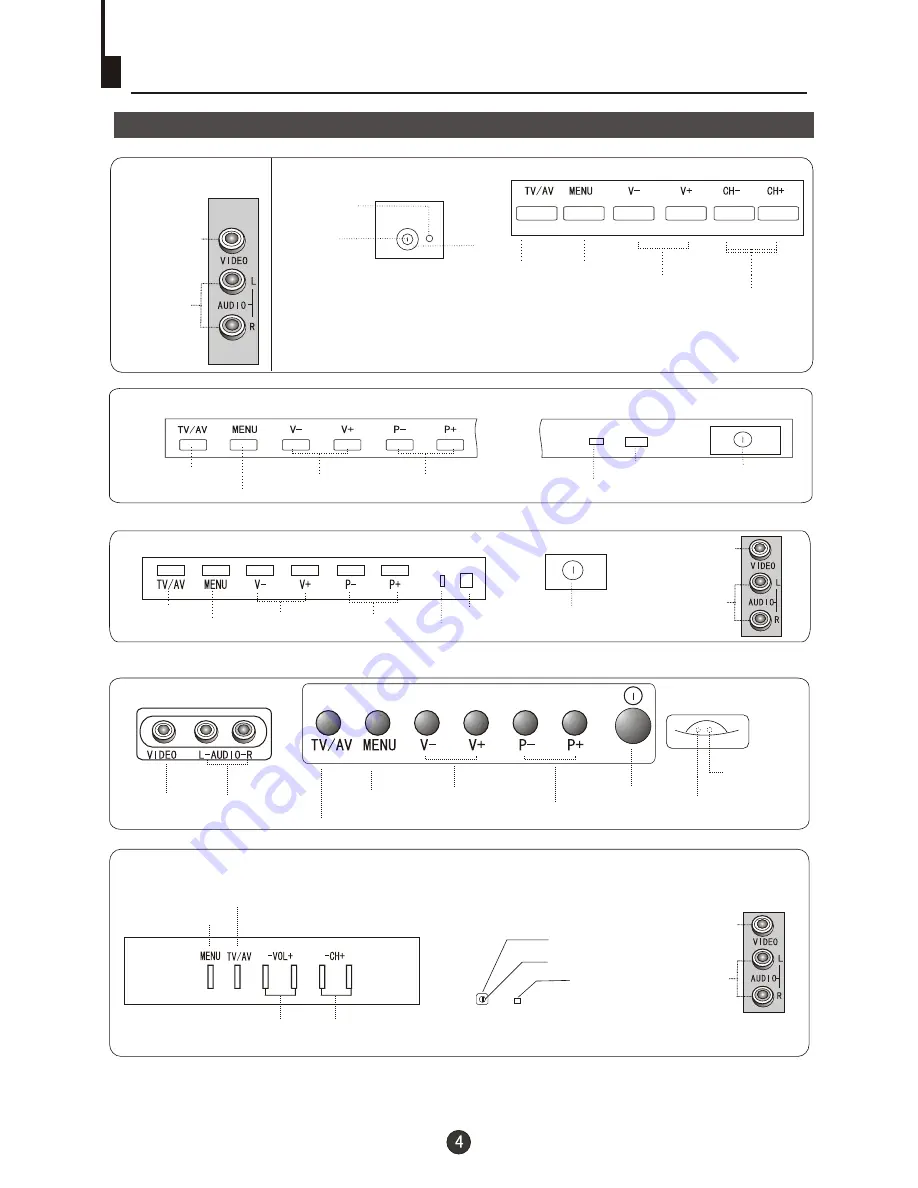
Position of Keys and Plug-ins

Front  and side panel 

Signal receiver

Power switch

Power 
indicator

VIDEO

L/R audio

Menu

Volume down/up

Channel down/up

TV/AV switch

21FA1/21TA1

21F9D/21T9D/21T9D(D)/21T9D(S)/21T9D(B)

21FA1/21TA1

TV/AV switch

Menu

Volume down/up Channel down/up

Power 
indicator

Signal receiver

Power switch

HT-3728

Signal receiver

Power 
indicator

Power switch

VIDEO

L/R audio

TV/AV switch

Menu

Volume down/up

Channel down/up

VIDEO

L/R audio

21FA11/21FA11-AM

Channel down/up

Power indicator

Signal receiver

Power switch

Volume down/up

Menu

TV/AV switch

Menu

Channel down/up

TV/AV switch

Volume down/up

Power indicator

Power switch

Signal receiver

21FV6H

VIDEO

L/R audio

Содержание 21FV6H

Страница 1: ...al carefully before operating the unit and keep it for future reference The Owner s Manual for the Follow Models 21F9D 21T9D 21FA1 21TA1 21T9D D 21T9D S 21T9D B 21FA11 21FA11 AM 15F6B HT 3768 HT 3728...

Страница 2: ...h 11 Man ual s ear ch 12 MFT 13 Ski p 14 Adj ust ing t he pi ctu re an d the s oun d 15 Mul tip le pi ctu re mo des 15 Mul tip le so und m ode s and s ett ing t he so und 16 S C C aut o off and mu te...

Страница 3: ...cover otherwise it is possible to damage the components in the TV set and harm you 3 Don t place the TV set in the sunshine or near heat source 6 When the TV set isn t going to be used for long time o...

Страница 4: ...and electric wire together coaxial cable to remove the disturbance caused by airwave Preparation for the remote control Battery installation Tips for remote operation Remove the batteries cover The ba...

Страница 5: ...Volume down up Channel down up Power indicator Signal receiver Power switch HT 3728 Signal receiver Power indicator Power switch VIDEO L R audio TV AV switch Menu Volume down up Channel down up VIDEO...

Страница 6: ...Position of Keys and Plug ins...

Страница 7: ...Using the Remote Control...

Страница 8: ...letely turn off the TV NOTE 1 You can also press the 0 9 button to call off the standby status instead of pressing the DC Standby button Press the digit button of the preset channel limited to one dig...

Страница 9: ...iewed channel 1 2 3 4 5 6 after the TV is powered on and the channel you are watching now is number 7 then press PRE button you can view channel 6 5 4 3 and you may press the Back button to return to...

Страница 10: ...n then the television will start scanning from the present channel with a rate of two seconds per cha nnel and until all the preconcerted programs have been displayed once the TV set will return to th...

Страница 11: ...u have set Press the QSET button to switch the saving mo de on off And the screen will displ ay on off at the same time Press the QSET button more than 3 secon ds to call the ENERGY SAVE menu ENERGY S...

Страница 12: ...ms will be stored in turn and the TV set will return to the first channel If you want to stop the search just press VOL button The order of the automatic search is due to the frequency of the program...

Страница 13: ...d move the indicator to SEARCH 4 Press VOL button to start searching VOL button is used to search the lower frquency channel VOL button is used to search the higher frequency channel Repeat the steps...

Страница 14: ...e and the sound become satisfactory VOL button is used to search the lower frquency channel VOL button is used to search the higher frequency channel Direct digit Choosing Button 2 Press CH button to...

Страница 15: ...o use the Direct digit Choosing button and Digit Select button on the remote control to select this channel directly If you want to recover the skipped channel 1 Use Direct digit Choosing button to se...

Страница 16: ...ET BY YOURSELF NO PICTURES BLACK AND WHITE PICTURE If the picture mode is set to PICTURE MUTE or COLOR MUTE it will autorenew to MEMORY mode when you restart your TV set with remote control Set the pa...

Страница 17: ...the volume to the preconcerted parameter quickly such as the LOW VOL NORMAL VOL HIGH VOL 2 Press CH button move the indicator to the HIGH VOL then press VOL button to adjust the parameter you expect W...

Страница 18: ...e indicator to the S C C then press VOL button to set it ON or OFF To prevent from forgetting turning off the TV this TV could turn off automatically That is if the off timer is set on and after two h...

Страница 19: ...to OFF TIMER then press VOL button to set the time 3 Press CH button move the indicator to CLOCK press VOL button and you can set the time It will be the standard of the clock of timer on off 1 Press...

Страница 20: ...turn the power on at the preset time in the standby status and display the preset program 2 Press CH button move the indicator to ON TIMER Then press VOL button to set the time 3 Press CH button move...

Страница 21: ...Press CH button move the indicator to APP POS 4 Press VOL button to set the channel number you want e g 100 5 Press CH button to enter the APP TIME item Press VOL button to set the time 6 Press DISP...

Страница 22: ...B B ON How to activate the function of screen protection If no signal has been received by the TV set when the B B function is set ON the screen will change into the form on the right shows if the scr...

Страница 23: ...the CALENDAR button again to conceal the display 2 Press CH button to adjust the YEAR press VOL button to adjust the MONTH Setting the other Function continued How to use the Curtain function 2 Press...

Страница 24: ...ve the indicator to POS EX Then press VOL button to enter the sub menu The number shown in EX POS1 and EX POS2 is the number of the present channel 3 Press CH button move the indicator to EX POS2 then...

Страница 25: ...PRESET PROG OFF AV LOCK OFF CHILD LOCK OFF MAX VOLUME OFF UNLOCK LOCK LOCK SET UP PASSWORD Direct digit Choosing Button This TV set provides you with the LOCK function you can choose it due to your ne...

Страница 26: ...menu you will have to type the password 2 The PRESETPROG allows you to turn on the TV always with one channel 3 When AV LOCK is set ON AV cannot be used hence the screen will change into black and in...

Страница 27: ...selection REACH will display on the screen if 2 is also selected and WIN will display on the screen if 2 is selected on the third position and the score will also display on the screen 3 You can press...

Страница 28: ...dio leftchannel Red Cr and audio rightchannel Blue Cb Green Y Yellow Video To S VIDEO input Laser DVD with output terminal To audio output To DVD output To audio input To video input DVD VCD or otheru...

Страница 29: ...ttempt to remove the back cover as the TV set has dangerous voltages in side that may cause a fatality or fire 3 The cabinet may produce the occasional snapping sound This is normal and caused by the...

Страница 30: ...Specifications 584 W x 477 D x 459 H mm 21FV6H...

Страница 31: ......

Страница 32: ...01 0090506298K...

Отзывы: