Hagen FLUVAL G 3 Скачать руководство пользователя страница 23

H Y D R O   T E C H   P E R F O R M A N C E   M O N I T O R 

A D VA N C E D   F I LT R AT I O N   S Y S T E M

w w w. f l u v a l - g . c o m

EN.

23

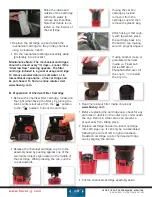
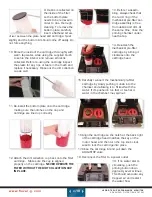
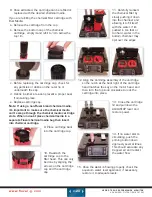
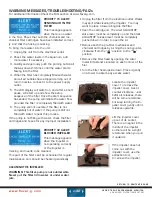
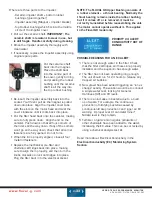
2. Locate the impeller 
cover. To remove the 
impeller cover, twist it 
counter-clockwise with 
the thumb and index fin-
ger pressed up against 
the tabs. Just before it 
releases, there will be 
some resistance, but 
keep turning the impel-
ler cover gently until it 
releases upwards. 

WARNING: This filter-pump is not submersible. 
Never put the filter head in water or under  
water jets.

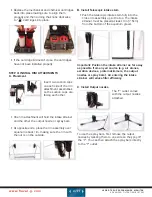
3. Pull the impeller cover 
up and out of its socket. 
The impeller may or may 
not come out with the 
impeller cover. 

Note: The impeller is 
magnetized so there 
will be a slight resis-
tance when you pull it 
upwards. 


If the impeller does not come out with the impeller 
cover, use the metal impeller hook to remove the 
impeller. 

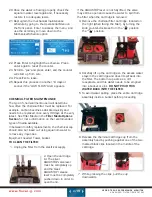
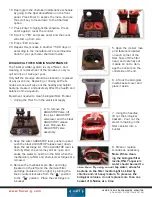
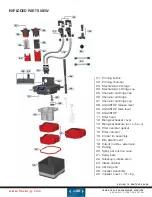
 4. There are three parts to the impeller:

Ê UÊ ÊiÀ>“ˆVʈ“«iiÀÊÅ>vÌʳÊÓÊÀÕLLiÀÊLÕň˜}Ã

Ê Uʠʓ«iiÀÊ>ÃÃi“LÞÊ­>}˜iÌʳʈ“«iiÀÊL>`iî

Ê UÊ Ê/œ«ÊÀÕLLiÀÊLÕň˜}ÊÈÌÃʈ˜Ê̅iÊVi˜ÌiÀʜvÊ̅iÊ


   impeller cover 

 5. If necessary remove the top bushing from the  
 

 impeller shaft and place it back into the center of  


 the impeller cover so it’s not lost. 

IMPORTANT NOTE: The Fluval G6 top rubber bush-
ing consists of the rubber bushing and a thrust 
bearing. Normally the thrust bearing remains 
inside the rubber mount, but if it comes off or is 
removed, it must be correctly re-installed before 
reassembling the impeller assembly. The motor 
WILL NOT operate without it. This applies to the 
Fluval G6 model only.

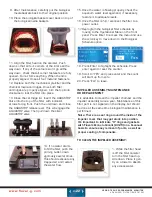
 6. Rinse the impeller assembly thoroughly with  
  

clean 

water.

 7. If necessary, replace the impeller assembly using  
 

 original Fluval G spare parts.


 (Unnecessary motor vibration would be an  


 indication of a worn impeller and warrant a  


replacement)

 8. Put the ceramic shaft back into the magnet.  
 

 Place the shaft back into the centre part of the  


 cover, gently turning and pressing the rubber  


 bushing until the ceramic shaft is all the way into  


 the top rubber bushing.

 9. Re-insert the impeller assembly back into the  
 

 impeller well. You’ll feel it pull as the magnet is  


 drawn down into place. Put the impeller cover  


 into position by turning the cover clockwise until  


 it clicks back into place.

10. Re-assemble the filter as outlined in the  
 

 Biological Filter Media Maintenance section. 
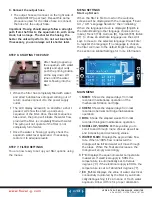
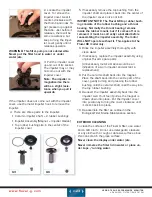
EXTERIOR CLEANING

To clean the surface of the Fluval G filter, use water 

and a soft cloth.  Do not use detergents, cleaners 
or any cloth with a rough or abrasive surface since 
this can scratch the gloss surface. 

Never clean the display under water jets. 

Never immerse the filter lid in water or place un-
der taps / running water.  

G3

G6

Содержание FLUVAL G 3

Страница 1: ...USER GUIDE ENTER...

Страница 2: ...nd coming in contact with the receptacle If the plug or receptacle does get wet DON T unplug the cord Disconnect the fuse or circuit breaker that supplies power to the appliance Then unplug and examin...

Страница 3: ...ations LCD Screen Flow Map Warranty Registration CONTENTS Click on an image to link to section TWO YEAR WARRANTY Electrical Conductivity Filter Media Options Warning Message Exploded Parts View Monito...

Страница 4: ...of use features include an ef cient primer AQUASTOP valves that enable you to handle routine maintenance without breaking the system s vacuum and disassembling the hoses user friendly rim connectors a...

Страница 5: ...cleaning The pre lter cartridge is available in two formats standard weave and 75 m for marine aquariums or water polishing in freshwater tanks The effective ness of the Fluval G s pre ltration proce...

Страница 6: ...ntake go along behind plants or rocks Each strainer snaps together at the ball joints so that you can turn them to the desired angle as you wish The end of the intake has been capped for nearly an inc...

Страница 7: ...ater con ductivity through the use of two titanium probes that instantly recognizes if the aquarium contains fresh water or salt water and automatically displays the temperature corrected values in th...

Страница 8: ...ong Do not use longer and or different type hosing as the priming ef ciency and i y i V Li i i w i may not operate correctly U NEVER INSTALL THE FILTER ABOVE THE WATER LEVEL The aquarium water level s...

Страница 9: ...er clockwise from the position to the position Pull out the cartridge U i i i i V i V V i V v i assembly head by pushing against one of the two marked black clips located in the middle of the cartridg...

Страница 10: ...ical baskets U i i L i L V i Remove G nodes from the plastic bags mixing the small and large G nodes evenly into each basket Leave enough space at the top no nodes should be protruding from the upper...

Страница 11: ...ium s back rim making sure the rim with the nut is on the outside B Install Telescopic intake stem U i i i V V i i v i cross rim assembly up to the top The intake strainer must be placed at least 3 in...

Страница 12: ...e the AQUASTOP release lever This engages the AQUASTOP valve Then pull the aquastop valve lever down Note Don t force the silver valve lever or re lease lever If it doesn t close easily then you need...

Страница 13: ...e displayed with the messages Fluval G3 G6 Language Selection then initializing When the language screen is displayed English is the default setting other language choices can be made French FR German...

Страница 14: ...i i selection U i i i i i L V ii U 9 i i i activate the scroll keys The value option will start y U 1 i i V i V i i U i i i i i i iV U v L i i i V ii i i previous settings after 3 minutes U i v i i L...

Страница 15: ...N or OFF Days to alert Use the scroll keys to choose the days between the previous and next maintenance The highest number available is 99 CHEMICAL SCHEDULE The following options are available Elapsed...

Страница 16: ...in Screen If there is more than one warning message to display the system will display one message in order of priority 1 PRIORITY Sensing air in lter This message appears when there is not enough wat...

Страница 17: ...ill from the lter when the mechanical cartridge is removed 3 Remove the mechani cal pre lter cartridge located on the left when facing the lter by turn ing the knob counter clockwise from the position...

Страница 18: ...idge Make sure the cup is aligned properly on the cartridge NEVER OPERATE THE FILTER WITHOUT THE DIRT COLLECTION CUP IN PLACE 13 Before re assem bling always check that the red O ring of the mechanica...

Страница 19: ...ts the chemical cup should also be rinsed out using aquarium water to remove any impurities Equipment needed Towel bucket TO CLEAN THE FILTER 1 Unplug the lter from the electrical supply 2 Open the ca...

Страница 20: ...emical media bag then insert into chemical cartridge 9 Place cartridge back into the cartridge cup 10 Re attach the cartridge cup to the lter head This can only be done by aligning the arrows on the c...

Страница 21: ...AQUASTOP valve lever and the black AQUASTOP release lever Remove the AQUASTOP valve assembly 3 Keep the silver AQUASTOP lever pushed up and push the black AQUASTOP release lever down Open the cartrid...

Страница 22: ...d evacuate any trapped air and restart i i y 15 Vi i i y i V iV i aquarium water level again and if necessary restore it to adequate levels 16 Once the lter is full reconnect the lter to a power outle...

Страница 23: ...e thrust bearing remains inside the rubber mount but if it comes off or is removed it must be correctly re installed before reassembling the impeller assembly The motor WILL NOT operate without it Thi...

Страница 24: ...e reduced It s important to note that conductivity is a gross measurement only and cannot speci cally indicate the concentration or presence of any one speci c component The EC Monitoring system is al...

Страница 25: ...which needs interpretation by performing further investigations With some experience dealing with this parameter and knowing your aquarium it will become easier to know what changing conditions the E...

Страница 26: ...the EC value generally by increasing it In fact every chemical additive piece of food medication or conditioner you put into your tank affects the conductivity in your aquarium and the above mentioned...

Страница 27: ...underside of the lter lid by rinsing with a soft jet of water To obtain the correct salinity level for your aquarium simply ll the tank with de ionized osmotic water Turn on the heater and wait until...

Страница 28: ...into soluble wastes and regular cartridge rinsing is recommended Chemical Cartridges Fluval G3 G6 Phosphate Cartridges The Fluval G3 G6 Phosphate cartridges are for use with the Fluval G3 G6 Advanced...

Страница 29: ...s is an effective solution against nitrate accumulation If used as a quick solution to reduce elevated nitrate concentrations the cartridge can be removed once levels have normalized and then stored u...

Страница 30: ...e reef aquariums or freshwater environments PHOSPHATE REMOVER Fluval Lab Series Phosphate Remover rapidly adsorbs large quantities of Phosphate silicate and dissolved organics with out leaching Mainta...

Страница 31: ...odors and discoloration while at the same time removes toxic ammonia for a clean healthy aquarium Combining two products into one gives you more space in your lter system for other types of media Repl...

Страница 32: ...message appears when the impeller is not operating correctly or the impeller is missing and needs to be cleaned This part of the lter can t be scheduled for regular maintenance so it should be checke...

Страница 33: ...urn the knobs clockwise to lock cartridges into place Plug the lter back into the electrical socket NOTE The FLUVAL G6 Upper Bushing consists of a rubber element a thrust bearing Normally the thrust b...

Страница 34: ...ocked by debris or foreign objects a Remove the mechanical pre lter cartridge b Remove the chemical cartridge c Pushing the priming button repeatedly check i i y i i chamber move freely If this is not...

Страница 35: ...ion on the cartridge Make sure to remove the power before performing any maintenance procedures Q I m not able to close the mechanical pre lter and chemical cartridges A 1 The cartridges bayonets have...

Страница 36: ...blem In this case clean the mechanical pre lter cartridge Q After having switched off the unit and cleaned the mechanical pre lter the lter is On but ow rate is zero or insuf cient A An air bubble cou...

Страница 37: ...moving one of the cartridges and opening the AQUASTOP valve lever Q There is water under lter canister feet A 1 During lter cartridge maintenance water has seeped into the gap between the motor base a...

Страница 38: ...cap 06 Chemical cartridge 07 Chemical cartridge cup 08 AQUASTOP release lever 09 AQUASTOP valve lever 10 AQUASTOP 11 Filter head 12 Biological basket cover 13 Biological baskets G3 x 2 G6 x 3 14 Filte...

Страница 39: ...0255 Fluval G3 G6 Gasket Kit A20251 Fluval G3 G6 Rim Connector Assembly with Suction Cups A20260 Fluval G3 Magnetic Impeller Assembly with Impeller Cover A20252 Fluval G3 G6 Water Return Kit A20262 Fl...

Страница 40: ...al Filter Circulation 700 l h 185 g h Head Height 50Hz 180 cm 5 10 ft 60Hz 190 cm 6 2 ft Wattages 120V 60Hz 18W 230 240V 50Hz 17W FLUVAL G6 Filter Dimensions L x W x H 249x249x326mm Aquarium Capacity...

Страница 41: ...EN 41 LCD SCREEN FLOW MAP HYDRO TECH PERFORMANCE MONITOR ADVANCED FILTRATION SYSTEM www fluval g com RETURN TO CONTENTS PAGE...

Страница 42: ...to help you before you return the product to your dealer Most problems can be handled promptly with a phone call Or if you prefer you can contact us on our web site at www hagen com Or visit www uval...

Отзывы: