English
!
The appliance must be installed by a qualified person in compliance
with the instructions provided.
!
Wear gloves when carrying out installation and maintenance
operations.
If the supply cord is damaged, it must be replaced by the manufacturer,
its service agent or similarly qualified persons in order to avoid a
hazard.
Warning: Failure to install the screws or fixing device in accordance with
these instructions may result in electrical hazards.
IMPORTANT: So as not to damage your product, during installation use
only the screws provided. Make sure these are used as shown in the
following instructions.
Prepare the power supply (see “Warning” sheet).
For the ducting version and version with an external motor, prepare the pipe
for air evacuation (see “Warnings” sheet).
FILTERING OR DUCTING VERSION ?
The hood may be in filtering version, in ducting version or in version with an
external motor. Decide from the outset which type is to be installed.
For better efficiency, we recommend installing the hood in the ducting
version or in version with an external motor (if possible).
Ducting version
The hood purifies the air and evacuates it to the outside through an exhaust
duct.
Version with external motor
The hood purifies the air and evacuates it to the outside through an exhaust
duct. The appliance must be connected to an ducting apparatus/motor which
works on its own using the appliance as a union for the air to be scavenged
Filtering version
The hood purifies the air and recycles the clean air back into the room.
CONTROLS
Only for hoods equipped with electronic control:
The 4th speed (intensive) is automatically lowered to 3rd speed after 5
minutes of operation to optimise energy consumption.
- If the hood is left on (lights and/or motor), after 10 hours in the absence
of commands from the user, it will automatically switch to OFF condition
with all services switched off.
- The Buzzer emits a “beep” each time that a command is set from the
keyboard or remote control (optional).
- In the event of interruption of power during the hood, if you restore the
hood in the OFF state, then the engine must be reactivate manually.
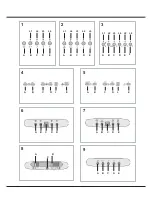
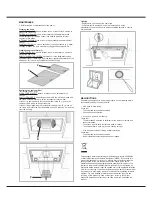
Controls of Fig. 1:
A) ON/OFF - lamps. This button is also used for the alarm function of the anti-
grease and charcoal filters.
Filter alarm: After 30h of motor operation, the L1 RED LED comes ON and
remains ON for 30" (the grease filters have to be cleaned). After 120h of motor
operation, the L1 RED LED comes ON and flashes for 30" (the charcoal filters
have to be changed if the hood is so equipped). The Filter Alarm is ONLY given
with the motor is OFF. The Filter Alarm is cancelled (HOUR meter reset) by
holding down button A for 2".
B) Press button B to start the motor at Speed 1. The speed is shown by the
L1 GREEN LED coming ON. When held down for 2", the motor switches off.
A single pressure on the button when the LED is ON activates the timer function
(motor ON for 5'), shown by the flashing LED. To cancel the timer function,
press the button again ONCE.
C) Press button C to start the motor at Speed 2. The speed is shown by the
L2 GREEN LED coming ON.
A single pressure on the button when the led is on activates the timer function
(motor on for 5'), shown by the flashing led. To cancel the timer function, press
the button again ONCE.
D) Press button D to start the motor at Speed 3. The speed is shown by the
L3 GREEN LED coming ON. A single pressure on the button when the led is
on activates the timer function (motor on for 5'), shown by the flashing led.
To cancel the timer function, press the button again ONCE.
E) Press button E to start the il motor at Speed 4. The speed is shown by the
L4 GREEN LED coming ON. A single pressure on the button when the led is
on activates the timer function (motor on for 5'), shown by the flashing led.
To cancel the timer function, press the button again ONCE.
Controls of Fig. 2:
A) ON/OFF - lamps. This button is also used for the alarm function of
the grease and charcoal filters.
Filter alarm: After 30h of motor operation, the L1 LED comes ON and
remains ON (the grease filters have to be cleaned). After 120h of motor
operation, the L1 LED comes ON and flashes (the charcoal filter have
to be changed if the hood is so equipped). The Filter Alarm is ONLY
given with the motor is OFF. The Filter Alarm is cancelled (HOUR meter
reset) by holding down button A for 2".
B) Press button B to start the motor at Speed 1. The speed is shown
by the L2 LED coming ON. When held down for 2", the motor switches
off. A single pressure on the button when the LED is ON activates the
timer function (motor ON for 5'), shown by the flashing LED. To cancel
the timer function, press the button again ONCE.
C) Press button C to start the motor at Speed 2. The speed is shown
by the L3 LED coming ON. A single pressure on the button when the
led is on activates the timer function (motor on for 5'), shown by the
flashing led. To cancel the timer function, press the button again ONCE.
D) Press button D to start the motor at Speed 3. The speed is shown
by the L4 LED coming ON. A single pressure on the button when the
led is on activates the timer function (motor on for 5'), shown by the
flashing led. To cancel the timer function, press the button again ONCE.
E) Press button E to start the il motor at Speed 4. The speed is shown
by the L5 LED coming ON. A single pressure on the button when the
led is on activates the timer function (motor on for 5'), shown by the
flashing led. To cancel the timer function, press the button again ONCE.
Controls of Fig. 3:
A) ON/OFF - lamps. This button is also used for the alarm function of
the grease and charcoal filters.
Filter alarm: After 30h of motor operation, the L1 LED comes ON and
remains ON for 30" (the grease filters have to be cleaned). After 120h
of motor operation, the L1 LED comes ON and flashes for 30" (the
charcoal filter have to be changed if the hood is so equipped). The Filter
Alarm is ONLY given with the motor is OFF. The Filter Alarm is cancelled
(HOUR meter reset) by holding down button A for 2".
B) The button B activates/deactivate sensor function (when activated the
sensor is lit by the LED L2).
C) Press button C to start the motor at Speed 1. The speed is shown
by the L3 LED coming ON. When held down for 2", the motor switches
o f f .
D) Press button D to start the motor at Speed 2. The speed is shown
by the L4 LED coming ON.
E) Press button E to start the motor at Speed 3. The speed is shown
by the L5 LED coming ON.
F) Press button F to start the il motor at Speed 4. The speed is shown
by the L6 LED coming ON.
SENSOR SENSITIVITY: sensitivity of the sensor may be modified in
accordance with individual requirements. Modify the sensitivity by pressing
simultaneously on the A and B buttons. The set sensitivity level will be
displayed via the 4 flashing Leds - L3, L4, L5, and L6. The desired
sensitivity is set via the C, D, E, and F buttons (C being minimum, F
being maximum). Set the sensitivity level to minimum for gas cook tops,
medium for glass-ceramic cook tops and maximum for induction cook
tops.
WARNING: when led L1lights up, this indicates that the grease or charcoal
filters require cleaning.
FILTER SENSOR (activated via the B button): this device is equipped
with a completely automatic system (Advanced Sensor Control) for
management of all hood functions. Thanks to the Advanced sensor
Control (ASC), air circulating in the kitchen is maintained clean and odour-
free without requiring any user intervention. The sophisticated sensors are
able to capture any type of odour, vapour, smoke or heat caused by
cooking. The ASC also captures any possible irregular gases present in
the environment.
When the sensor function is activated, the C, D, E and F buttons activate
the speed temporarily, to then be overridden by the automatic speed
setting.
Warning: in order to avoid damaging the sensor, never use silicone products
near the hood!
Controls of Fig. 4:
A) Turns the lights off.
B) Turns the lights on.
C) Reduces the motor speed until reaching zero. If pressed for 2" when the
Filter Alarm is active, the HOUR counter is reset.
D) Drives the motor (calling the last speed used) and increases the speed until
reaching maximum.
E) Activates/deactivates the sensor (AUTOMATIC or MANUAL mode). In


