background image

CLEANING AND MAINTENANCE

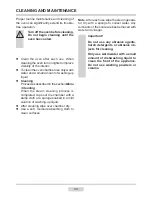
Door removal

In order to obtain easier access to the oven 

chamber for cleaning, it is possible to remove 

the door. To do this, tilt the safety catch part 

of the hinge upwards (fig. A). Close the door 

lightly, lift and pull it out towards you. In order 

to fit the door back on to the cooker, do the 

inverse. When fitting, ensure that the notch of 

the hinge is correctly placed on the protrusion 

of the hinge holder. After the door is fitted to 

the oven, the safety catch should be carefully 

lowered down again. If the safety catch is not 

set it may cause damage to the hinge when 

closing the door.

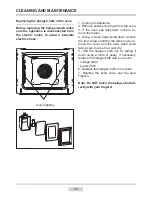
Removing the inner panel

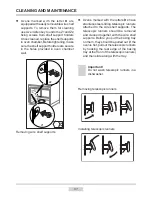
1.  Using a flat screwdriver unhook the up

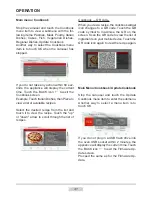
-

per door slat, prying it gently on the sides 

(fig. B).

2.  Pull the upper door slat loose. (fig. B, C)

Tilting the hinge safety catches

A

B

C

     53

Содержание EB SERIES

Страница 1: ...IO CBI 0161 8064847 01 2016 v1 EB 1020 Tip EN INSTRUCTION MANUAL ...

Страница 2: ... following these instructions carefully you will be able to avoid any problems in using the appliance It is important to keep the instruction manual and store it in a safe place so that it can be consulted at any time It is necessary to follow the instructions in the manual carefully in order to avoid possible accidents Caution Do not use the oven until you have read this instruction manual The ov...

Страница 3: ... TABLE OF CONTENTS Safety instructions 4 Description of the appliance 8 Installation 10 Operation 13 Baking in the oven practical hints 48 Cleaning and maintenance 50 Troubleshooting 55 Technical data 56 ...

Страница 4: ...volved Children shall not play with the appliance Cleaning and user maintenance shall not be made by chil dren without supervision During use the appliance becomes hot Care should be taken to avoid touching heating elements inside the oven Accessible parts may become hot during use Young children should be kept away Warning Do not use harsh abrasive cleaners or sharp metal scrapers to clean the ov...

Страница 5: ...faults must be fixed by an appropriately qualified and authorised person In the event of any incident caused by a technical fault disconnect the power and report the fault to the service centre to be repaired The rules and provisions contained in this instruction manual should be strictly observed Do not allow anybody who is not familiar with the contents of this instruc tion manual to operate the...

Страница 6: ...n a pan on the cooker hob Make use of residual heat from the oven If the cooking time is greater than 40 minutes switch off the oven 10 minutes before the end time Important When using the timer set appropriately shorter cooking times according to the dish being prepared Make sure the oven door is properly closed Heat can leak through spillages on the door seals Clean up any spillages immediately ...

Страница 7: ...t contribution to the protection of our environment Information on appropriate disposal centres for used devices can be provided by your local authority During transportation protec tive packaging was used to protect the appliance against any damage After unpack ing please dispose of all elements of packaging in a way that will not cause dam age to the environment All materials used for packaging ...

Страница 8: ...8 DESCRIPTION OF THE APPLIANCE Oven door handle Touch screen con trol panel On Off switch Built in USB con nector Child Lock Water container drawer Built in LAN port ...

Страница 9: ...9 SPECIFICATIONS OF THE APPLIANCE Cooker fittings optional Baking tray Grill grate drying rack Roasting tray Meat probe Perforated bowl Solid bowl Wire shelf supports Steam generator ...

Страница 10: ...ing or veneer used on fitted furniture must be applied with a heat resistant adhesive 100 C This prevents surface deforma tion or detachment of the coating Hoods should be installed according to the manufacturer s instructions Make an opening with the dimensions given in the diagram for the oven to be fitted Make sure the mains plug is disconnected and then connect the oven to the mains supply Ins...

Страница 11: ...alternating current 230V 1N 50 Hz and is equipped with a 3 x 1 5 mm2 connection lead of 1 5 mm length with a plug including a protection contact A connection socket for electricity supply should be equipped with a protection pin and may not be located above the cooker After the cooker is positioned it is necessary to make the connection socket accessible to the user Before connecting the oven to t...

Страница 12: ...nternet access is available use the supplied wireless router You need to first connect the router to your PC and connect it to an available wireless network you will need the name of the local wireless network its security mode and password For guidance use Chapter 5 Client Mode in the router s operating instructions After initial setup of your wireless router you can connect it to the LAN port at...

Страница 13: ...crosoft com pl pl download details aspx id 8483 The installation must be performed with administrator rights default for home users The app will be available for Android iOS and OSX Important The oven is equipped with a touch screen display control panel The con trol panel includes two touch sensors On off sensor Child Lock To activate each touch sensor touch the glass above the sensor indicated b...

Страница 14: ...vious page menu or up one level 2 COOKBOOK touch to open the cook book 3 TIMER touch to set the timer 4 SHORTCUTS touch to display the default and user programmable shortcuts as shown below 5 INFORMATION touch to display appli ance specs and information 6 FREEZE touch to freeze the touch screen display if you want to wipe it clean during the appliance operation 7 OK START touch to start stop a fun...

Страница 15: ...w user defined shortcuts such as sub menu pre set or user programme shortcuts To edit touch and hold an empty placeholder 3 seconds Touch the icon to open the corresponding menu You can choose one of the three sub menus Heating Functions Pre set programmes User Programmes When you select the Poultry Pre Set pro gramme for a shortcut touch the symbol to save it When you select the Grill Heating Fun...

Страница 16: ...such as a hob cooker hood or remotely controlled socket In order to connect the oven to another home appliance you must first select connecting mode in the appliance and then touch the search widget pictogram The pictogram flashes when searching and turns green when a new appliance is found and connected or red the search fails Important add appliance one by one The List of Appliances widget Touch...

Страница 17: ...ing Set current time Once your preferred language is set you now need to confirm the current time by touching OK or set the time using the slider or the soft keys Touch OK to confirm the current time Time can be set in the range from 0 00 to 23 59 for 24 hour clock system or from 0 00 to 12 00 for the 12 hour clock system When current time is set the appliance dis plays the current time Touch in s...

Страница 18: ...the current date When the date is set the appli ance displays current time Main Menu Touch in standby to display current time Touch the screen anywhere to activate the appliance and display the main menu Select the desired main menu item from the rotating carousel display by swiping your finger left or right across the screen Stop the carousel and touch the chosen menu item to enter the submenu An...

Страница 19: ...the current time Main Menu Settings Language Stop the carousel and touch the Language menu item to enter the submenu Another way to select the Settings menu item is to touch OK when the carousel has stopped The following language menu items are available Deutsch English Polski Пo pyccки Česky Srpski Lietuviškai Eesti Latviski Français Español Türkçe Svenska Norsk Suomi Dansk Italiano Nederlands Fo...

Страница 20: ...etting screen at any time Touch soft keys or use the slider bar to set the required Duration Touch OK to confirm the Duration setting The Duration setting screen will close The icon will be shown in the upper corner on the notification clock type time format Swipe your finger across the screen to rotate the menu items Stop the carousel and touch the chosen menu item to enter the submenu Another wa...

Страница 21: ...ymbol will flash If the user takes no action within 10 seconds the selected heating function screen will be displayed with the previously set Duration Touch again while is still flashing You will now be able to set End Time The symbol stops flashing and the symbol starts to flash If the user takes no action within 10 seconds the selected heating function screen will be displayed with the previousl...

Страница 22: ...m to enter the submenu Another way to select the Timer menu item is to touch OK when the carousel has stopped This will bring up the Duration screen as shown below If you do not set or accept Duration within 10 seconds the Timer screen will be displayed Touch the BACK icon to exit the Timer menu Touch soft keys or use the slider bar to set the required Duration Touch OK to confirm the Duration set...

Страница 23: ...ted clock will now appear in the upper right corner of the display and when current time is displayed If you do not take any action within 60 sec onds the appliance will display the current time Touch the BACK icon to exit from the Clock Type menu to the Settings menu the Main Menu and then display the current time Touch OK to acknowledge and mute the acoustic signal Afterwards the appliance will ...

Страница 24: ...n lighting handle backlight Touch the chosen lighting to select it The selected lighting is highlighted in red Touch OK to confirm your selection If you do not take any action within 60 sec onds the appliance will display the current time Touch the BACK icon to exit from the Lighting menu to the Settings menu the Main Menu and then display the current time Access the oven lighting menu to select c...

Страница 25: ...our selection If you do not take any action within 60 sec onds the appliance will display the current time Touch the BACK icon to exit from the Sounds menu to the Settings menu the Main Menu and then display the current time Access handle backlight menu to select re sidual heat mode or decorative mode Decorative mode Activate the decorative mode to use the back lit oven door handle as a decorative...

Страница 26: ...e Settings menu the Main Menu and then display the current time Main Menu Settings Sounds End Sound Select the sound in the same way as de scribed in the previous section Main Menu Settings Sound Volume Stop the carousel and touch the Volume menu item to enter the Volume setting screen Another way to select a menu item is to touch OK when the carousel has stopped This will bring up the Volume scre...

Страница 27: ...play the current time Touch the BACK icon to exit from the Themes menu to the Settings menu the Main Menu and then display the current time Main Menu Settings Brightness Main Menu Settings Brightness Stop the carousel and touch the Brightness menu item to enter the submenu Another way to select a menu item is to touch OK when the carousel has stopped There are two items in the Brightness menu Disp...

Страница 28: ...to exit from the Weather menu to the Settings menu the Main Menu and then display the current time Main Menu Settings Firmware update Stop the carousel and touch the Firmware update menu item to enter the submenu Another way to select the Firmware update menu item is to touch OK when the carousel has stopped You can perform Firmware update using USB stick In order to update firmware fol low the in...

Страница 29: ...current time Any other use such as navigating the menus or selecting any options or settings is not possible The Service Message screen is always displayed Normal operation of the appliance will be restored once the fault is repaired If the E1 error is detected by the appliance meat probe can t be used in any programme If an attempt is made to select a programme where the meat probe is used the ap...

Страница 30: ...y the appli ance turns off OPERATION Touch the Remote Control menu item to en able or disable remote control The selected symbol is highlighted in red Touch OK to confirm your selection When remote control is disabled the oven will not communicate with the PC application over the internet When remote control is enabled the symbol is displayed in clock and cooking mode You are able to control the o...

Страница 31: ...220 2 browning 180 roasting 200 defrosting 3 Main Menu Heating Functions Stop the carousel and touch the Heating Functions menu item to enter the submenu Another way to select a menu item is to touch OK when the carousel has stopped The following heating functions menu items are available Overview of heating functions possible tem perature and default settings ECO Fan Heater is an optimised heatin...

Страница 32: ...onds of starting a programme the temperature and time indications are swapped and temperature is displayed in the middle of the screen Appliance display will show the following information During a programme the fan heater operates periodically thermostat thus ensuring stabil ity of the oven chamber temperature Touch STOP to end programme The STOP soft key will be replaced with the START soft key ...

Страница 33: ...chamber and core temperature Touch STOP to end programme The STOP soft key will be replaced with the START soft key If you do not resume the programme within 60 seconds the appliance will display the current time Touch at any time to end programme and exit to an upper menu level showing the avail able heating functions Once the core temperature reaches the set temperature an acoustic signal is sou...

Страница 34: ...base 220 2 thick base 200 2 frozen 200 3 frozen products fish 220 2 Lasagne 200 2 chips 200 3 Main Menu Preset Programmes Stop the carousel and touch the Preset Pro grammes menu item to enter the submenu Another way to select a menu item is to touch OK when the carousel has stopped The following Preset Programmes are avail able meat poultry pizza frozen products pastry steam cooking low temperatur...

Страница 35: ...bles Function 2 95 2 broccoli cauliflower Function 3 90 2 Asparagus Function 4 95 2 jacket potatoes Function 4 95 2 Vegetable casserole Function 5 160 2 Fish Function 6 95 2 Sea food Function 7 95 2 meat Function 8 180 2 Rice couscous Function 9 95 2 Stewed apples Function 10 95 2 Stewed pears Function 10 95 2 Crème brûlée Function 11 80 2 bread Function 12 180 2 buns Function 13 180 2 reheating F...

Страница 36: ...re fillet of beef 75 2 beef roulade 80 2 pork neck 90 2 roast pork 90 2 roast beef 80 2 rare roast beef 70 2 turkey breast 90 2 pork loin 80 2 veal 80 2 additional pro grammes dough proving 30 2 drying 50 2 3 4 keep food warm 60 1 heating plates 200 2 pasteurization 130 1 ...

Страница 37: ...urrent time Touch the BACK icon to exit from the Chicken menu to the Poultry menu the Main Menu and then display the current time Touch START to start the programme Cool ing fan light and fan grill and spit motor will be on Instead of weight the remaining time to bake the chicken and an animated progress bar are shown on the screen You can modify temperature settings for chamber oven or end time a...

Страница 38: ... display will show a message add water 0 5 l After adding the water touch OK Countdown will stop automatically pro gramme will be resumed after a few sec onds when added water in the generator is detected Note Start steam cooking in a preheated oven To start steam cooking in the preheated oven which has already been used to pre pare another dish first allow the tempera ture to drop to no more than...

Страница 39: ...rogramme the START icon is replaced with the STOP icon Touch START to start the programme Cool ing fan light and top and bottom heating elements will be on In the duration box of the preset programme DURATION changes to END TIME and consequently Duration of 0 30 is replaced with End Time and the remaining time is shown on the progress bar Once the Duration has elapsed an acoustic signal is sounded...

Страница 40: ...ouch to exit the name editing screen at any time Edit mode screen is shown once the new name is entered and confirmed Temperature box is highlighted Touch the temperature box to view the temperature setting screen Set the desired temperature and touch OK to confirm Duration box is highlighted Touch Duration box to view the Duration setting screen Set the desired Duration and touch OK to confirm Th...

Страница 41: ...nd touch it to view the recipe Touch the up or down arrow to scroll through the list of recipes OPERATION Cookbook QR code When you view a recipe the cookbook widget icon changes to a QR code Touch the QR code symbol to maximise the QR on the screen Scan the QR code to view the list of ingredients on your mobile device Touch the QR code icon again to view the recipe again Main Menu Cookbook Update...

Страница 42: ...splay the current time Touch the BACK icon to exit the current screen Pour about 500 ml of water onto the bottom of the oven chamber close the door and touch START to start the programme When you start the programme the START icon is replaced with the STOP icon Once the Duration has elapsed an acoustic signal is sounded The acoustic signal is repeated for about 5 minutes The display shows the set ...

Страница 43: ...o exit the Slide Show screen Main Menu Slideshow Select Photo Album Stop the carousel and touch the Select Photo Album menu item to view a submenu with the following items Album 1 Album 5 Touch one of the photo albums and the selected photo album thumbnails will be shown Swipe your finger across the screen to scroll through each page 1 17 of thumbnails Touch on hold a thumbnail for 1 second to vie...

Страница 44: ...ideshow Slideshow speed Stop the carousel and touch the Slideshow speed menu item to view the slideshow speed submenu Another way to select the Slideshow speed menu item is to touch OK when the carousel has stopped This will bring up the setting screen as shown below If you do not set or accept the Slideshow speed within 60 seconds the upper level Slideshow menu screen will be displayed Touch the ...

Страница 45: ...nu the Main Menu and then display the current time OPERATION Main menu Slideshow Update Photos Stop the carousel and touch the Update Pho tos menu item to enter the submenu Another way to select the Update Photos menu item is to touch OK when the carousel has stopped If you do not plug in a USB flash drive into the oven USB socket within 2 minutes and touch OK the appliance will display the cur re...

Страница 46: ...tup Lighting light illuminates con tinuously for 10 minutes when oven chamber door is opened and turns off when the door is closed Opening the door during a programme dis connects the heating elements and convec tion fan motor if used Normal operation is resumed after that door is closed OPERATION ECO feature Eco function allows the use of residual heat in the oven chamber to heat food Eco functio...

Страница 47: ... time Special functions Child Lock How to activate Touch and hold for 3 seconds to activate the Child Lock Activation of Child Lock is indicated on the display by symbol and a short beep When the Child Lock is enabled it is not pos sible to make any changes to the cooking programmes Only the Child Lock and On Off touch sensors are active When Child Lock is active use touch sensor to termi nate a p...

Страница 48: ...ke after switching off the oven it is advisable to leave the cake inside for about 5 min temperatures for baking with the ultra fan function are usually around 20 30 degrees lower than in normal baking using top and bottom heaters the baking parameters given in Table are approximate and can be corrected based on your own experience and cooking preferences if information given in recipe books is si...

Страница 49: ...0 220 2 90 160 180 200 2 80 100 ECO Fan Heater l ECO Fan Heater is an optimised heating function designed to save energy when preparing food l You cannot reduce the cooking time by setting a higher temperature preheating the oven is not recommended l Do not change the temperature setting and do not open the oven door during cooking Recommended setting for ECO Fan Heater ...

Страница 50: ...d in the section Menu Cleaning When the steam cleaning process is completed wipe out the chamber with a damp cloth or a sponge soaked in a mild solution of washing up liquid l After cleaning wipe over chamber dry l Use a soft moisture absorbing cloth to clean surfaces Important Do not use any abrasive agents harsh detergents or abrasive ob jects for cleaning Only use warm water with a small amount...

Страница 51: ...ray at the front of the telescopic runners and then slide along with the tray Important Do not wash telescopic runners in a dishwasher Removing telescopic runners Installing telescopic runners l Ovens marked with the letter D are equipped with easily removable wire shelf supports To remove them for cleaning use size 3Allen key to undo the Z1 and Z2 fixing screws from shelf support holders Once cle...

Страница 52: ...c runners re move them also 4 Using a cross head screwdriver remove the four screws holding the lamp cover re move the cover and the seal wash clean taking care to wipe the cover dry 5 Pull the halogen bulb out by sliding it down using a cloth or paper If necessary replace the halogen bulb with a new one voltage 230V power 25W 6 Replace the halogen bulb in its socket 7 Replace the lamp cover and t...

Страница 53: ...oker do the inverse When fitting ensure that the notch of the hinge is correctly placed on the protrusion of the hinge holder After the door is fitted to the oven the safety catch should be carefully lowered down again If the safety catch is not set it may cause damage to the hinge when closing the door Removing the inner panel 1 Using a flat screwdriver unhook the up per door slat prying it gentl...

Страница 54: ...or by an appropriately authorised fitter CLEANING AND MAINTENANCE 3 Pull the inner glass panel from its seat in the lower section of the door Re move the inner panel fig D 4 Clean the panel with warm water with some cleaning agent added Carry out the same in reverse order to reassemble the inner glass panel Its smooth surface shall be pointed up wards Important Do not force the upper strip in on b...

Страница 55: ...not work loose or damaged bulb Replace the blown bulb see Cleaning and Maintenance section 3 E0 error message on the screen Temperature sensor failure See the Operating Instruc tions chapter Main Menu Settings Service 4 E1 error message on the screen meat probe failure See the Operating Instruc tions chapter Main Menu Settings Service 5 E2 error message on the screen Steam generator sensor failure...

Страница 56: ...declares that this product complies with the general requirements pursuant to the following European Directives l The Low Voltage Directive 2006 95 EC l Electromagnetic Compatibility Directive 2004 108 EC ErP Directive 2009 125 EC and therefore the product has been marked with the symbol and the Declaration of Conformity has been issued to the manufacturer and is available to the competent authori...

Страница 57: ...57 ...

Страница 58: ...58 ...

Страница 59: ...59 ...

Страница 60: ......

Отзывы: