10
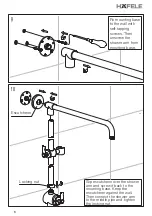
Rain shower
Connect rain shower
to the shower arm.
(Note to tighten it up
properly to avoid
falling due to high
water pressure.)
Attention to the relevant position of slot
and stop collar.
Slot
Stop
collar
Thermostatic
cartridge
Safety
button
Thermostatic
handle
Safety
button
Cap
Thermostatic
handle
Locking
screw
Cover
plate
Install the thermostatic handle to the
mixer body by a locking screw, and
plug the cap. Pay attention to
keeping the four parts on one line:
the slot on the thermostatic cartridge,
stop collar, the 38
°
C mark on the
cover plate and the safety button on
the thermostatic handle.
9
Содержание 589.35.005
Страница 2: ......
Страница 4: ...3 III Installation Diagram 2 ...
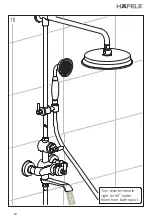
Страница 14: ...13 Turn diverter handle right for 90 water flows from bath spout 12 ...
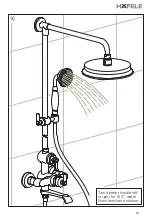
Страница 15: ...14 Turn diverter handle left or right for 180 water flows from hand shower 13 ...
Страница 17: ...16 Wrench Aerator 15 ...
Страница 21: ...20 III Sơ đồ lắp đặt 19 ...
Страница 31: ...30 Quay tay cầm lõi chuyển hướng sang phải 90o Cº nước chảy từ vòi tắm 29 ...
Страница 32: ...31 Quay tay cầm lõi chuyển hướng sang trái hoặc phải 180ºo nước chảy từ tay sen 30 ...
Страница 34: ...33 Đầu tạo bọt Chìa vặn 32 ...


