Table of contents
on page 3
on page 17
on page 18
on page 6
on page 18
Specifications
Specifications are subject to change without notice.
Specification
Details
Dimensions (L x W X D)
247 x 300 x 130 mm (9.71 x 11.82 x 5.12 in.)
Enclosure
IP66, NEMA 4X
Weight
2.5 kg (5.5 lb)
Pollution degree/installation
category
2, II
Protection class
II
Operating temperature
–40 to 50 °C (–40 to 122 °F)
Storage temperature
–40 to 80 °C (–40 to 176 °F)
Storage/operating humidity
100% non-condensing
Cable
Auxiliary cable, 2.74 m (9 ft)
Cable strain reliefs
Eight
Power requirements
12 to 15 VDC, 1 A supplied by AS950 controller
Analog outputs
IO9001: None; IO9004: Three
0/4–20 mA current loop; external loop power (18 VDC maximum) or internal loop
power (14 VDC minimum, 18 VDC maximum); loop burden—3.6 V maximum at
25 mA
Wire size: 24 to 16 AWG solid or stranded copper. The analog outputs are
individually galvanically isolated
1
.
Analog inputs
IO9001: None; IO9004: Two
Current input mode: 0/4–20 mA; 18 VDC maximum; 108 Ω and 0.4 V maximum
loop burden
Voltage pulse input mode: Input resistance—11 kΩ typical; pulse high level—4 V
minimum to 15 V maximum; pulse low level—0 V minimum to 2 V maximum;
hysteresis—0.5 V typical; pulse width (high or low state)—50 ms minimum
Wire size: 24 to 16 AWG solid or stranded copper. The analog inputs are
individually galvanically isolated
1
.
Digital outputs
IO9001: None; IO9004: Four
Low-voltage (±30 VDC or 20 VAC-rms at 0.15 A maximum) contact closure
relays; optional pull-up to externally-supplied logic level (0 to 30 VDC)
Wire size: 24 to 16 AWG solid or stranded copper. The digital outputs are
galvanically isolated as a group. If a switch is not referenced to the COM pin, the
switch is individually galvanically isolated
1
.
1
Galvanic isolation is used to decrease the effects of ground loop interference. Galvanic isolation
does not supply safety isolation.
English
3
Содержание IO9000
Страница 2: ...English 3 Français 19 Español 37 Português 54 中文 72 日本語 88 2 ...
Страница 7: ...Figure 2 Wall mounting English 7 ...
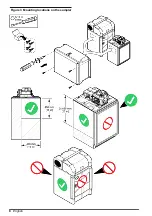
Страница 8: ...Figure 3 Mounting locations on the sampler 8 English ...
Страница 24: ...Figure 2 Montage sur un mur 24 Français ...
Страница 25: ...Figure 3 Emplacements de montage sur l échantillonneur Français 25 ...
Страница 42: ...Figura 3 Ubicaciones de montaje en el tomamuestras 42 Español ...
Страница 59: ...Figura 2 Montagem na parede Português 59 ...
Страница 60: ...Figura 3 Locais de montagem no amostrador 60 Português ...
Страница 76: ...图 2 墙面安装 76 中文 ...
Страница 77: ...图 3 采样仪上的安装位置 中文 77 ...
Страница 79: ...拆下护盖 按照如下图示步骤拆下护盖 布线概述 图 4 显示了布线连接以及保险丝位置 请参阅 图 5 准备和安装电线 中文 79 ...
Страница 93: ...図 3 サンプラーの取り付け場所 日本語 93 ...
Страница 95: ...カバーの取り外し 次の図の手順に示されているように カバーを取り外します 配線の概要 図 4 は ワイヤの接続部とヒューズの場所を示しています 配線を用意して取り付けるには 図 5 を 参照してください 日本語 95 ...
Страница 105: ......


