background image


44 

The following are the required terminal settings: 


Baud rate

—9600. 


Data bits

—8. 


Stop bits

—1. 


Parity

—none. 


Flow control

—none. 

Installing a power module 


IMPORTANT: 

  The MSR 36-40/36-60 router supports AC power modules, DC power modules, and PoE power 

modules. 

  The MSR3610-G/3620-G/3600-51/3620-DP router supports AC and DC power modules. 

  You cannot install AC and DC power modules on the same router. 

  The MSR 3600 routers support hot swapping of power modules. 


Installing an AC/DC power module 

1. 

Face the front of the router and locate the slot to be used. 

2. 

Loosen the captive screws with a Phillips screwdriver to remove the filler panel from the slot. 

Keep the removed filler panel for future use. 

Skip this step if the router is shipped with this slot empty. 

3. 

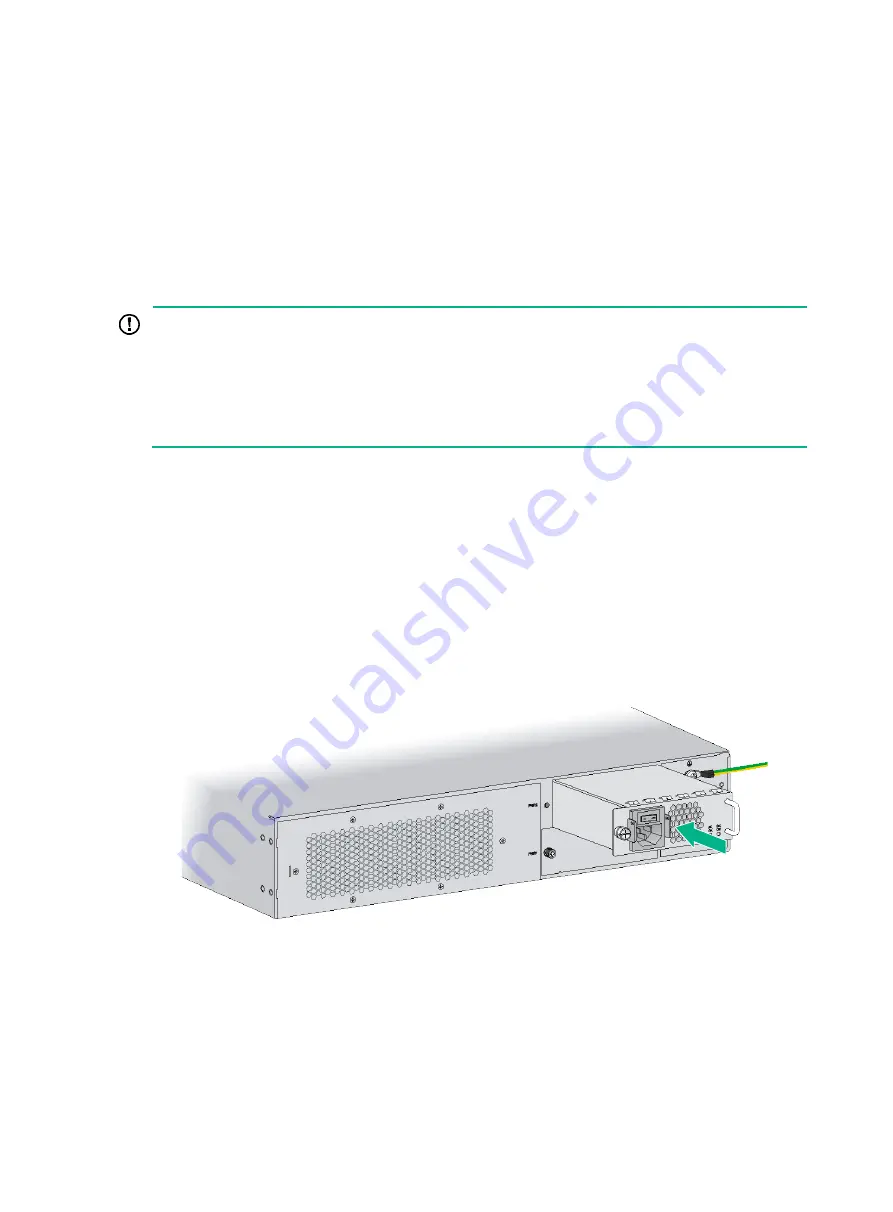
Holding the handle of the power module with one hand and supporting the bottom of the power 
module with the other hand, insert the power module slowly along the slide rails until it makes 
close contact with the backplane. 

4. 

Use a Phillips screwdriver to fasten the captive screws on the two sides of the power module. 

Figure 55 Installing an AC power module (MSR 36-40/36-60) 


Содержание MSR3600-28

Страница 1: ...nstalling an interface module 30 Installing a SIC 30 Installing a DSIC 31 Installing an HMIM 33 Installing a MIM 34 Connecting the router to the network 35 Connecting an Ethernet cable 35 Connecting a...

Страница 2: ...seal on a mounting screw on the chassis cover intact and if you want to open the chassis contact H3C for permission Otherwise H3C shall not be liable for any consequence Installation prerequisites You...

Страница 3: ...ords Verify the installation Power on the router Troubleshoot the router Power off the router Operating correctly End Install the air filter Install the Micro SD card Install the power modules Install...

Страница 4: ...the chassis Fasten the fastening screws on the guide rails with a Phillips screwdriver See Figure 2 Figure 2 Installing the upper and lower guide rails 3 Push the air filter along the guide rails from...

Страница 5: ...e router on the workbench with the upside up Figure 5 Mounting the router on a workbench MSR 36 10 AC Installing the router in a rack Mounting brackets The following routers require only the front mou...

Страница 6: ...0 DP MSR 36 40 MSR 36 60 The front mounting brackets vary by router model as shown in Figure 6 Figure 6 Front mounting brackets Figure 7 Rear mounting brackets 3640 3660 1U front mounting brackets of...

Страница 7: ...6 Router dimensions Figure 8 MSR 36 10 36 20 router dimensions 480 mm 18 90 in 60 mm 2 36 in Front mounting bracket RPS power cord 65 mm 2 56 in E1 cable...

Страница 8: ...7 Figure 9 MSR3610 G 3620 G router dimensions 470 mm 18 50 in 60 mm 2 36 in 45 mm 1 77 in E1 cable Power cord...

Страница 9: ...8 Figure 10 MSR3620 DP router dimensions 470 mm 18 50 in 60 mm 2 36 in Ethernet network cable 45 mm 1 77 in E1 cable Front mounting bracket...

Страница 10: ...9 Figure 11 MSR 36 40 36 60 router dimensions 480 mm 18 90 in E1 cable 60 mm 2 36 in Power cord 60 mm 2 36 in Front mounting bracket...

Страница 11: ...10 Figure 12 MSR3600 28 router dimensions 360 mm 14 17 in 60 mm 2 36 in 60 mm 2 36 in E1 cable Front mounting bracket Power cord...

Страница 12: ...11 Figure 13 MSR3600 28 SI 3600 28 SI GL router dimensions 360 mm 14 17 in 60 mm 2 36 in 45 mm 1 77 in Power cord Ethernet network cable Front mounting bracket...

Страница 13: ...12 Figure 14 MSR3600 28 X1 router dimensions 360 mm 14 17 in 60 mm 2 36 in 60 mm 2 36 in Power cord E1 cable Front mounting bracket...

Страница 14: ...13 Figure 15 MSR3600 28 X1 DP router dimensions 360 mm 14 17 in 60 mm 2 36 in 60 mm 2 36 in Power cord E1 cable Front mounting bracket...

Страница 15: ...14 Figure 16 MSR3600 51 router dimensions 400 mm 15 75 in 45 mm 1 77 in 60 mm 2 36 in Front mounting bracket Power cord Ethernet network cable E1 cable...

Страница 16: ...15 Figure 17 MSR3600 51 SI router dimensions 360 mm 14 17 in 60 mm 2 36 in 45 mm 1 77 in Power cord Ethernet network cable Front mounting bracket...

Страница 17: ...16 Figure 18 MSR3600 51 X1 router dimensions 400 mm 15 75 in 60 mm 2 36 in 45 mm 1 77 in Ethernet network cable Power cord E1 cable Front mounting bracket...

Страница 18: ...e front post to the front door A minimum of 80 mm 3 15 in Distance from the front post to the rear door A minimum of 550 mm 21 65 in Distance from the front post to the rear post 290 mm 11 42 in to 43...

Страница 19: ...mum of 680 mm 26 77 in Distance from the front post to the front door A minimum of 70 mm 2 76 in Distance from the front post to the rear door A minimum of 500 mm 19 69 in Distance from the front post...

Страница 20: ...Depth A minimum of 600 mm 23 62 in Distance from the front post to the front door A minimum of 80 mm 3 15 in Distance from the front post to the rear door A minimum of 420 mm 16 54 in MSR3600 28 X1 MS...

Страница 21: ...n Depth A minimum of 600 mm 23 62 in Distance from the front post to the front door A minimum of 80 mm 3 15 in Distance from the front post to the rear door A minimum of 460 mm 18 11 in Installing the...

Страница 22: ...ront mounting brackets 2 Use a rear mounting bracket to mark the positions of cage nuts on the rear rack posts making sure the front and rear mounting brackets are at the same level Figure 21 Marking...

Страница 23: ...Figure 22 Installing cage nuts 5 Attach the rear mounting brackets to the rack and fasten the screws The depth of the router might be greater or smaller than the depth of the rack depending on the rac...

Страница 24: ...mounting brackets to the chassis and fasten the screws 7 Attach shoulder screws to the rear of the chassis Figure 25 Attaching the front mounting brackets and shoulder screws to the MSR 36 10 36 20 3...

Страница 25: ...unting brackets Secure the chassis in the rack by attaching the front mounting brackets with pan head screws onto the back Figure 28 Mounting the router in the rack Installing the router in a rack by...

Страница 26: ...o mark the positions of cage nuts on the front rack posts making sure they are at the same level Figure 29 Marking the positions of cage nuts on the front rack posts 2 Insert one edge of a cage nut in...

Страница 27: ...ing brackets to the chassis and fasten the screws Figure 31 Attaching the front mounting brackets to the chassis 5 Place the router on the rack and secure the chassis in the rack by attaching the fron...

Страница 28: ...IMPORTANT Make sure the rack is correctly grounded before grounding the router To connect the grounding cable 1 Remove the grounding screw from the grounding hole on the rear panel of the chassis 2 U...

Страница 29: ...28 Figure 33 Connecting the grounding cable to the router Figure 34 Grounding the router through the grounding terminal on the rack...

Страница 30: ...strip If a grounding strip is available at the installation site connect the grounding cable to the grounding strip Follow the same procedures in Grounding the router through the grounding terminal on...

Страница 31: ...treat the joint for corrosion protection Installing an interface module CAUTION An MSR 36 20 router does not support any mixture of SIC 4GSW HMIM 8GSW and HMIM 24GSW interface modules Installing a SI...

Страница 32: ...d off before installing a DSIC Only the MSR 36 20 36 40 36 60 router supports DSICs You must remove the slot divider between slot 1 and slot 2 or between slot 3 and slot 4 before you install a DSIC To...

Страница 33: ...divider and pull out the slot divider Figure 39 Removing the slot divider 3 Insert the DSIC into the slot and push it along the slide rails until it makes close contact with the backplane of the rout...

Страница 34: ...HMIM has good contact with the connectors in the slot The following routers do not support HMIMs MSR3600 28 MSR3600 28 SI MSR3600 28 SI GL MSR3600 28 X1 MSR3600 28 X1 DP MSR3600 51 MSR3600 51 SI MSR3...

Страница 35: ...tall a 0 5 U MIM into HMIM slot 3 on an MSR 36 10 or HMIM slot 9 or 10 on an MSR 36 60 install the MIM in the lower part of the slot Make sure the MIM has good contact with the connectors in the slot...

Страница 36: ...ter 6 Fasten the captive screws to secure the MIM to the router Figure 43 Attaching a MIM to an HMIM adapter Figure 44 Installing the MIM to the router Connecting the router to the network Connect the...

Страница 37: ...connected to a fiber connector To connect an optical fiber 1 Remove the dust plug from a fiber port of the router 2 Remove the dust cover from the transceiver module and plug the end without a pull l...

Страница 38: ...3600 28 X1 DP MSR3600 51 MSR3600 51 SI MSR3600 51 X1 MSR3600 51 X1 DP To install a CF card 1 Open the CF card cover by pressing the spring clip 2 Push the CF card eject button all the way into the slo...

Страница 39: ...he MSR3620 DP router are hot swappable To prevent Micro SD card damage and data loss execute the umount command before you hot swap a Micro SD card Make sure a Micro SD card is installed with the meta...

Страница 40: ...move the chassis cover See Removing chassis covers To install an SSD drive 1 Locate the SSD drive slot See MSR3620 DP internal module locations in Locating internal modules 2 Align the golden plating...

Страница 41: ...through the console port only by using a console cable MSR3610 G MSR3620 G MSR3620 DP MSR3600 28 MSR3600 28 SI MSR3600 28 SI GL MSR3600 28 X1 MSR3600 28 X1 DP MSR3600 51 MSR3600 51 SI MSR3600 51 X1 M...

Страница 42: ...iver program To connect a serial port console cable 1 Plug the DB 9 female connector to the RS 232 port of the configuration terminal 2 Connect the RJ 45 connector to the console port of the router Fi...

Страница 43: ...qr default htm id 32 4 Select a driver program according to the operating system you use XR21V1410_XR21B1411_Windows_Ver1840_x86_Installer EXE Applicable to 32 bit operating systems XR21V1410_XR21B14...

Страница 44: ...er installation wizard Setting terminal parameters To access the device through the console port you must run a terminal emulator program HyperTerminal PuTTY or Tera Term on the configuration terminal...

Страница 45: ...n AC DC power module 1 Face the front of the router and locate the slot to be used 2 Loosen the captive screws with a Phillips screwdriver to remove the filler panel from the slot Keep the removed fil...

Страница 46: ...er and locate the slot to be used 2 Loosen the captive screws with a Phillips screwdriver to remove the filler panel from the slot Keep the removed filler panel for future use Skip this step if you in...

Страница 47: ...For routers that have two power receptacles you can connect two power cords for 1 1 redundancy Connecting an AC power cord 1 Make sure the router is correctly grounded and the power switch on the rout...

Страница 48: ...47 Figure 61 Connecting an AC power cord to an MSR3600 28 router Figure 62 Connecting an AC power cord to an MSR3610 G 3620 G 3620 DP 3600 51 router 2 1 1 2...

Страница 49: ...outers do not support DC power cords MSR3600 28 MSR3600 28 SI MSR3600 28 SI GL MSR3600 28 X1 MSR3600 28 X1 DP MSR3600 51 SI The other routers use different DC connectors but the power cord connection...

Страница 50: ...36 40 36 60 router provide a power switch 2 Loosen the captive screws on the power module with a Phillips screwdriver to remove the power module connector 3 Connect one end of the DC power cord suppli...

Страница 51: ...e abnormality It enhances the reliability of the device The router has a sticky label and a protective cover when shipped to protect the RPS receptacle To connect an RPS power cord 1 Remove the sticky...

Страница 52: ...router and the rack or workbench is stable USB devices and interface modules are correctly installed The router rack and power cords are correctly grounded The correct power source is used The router...

Страница 53: ...described in Table 2 Table 2 LED states when the router is operating correctly LED State Description PWR Steady green The power module is supplying power correctly SYS Slow flashing green The router i...

Страница 54: ...0 msr36 cmw710 boot e0006p05 bin Done Image file cfa0 msr36 cmw710 boot e0006p05 bin is self decompressing Done System image is starting Line aux0 is available Press ENTER to get started 4 Press Enter...

Отзывы: