


Owner’s Manual
HK3819 / HK5523
Page 15
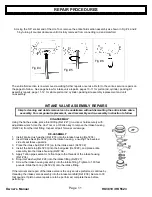
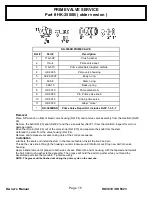
PRIME VALVE SERVICE
Part # HK-3500B ( older version )
Removal
Place 5/8” wrench on flats of bleed valve housing (Ref # 4) and remove valve assembly from the manifold (Ref #
39).
Remove the ball (Ref # 3) seat (Ref # 2) and the crush washer (Ref # 1) from the manifold. Inspect for worn or
damaged parts.
Drive the roll pin (Ref # 9) out of the valve knob (Ref # 10) and separate the knob from the stem.
Unthread the stem from the valve housing (Ref # 4).
Remove and replace stem seals, taking note of their correct sequence
Installation
Lubricate the seals and install the stem in the reverse fashion. Install the knob and pin.
Thread the valve knob through the housing counter clockwise until it bottoms out. Drop new ball into valve
housing.
Apply a liberal amount of grease to both sides of seat. Place into end of housing, with the tapered end towards
the ball. Add crush washer to the assembly. The grease will hold the parts to gather while you thread the
assembled parts into the manifold. Tighten securely.
NOTE: The grease will be flushed out during the prime cycle on the next use.
Ref #
Part #
Description
1
11A-3CP
Crush washer
2
11A-4
Prime valve seat
3
11A-5TC
Prime valve ball, tungsten carbide
4
HK-3005
Prime valve housing
5
02-22-2007
Body o-ring
6
606-8
Stem o-ring
7
606-15
Back up ring
8
HK-3010
Prime valve stem
9
HK-3020
Pin, Prime valve knob
10
HK-3015
Knob, prime valve
11
HK-3030
Label, “close”
HK-3500B PRIME VALVE
*
HK-3600BRK
Prime Valve Repair Kit, Includes Ref # 1-3, 5-7


