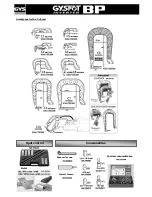
25
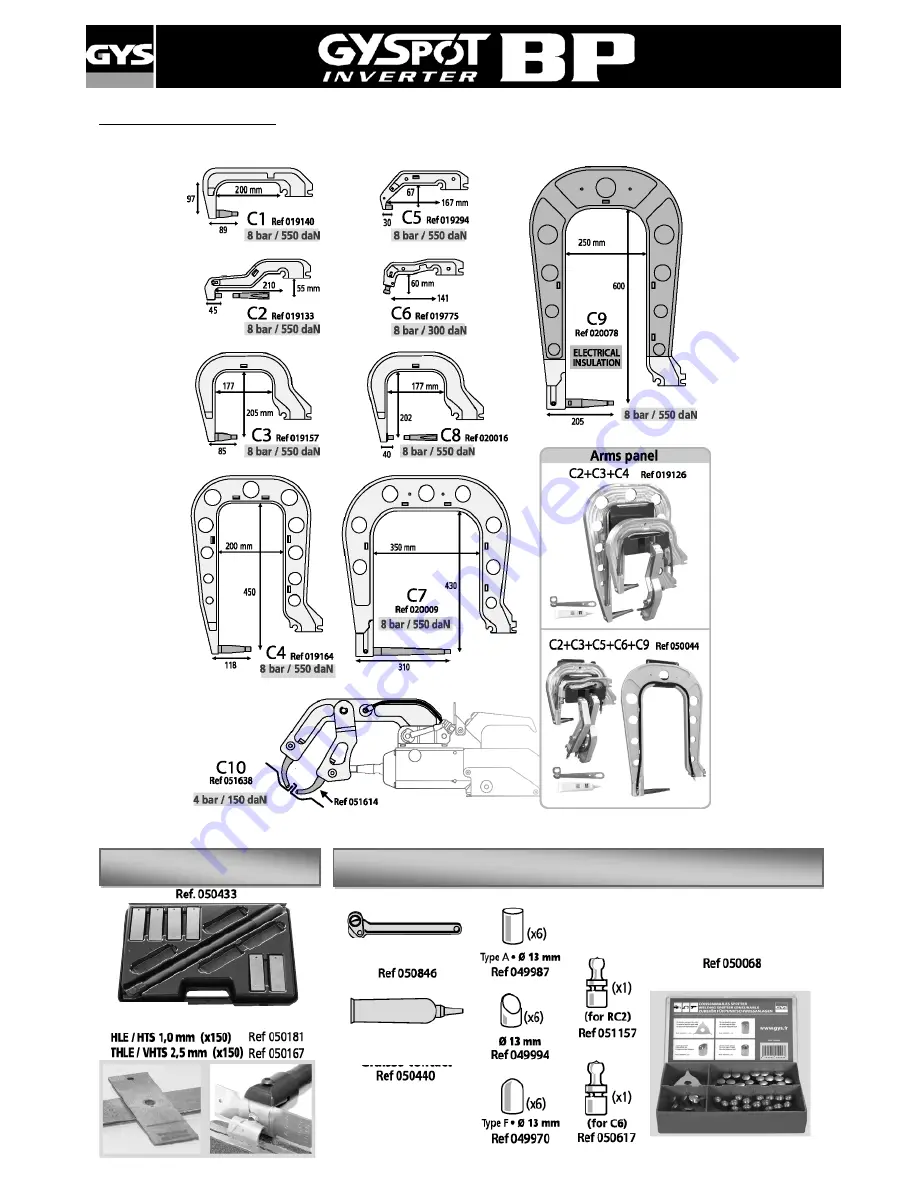
Arms types for the C clamp:
Spot control
Consumables
Spotter consumable box
Metal
Spanner for cap
Contact Grease
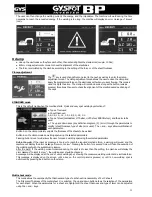
Страница 1: ...oftware 18 21 5 USE AND MAINTENANCE PRECAUTIONS 22 User training 22 Preparation of the parts to assemble 22 Single sided gun welding 22 Level and efficiency of the cooling liquid 22 Cleaning the pneum...
Страница 2: ...wet areas or on a wet floor 6 Do not weld with worn out cables Make sure that there is no isolation defect nor stripped cables nor loose connections and that there is no cooling liquid leaks 7 Before...
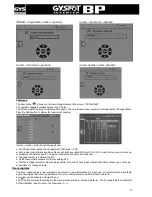
Страница 3: ...X clamp for BP LCX C clamp for BP LC or BP LCX SD card reader Display board for communication with the user Over opening of the clamp Close the clamp and weld A button Remote control to choose the me...
Страница 4: ...in order to avoid voltage drops which can generate bad welding spots you must never have overloaded electrical lines nor supply cable diameters which cross section are not large enough Also the mains...
Страница 5: ...ecommendations regarding CS330 cooling liquid In case of contact with the eyes rinse thoroughly with plenty of water immediately after contact remove contact lenses first if worn Seek medical help if...
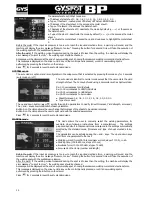
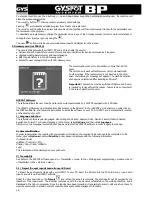
Страница 6: ...down keys in the circle allow to select the parameter to modify sheet thickness type of steel arm used The and keys allow to modify the parameter Save user welding parameters The save key allows to sa...
Страница 7: ...nd CAR MANUFACTURER modes are available on GYSPOT S7 models only The AUTO mode allows welding without entering any parameter inside the machine This mode may be used on all welding spots identified as...
Страница 8: ...electrodes and positioning of the caps Press for 2 seconds to revert back to standard mode STANDARD mode This is the default mode when the machine starts Quick and easy spot welding by selection of th...
Страница 9: ...e or decrease the value The highlight allows to select the parameter to modify The parameters to change in this mode are the thickness of each sheet to be welded 0 6 0 8 1 0 1 2 1 5 1 8 2 0 2 5 3 0 th...
Страница 10: ...elding steel sheets without specifying any parameter on the screen of the machine The machine determines the adapted welding parameters In order to use this mode a calibration should be first performe...
Страница 11: ...ers to modify sheet thickness type of steel arm used The and keys allow modification of each parameter Button A on the clamp remotely adjusts the thickness of the sheets to be welded Button B on the c...
Страница 12: ...19 35 corresponds to UHSS steels Re 36 99 corresponds to boron steel Sheet thickness 0 6 0 8 1 0 1 2 1 5 1 8 2 0 2 5 3 0 Type of arm used The up and down button or scrolls through the parameters to mo...
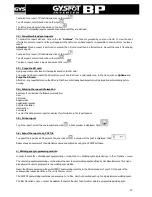
Страница 13: ...it is therefore impossible to select higher values for these parameters Set the generator by selecting the thickness of the sheet metal with the key and It is possible to modify the parameters time an...
Страница 14: ...lay the message overheating Low battery clock The message Low battery clock appears after switch ON of the machine and alerts the user that the voltage of the battery on the command board is too low T...
Страница 15: ...onfigure it in the settings menu which is activated by pushing the mode button for 2 seconds identification mode on off If the identification mode is off enter a file name and activate it to store the...
Страница 16: ...inserted in the BP drive instead of the Program SD card The setting screen below is activated by pressing the mode button for 2 seconds When the Identification SD card is inserted and the identificat...
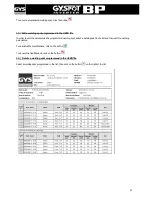
Страница 17: ...t with xxx identifier from 001 to 100 In each archive you can save up to maximum 500 welding points The repair order names and users are displayed The page number is indicated top left All the repair...
Страница 18: ...h a SD drive The GYSPOT software can be installed from files present on the SD card In the GYSPOT V X XX directory double click on the INSTALL EXE file and follow the instructions to install the softw...
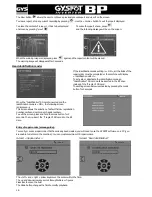
Страница 19: ...d automatically before purging 3 4 Entering the report information Each report can include the following information User Car model Repair order Registration number Put into circulation Intervention C...
Страница 20: ...a programmed welding spot in the USER file In order to add a welding spot in the USER file select the USER file in the list of files and then click on the button on the right of the table below Enter...
Страница 21: ...programmed welding spot select a welding spot in the list and then edit the welding parameters To validated the modifications click on the button To cancel the modifications click on the button 4 4 D...
Страница 22: ...ilter located at the back of the machine is cleaned regularly Generator maintenance The maintenance and repair of the generator should only be carried out by a GYS technician Any repair maintenance ma...
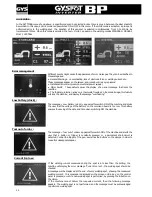
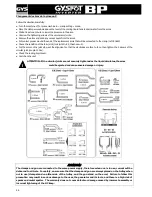
Страница 23: ...es Unscrew screw and loosen the lever on the side of the clamp Remove the clamp arm Lubricate both a new arm and the support with contact grease ref 050440 Specific Installation for C2 and C8 arms For...
Страница 24: ...en not in use clamp stand on either side of the trolley and the gun stand on the arm Failure to follow this precaution may result in serious damage to the user the generator and its tools and there is...
Страница 25: ...25 Arms types for the C clamp Spot control Consumables Spotter consumable box Metal Spanner for cap Contact Grease...
Страница 26: ...s are face to face then tighten the 2 screws of the circular joint couple 15 Nm Check the cooling liquid level Switch on the unit ATTENTION If the circular joints are not securely tightened as the liq...
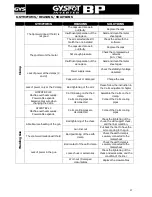
Страница 27: ...SPOT BP LCX Machine overheats quickly Power cable expands Excessive pressure when changing the X arm C arm missing on the the C clamp C arm cooling pipes are disconnected Assemble the C arm on the C c...
Страница 28: ...in respect of the harmonized norm EN 62135 1 Electromagnetic Compatibility Directive EMC 2004 108 CE in respect of the harmonized norm EN62135 2 Machine Directive 2006 42 EC in respect of the harmoni...
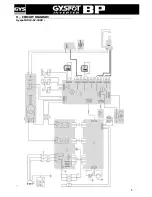
Страница 29: ...29 9 CIRCUIT DIAGRAM Gyspot BP LC S7 230V...
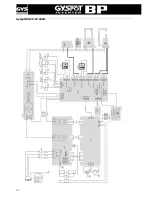
Страница 30: ...30 Gyspot BP LCX S7 230V...
Страница 31: ...t BP LCX 185 kg OTHER CHARACTERISTICS Maximum air pressure P1 8 bars Liquid flow rate 2l min Minimum regulated force F min 100 daN Maximum regulated force with C clamp F max 550 daN Maximum regulated...