

Introduction
Below are the key features of your new smart gas meter. They
will be referred to throughout this guide.
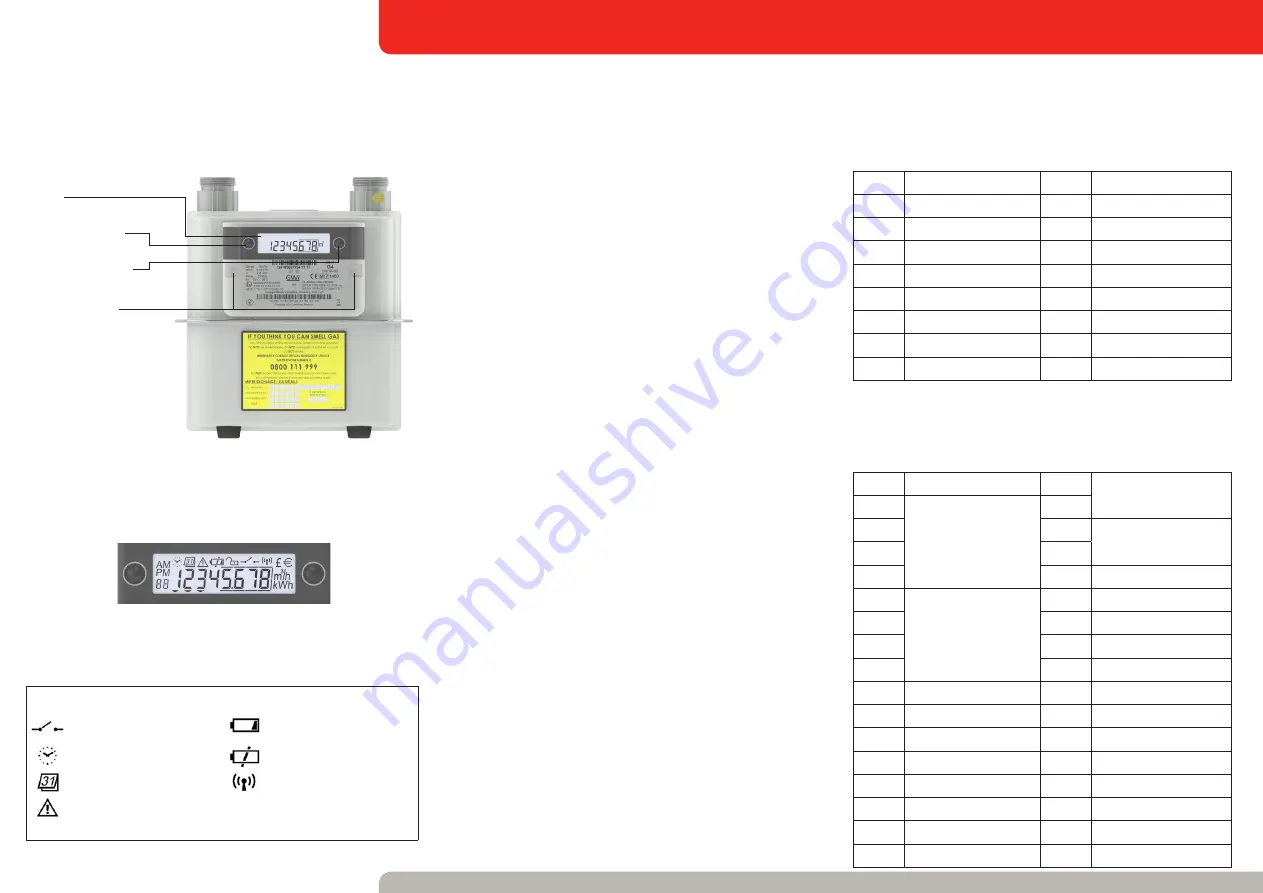
Gas Meter
General Function
Pressing either button activates the LCD and goes directly
to the
automatic scroll sequence.
This will remain active for 3
minutes before the index returns to sleep mode.
It shows:
• 00 Any user messages from your energy supplier
• 01 Corrected volume total
(meter reading)
• 02 Local time
• 03 Device ID (serial number)
From here, press and hold button A to access the
main menu
Or, press button B twice in quick succession to access the
manual scroll sequence.
All segments of the LCD will light to
confirm this was successful.
Important windows (Quick Reference)
Top-up code entry
To enter a top-up code, navigate to the main menu then
window 08 - Top-up Code. Select the menu item by pressing
and holding button B.
Enter your top-up code by quick-pressing button B to
increment each digit, then accept by pressing and holding
button B to move onto the next digit. When all 20 digits are
entered, press and hold button B to submit the code.
Pressing button A moves to the previous digit, pressing and
holding button A exits the top-up code entry window.
Setting the PIN
Pre-selected windows with user sensitive information can be
hidden from the manual scroll sequence in the gas meter.
PIN protection is disabled by default but can be activated by
navigating to window 04 - PIN access in the main menu. Enter
your PIN in the same way a top-up code is entered. This will
then need to be repeated to confirm the PIN is correct.
Do not reveal your PIN to anyone.
To reveal the hidden windows, enter your PIN in window 04 in
the main menu. A PIN entry will stay valid until the index returns
to sleep mode.
Note: Once activated, PIN control can only be reset by your
energy supplier.
Main Menu Options
Select a main menu item by pressing and holding button B. To
return to the main menu press and hold button A. Please note,
this will cancel any entry or active functions. The display will
remain on the selected window for 2 minutes before returning
to the automatic scroll sequence.
LCD
Left Button (A)
Right Button (B)
Security Seal
Liquid Crystal Display (LCD)
The LCD gives access to a wealth of information available within
the index as well as important icons which show you the status
of your gas meter.
The LCD displays meter data using its 8 digit display. Each
window has an index number in the bottom left corner, and is
accessed through a combination of buttons A and B.
Manual Scroll Sequence Windows
Move between windows using button B to go to the next
window and button A to go back to the previous window. The
selected window will remain active for 2 minutes then return to
the automatic scroll sequence.
01 (S)
Install
10 (S)
Security Log
02 (S)
Uninstall
11 (S)
Billing
03 (A) ZigBee Trig
12 (S)
Change Resolution
04 (A) PIN Access
13 (S)
Test Valve
05 (U) Valve Menu
14 (S)
Reset Battery Life
06 (U) Clear Messages
15 (S)
Battery Usage Data
07 (U) Activate Emg Credit
16 (S)
Battery Usage Old
08 (A) Top-Up Code
17 (S)
Clear Tampers
09 (A) Event Log
18 (S)
Quit Service Mode
01 (U) Payment Mode
18 (U) Time-based debt 1
& 2
02 (A)
TOU (Time-of-use)
Register matrix 1-4
19 (U)
03 (A)
20 (U) Time-based debt
recovery rate 1 & 2
04 (A)
21 (U)
05 (A)
22 (U) Payment Debt %
06 (A)
Tariff Block Counter
Matrix 1-4
23 (U) Accumulated Debt
07 (A)
24 (U) MPRN
08 (A)
25 (A) Local Time
09 (A)
26 (A) Local Date
10 (A) Consumption (Vb)
27 (U) Standing Charge
11 (U) Balance
28 (A) Contact Details
12 (U) Debt to Clear
29 (U) Active Tariff Price
13 (U) Customer Ident No.
30 (S)
RSSI
14 (U) Emg Credit Avail.
31 (S)
Link Quality
15 (U) Non-disablement
32 (A) Core FW Version
16 (U) Emg Credit Balance
33 (A) Application FW Ver
17 (U) Low Credit Status
34 (A) ZigBee FW Version
LCD User Interface Symbol Descriptions
Valve open
Battery status icons
Not present: battery life sufficient
First icon: 10% battery remaining
Second icon (flashes): battery empty
Time and date icons
(used during manual / auto scroll
sequence)
RF Communication active
Error warning
▼
Tamper flag icons
1st flag: general tamper activated
2nd flag: MID tamper activated
3rd flag: valve failure


