

4
5
BS 160 = 1310 mm / BS 200 = 1710 mm
BS 200 = 825 mm
60 mm
2.
3.
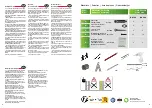
BS 160 - 8 x
BS 200 - 12 x
Neigung | Pitch |
pente de toit | Helling
max.
0,5%
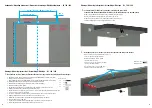
Anbaumaße
|
Mounting dimensions
|
Dimensions de montage
|
Montageafmetingen - BS 160 / 200
mind.
Höhe
|
min.
High
|
hauteur minimale
|
minimumhoogte = 2250 mm
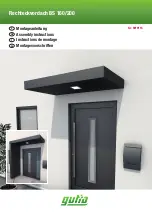
Montage
|
Mounting
Instructions
|
Assemblage
|
Montage - BS 160 / 200
Wandhalter montieren
|
Mount wall bracket
|
Montage du support mural
|
Bevestiging van de muurbeugel
1. Abstände messen, im Wasser ausrichten, Bohrlöcher anzeichnen (Wandhalter als Schablone verwenden).
2. Bohren Sie die Löcher mit einem Ø 12 mm Bohrer.
3. Dübel in die Wand einsetzen, nun die Wandhalter mit je 3 Schrauben und Unterlegscheiben lose anziehen.
4. Wandhalter mit Wasserwaage ausrichten und nun die Schrauben fest anziehen.
1. Measure distances, align in water, mark drill holes (use wall holder as template)
2. Drill the holes with a Ø 12 mm drill bit
3. Insert dowels into the wall, now loosely tighten the wall brackets with 3 screws and washers each.
4. Align the wall brackets with a spirit level and now tighten the screws.
1. Mesurer les distances, les aligner dans l‘eau, marquer les trous de forage (utiliser le support mural comme modèle)
2. Percer les trous avec une mèche de Ø 12 mm.
3. Insérez des chevilles dans le mur, puis serrez les supports muraux avec trois vis et trois rondelles chacun.
4. Alignez les supports muraux avec un niveau à bulle et serrez maintenant les vis.
1. Afstanden meten, uitlijnen in water, boorgaten markeren (gebruik muurbeugel als sjabloon)
2. Boor de gaten met een Ø 12 mm boor.
3. Steek de deuvels in de muur, draai nu de muurbeugels losjes aan met 3 schroeven en ringen elk.
4. Richt de muurbeugels uit met een waterpas en draai nu de schroeven vast.
1.
Montage
|
Mounting
instructions
|
Assemblage
|
Montage - BS 160 / 200
BS 160 BS 200
6 x
9 x
6 x
9 x
6 x
9 x
2 x
3 x
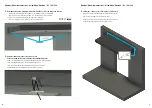
Stromanschluss für LED Panel vorbereiten
|
Preparing the power cable
Préparation du câble d‘alimentation
|
Bereid de stroomaansluiting voor op het LED-paneel
Nehmen sie das LED Panel ab und ziehen Sie das Stromkabel durch das Vordach.
Disconnect the LED panel and pull the power cable through the canopy.
Débranchez le panneau LED et tirez le câble d‘alimentation à travers la verrière.
Verwijder het LED-paneel en trek de voedingskabel door de kap.
Befestigung von oben
|
at the top
|
Pièce jointe supérieure
|
Montage van bovenaf
Bohren Sie die Löcher mit einem Bohrer Ø 3,5 mm vor.
Setzen Sie die Schrauben wie angezeigt.
Drill the holes with a Ø 3.5 mm drill bit.
Insert the screws as shown.
Percez les trous avec une mèche de Ø 3,5 mm.
Insérez les vis comme indiqué.
Boor de gaten voor met een Ø 3,5 mm boor.
Plaats de schroeven zoals aangegeven.
Neigung | Pitch |
pente de toit | Helling
max. 0,5%
Neigung ->
links oder rechts |
Pitch ->
left or right |
Pente de toit ->
gauche ou droite |
Helling ->
links of rechts


