background image

Customer Helpline

 0333 3201989

8

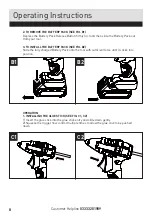
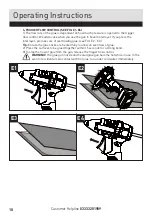
2. TO REMOVE THE BATTERY PACK (SEE FIG. B1) 

Depress the Battery Pack Release Button firmly first and then slide the Battery Pack out 
from your tool.

3. TO INSTALL THE BATTERY PACK (SEE FIG. B2) 

Slide the fully charged Battery Pack onto the tool with sufficient force until it clicks into 
position. 

OPERATION

1. INSTALLING THE GLUE STICK (SEE FIG. C1, C2)

1) Insert the glue stick into the glue stick entry and slide down gently.

2) Squeeze the trigger flow control multiple times to allow the glue stick to be pushed 

down.

Operating Instructions

B1

C1

B2

C2

Содержание CGG12G

Страница 1: ...ld Glue Gun These instructions contain important information that will help you get the best from your Guild Glue Gun ensuring it remains safe to operate If you need help or have damaged or missing pa...

Страница 2: ...omer Helpline 0333 3201989 2 Contents Safety Information 3 In The Box 6 Accessories 6 Operating Instructions 7 Maintenance 11 Troubleshooting 11 Technical Data 12 Environmental Protection 12 Guarantee...

Страница 3: ...ion Wear dust mask Double insulation Waste electrical products must not be disposed of with household waste Please recycle where facilities exist Check with your local authorities or retailer for recy...

Страница 4: ...y result in electric shock fire and or serious injury Save all warnings and instructions for future reference This appliance can be used by children aged from 8 years and above and persons with reduce...

Страница 5: ...unlight d Do not subject battery pack to mechanical shock e In the event of battery leaking do not allow the liquid to come into contact with the skin or eyes If contact has been made wash the affecte...

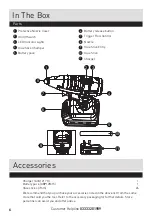
Страница 6: ...Battery pack ABP12M15 1 Glue sticks 7mm 24 Battery release button Trigger Flow Control Nozzle Glue Stick Entry Glue Stick Charger We recommend that you purchase your accessories listed in the above l...

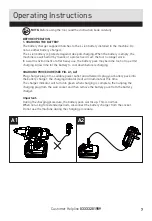
Страница 7: ...to permit charging Allow time for the battery to cool down before recharging CHARGING PROCEDURE SEE FIG A1 A2 Plug charger plug into a suitable power outlet and afterwards plug your battery pack into...

Страница 8: ...ALL THE BATTERY PACK SEE FIG B2 Slide the fully charged Battery Pack onto the tool with sufficient force until it clicks into position OPERATION 1 INSTALLING THE GLUE STICK SEE FIG C1 C2 1 Insert the...

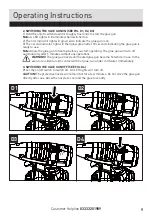
Страница 9: ...ready to use Note Allow the glue gun to heat up before you start operating The glue gun will turn off automatically after 5 minutes without any operations WARNING The glue gun nozzle and heated glue g...

Страница 10: ...ke care of overflowing glue see FIG E2 E3 Tip Ensure the glue sticks are heated fully to allow an even flow of glue 2 Press the surfaces to be glued together within 15 seconds for a strong bond 3 To s...

Страница 11: ...e Ensure the battery is properly charged It will take 4 5 charging cycles before the battery reaches optimum charge and run time 3 Glue gun will not turn on Ensure you hold the on off switch down unti...

Страница 12: ...Battery capacity 1 5Ah Li ion Charger rating Input 100 240V 50 60Hz 56W Output 15V 1700mA Charging time 1 hr Charger protection class II Technical Data Table Environmental Protection Waste electrical...

Страница 13: ...abuse use in contravention of the instructions or where the product has been the subject of unauthorised modifications or alterations or has been the subject of commercial use In the event of a probl...

Страница 14: ......

Страница 15: ......

Страница 16: ......

Отзывы: