Putting the appliance into operation
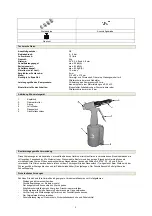
Put the insertion (6) included to the air connection (8). Fix the safety container (2) to the riveter using the cap nut (3). Depending
on the rivets used, select the suitable end piece (7) and screw it on the head (1). Connect the rivet tool to a compressor of
appropriate output or to the air network. For that purpose, use the flexible air hose (internal diameter of 6 mm) with the quick-
acting coupling. It is necessary to make sure the maximum operating pressure (6 bar) is not exceeded. Now press the rivet
inserted in the end piece to the riveted hole and pull the release (4). Make sure the broken guide pin is caught in the safety
container (2).
Servicing and maintenance
Following the servicing instructions given in this document is a guarantee of a long service life and trouble-free operation of the
appliance. Before servicing and maintenance, the appliance must be disconnected from the source of compressed air. The
permanent and trouble-free functioning of the rivet tool is conditioned by regular lubrication. Special tool oil to be used only for
that purpose.
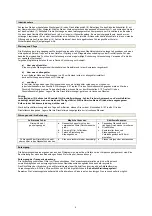
As to lubrication, you can choose from the following options:
d)
Using the oil sprayer
The complete maintenance unit contains an oil sprayer. It is placed on the compressor.
e)
Using the lubricator connected to the piping
A lubricator connected to the piping will be installed in the immediate vicinity (distance of app. 50 cm). The lubricator will supply
the appliance with a sufficient amount of oil.
f) Manually
If your equipment does not have any maintenance unit or lubricator connected to the piping, 3 – 5 drops of oil must be applied to
the air connection before putting the air appliance into operation. If the air appliance has been out of operation for a couple of
days, 5 – 10 drops of oil must be applied to the air connection before starting the appliance. Keep your air tools and appliances
in dry spaces only.
Important
There is special oil for air tools in the air cylinder (5). When replacing components subject to quick wear, it is
necessary to make sure a sufficient amount of oil is added again. The oil level is correct when oil can be seen when the
piston in the chamber connection is pulled out!!
Troubleshooting
Failure Possible
cause Removal
Rivet is not pulled in to the full extent
d.
Unsuitable end piece for the rivet
used (too big diameter)
e.
Too little oil in the air cylinder
f.
Wrong setting on the clamp
compartment
d.
Fit in a suitable end piece with the
right diameter
e.
Add some oil
f.
Loosen the safety nut and set the
clamp compartment with the connection
part to 69 mm.
Guide pin of rivets can only be inserted in
the end piece with difficulties or cannot be
inserted at all.
b.
Clamps are dirty or damaged
b.
Clean or replace the clamps
Disposal
Disposal instructions are illustrated in the form of pictograms on the device or packaging. Description of the pictograms is given
in "Identification" chapter.
Disposal of transport packaging
Packaging protects the device against damage during transport. Packaging materials are usually selected according to their
effect on environment and disposal methods and can therefore be recycled.
Returning of the packaging back to circulation saves resources and costs for packaging disposal.
Parts of the packaging (e.g. foil, styropor) may be dangerous for children.
Risk of suffocation!
Keep these parts of the packaging out of reach of children and dispose as soon as possible.
Emergency Action
Apply the first aid adequate to the injury and get qualified medical assistance as quickly as possible. Protect the injured person
from more accidents and calm him/her down.
For the sake of eventual accident, in accordance with DIN 13164, a workplace has to be fitted with a first-aid kit. It is
essential to replace any used material in the first-aid kit immediately after it has been used. If you seek help, state the
following pieces of information:
1. Accident
site
2. Accident
type
3. Number of injured persons
4. Injury
type(s)
8


