SummaSketch FX 27
Chapter 6: Configuring AutoCAD Release 12 for Windows
This chapter assumes you’re using a template with AutoCAD. If you’re not using a
template, you will need to designate a rectangular area within the active area as your
screen pointing area.
Configuring the Windows Driver
1.
Install the tablet Windows driver as described in Part II, Chapter 5 of this manual.
2.
Fasten the AutoCAD template to the tablet.
3.
Start Windows. Open the Summagraphics Control Panel and double click on the
Setup icon.
4.
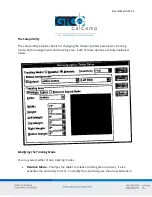
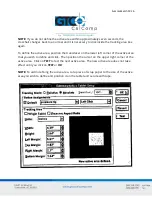
The Setup dialog box appears. In the
Tracking Area
field of the Setup dialog box,
click in the
Whole Tablet
and
Preserve Aspect Ratio
checkboxes so that there are no
checkmarks.
5.
Position the screen pointer inside the black/gray box in the lower portion of the
Setup dialog box and click. This box will turn completely gray.
6.
Digitize the lower left dot on the template’s screen pointing area. Next, digitize the
upper right dot on the template’s screen pointing area. When finished digitizing the
two points, click
OK
to close the dialog box.
Configuring AutoCAD for Windows
1.
Install AutoCAD for Windows as explained in the AutoCAD Installation Guide.
2.
Start AutoCAD for Windows. In the Drawing Editor, select
Preferences
from the File
dropdown menu.
3.
In the Preferences dialog box, activate the
Save to ACAD.INI
and the
Digitizer/Mouse
Arbitrate
ratio buttons. Then click
OK
to close the dialog box and save changes.
4.
Select Configure from the File dropdown menu. The current Configuration Screen
appears. Press
ENTER
until the Configuration Menu appears.

