background image


- 9 - 

HDMA 784 C ASI 

3.1  r

etrofit ting


a

 Ca 

module


The cassette is equipped with two common interfaces. This allows you to con-
nect two CA modules for various scrambling systems and service providers. 
Scrambled channels can only be descrambled with a CA module suitable for 
the scrambling system and the corresponding smart card. The smart card con-
tains all the information for authorisation, descrambling and subscription.

  –  Check with the distributor or manufacturer of the CA modules to be used 

to ensure that they are suitable for descrambling several channels. 


–  The hardware and software of this cassette have been thoroughly prepared 

and tested.


– 

Any  changes  made  by  programme  provider  to  the  structures  in  the  pro-
gramme data might impair or even prevent this function.


–  When working with the CA modules, please read the corresponding oper-

ating manuals from the respective providers.


•  Insert the smart card 

1

 into the CA module 

2

 so that the chip 

3

 on the 

smart card faces the thicker side (top) of the CA module (fig. 1).


•  Push the CA module 

2

 without canting into the guide rails 

4

 of the com-

mon interface 

5

 according to the following picture and contact it to the 

common interface.

5

3

4

1

2

CI 

Tuner 

A

CI 

Tuner C

PCB

Fig. 1

—>  If the QAM module is inserted in the head-end station, the left com-

mon interface is assigned to tuner A, the right one to tuner C.

Содержание HDMA 784 C ASI

Страница 1: ...Notes on the Assembly Instructions As well as this supplementary Assembly Instructions the Assembly Instructions for the STC 160 apply GSS Grundig SAT Systems GmbH Beuthener Strasse 43 D 90471 Nuremberg Phone 49 0 911 703 8877 Fax 49 0 911 703 9210 Email info gss de Internet www gss de en 16 32APSK ...

Страница 2: ...3 Connecting the QAM module 11 4 The control panel at a glance 12 4 1 Functions of the control panel buttons 12 4 2 Menu items 12 5 Programming 13 5 1 Preparation 13 5 2 Notes on level setting 13 5 3 Programming procedure 14 5 4 Programming the QAM module 16 Selecting the module channel strip 17 Output settings 17 Modulator on off Level 18 Channel Frequency 18 Output symbol rate QAM modulation 20 ...

Страница 3: ...nes on the installa tion and operation of antenna systems To ensure electromagnetic compatibility make sure all connections are tight and the covers are screwed on securely No liability is accepted for damage caused by faulty connections or inap propriate handling of the device Check the head end station STC 160 according to the safety instructions listed in their assembly instruction Take precaut...

Страница 4: ... 2004 108 EC The product fulfils the guidelines and standards for CE labelling page 40 Unless otherwise noted all values are specified as typical HF input Frequency range 910 2150 MHz Level range 60 dBμV 80 dBμV DVB S modes QPSK 1 2 2 3 3 4 5 6 7 8 DVB S2 modes QPSK 1 2 3 5 2 3 3 4 4 5 5 6 8 9 9 10 8PSK 3 5 2 3 3 4 5 6 8 9 9 10 16APSK 2 3 3 4 4 5 5 6 8 9 9 10 32APSK 3 4 4 5 5 6 8 9 9 10 Symbol rat...

Страница 5: ... Connection strip 20 pin for supply voltages and control circuits Common Interfaces 2 several channels can be descrambled 2 4 Description The Head end Digital Transmodulator QAM HDMA 784 C ASI in the fol lowing called QAM module converts two DVB S DVB S2 also 16 32 APSK modulated data streams into four DVB C QAM modulated data streams The QAM module has two SAT IF inputs one ASI input and one HF o...

Страница 6: ...ng of 8 MHz to modulators A and C Herein only frequency setting frequency spacing of channel strips A B and C D is possible The QAM modulated HF output signals are sent through the HF output of the QAM module to the output collector of the head end station When the head end station is switched on the two line LC display shows the SETUP menu and the software version of the control unit The head end...

Страница 7: ...e ORGNET ID is changed a new NIT must be generated Changing the NIT The transport stream contains data in the form of tables which the receivers evaluate and require for convenient use The TPS module can adjust the Net work Information Table NIT to accommodate the new stations output data incl LCN The NIT contains data which is required by the set top boxes connected to the cable network for the a...

Страница 8: ...et output symbol rate to a higher value Defined symbol rates Some cable operators specify a fixed symbol rate e g 6 900 kSymb s 3 Installation Ensure the head end station is mounted so it will not be able to vibrate Avoid for example mounting the head end station onto a lift shaft or any other wall or floor construction that vibrates in a similar way Before installing or changing a module switch o...

Страница 9: ...and software of this cassette have been thoroughly prepared and tested Any changes made by programme provider to the structures in the pro gramme data might impair or even prevent this function When working with the CA modules please read the corresponding oper ating manuals from the respective providers Insert the smart card 1 into the CA module 2 so that the chip 3 on the smart card faces the th...

Страница 10: ...contact strip on the board at the rear wall of the housing are for add on modules only Open the housing of the head end station in accordance with the assembly instructions for the STC 160 Open the locking device 1 in the direction of the arrow fig 2 1 Fig 2 Insert the QAM module in grooves A of an open slot with contact strip on the board at the rear wall of the housing and gently slide it into t...

Страница 11: ...minals in the rear wall of the head end station via the cable inlets H using HF cables made on site or if ap plicable connect each to one of the outputs of a retrofitted SAT IF input distributor If required connect the ASI input D to a corresponding ASI signal source After programming connect the modulator output G to one of the input sockets I of the output collector ...

Страница 12: ...rs and functions to be set are underlined With the button select the channel strip other modules You can use the button to select the following menu items Output signal settings Modulator on off level Output channel modulators A and C Output frequency modulators A D QAM modulation Substitute signal ASI input selection Input signal settings LNB oscillator frequency Input symbol rate Input frequency...

Страница 13: ...witch on the channel strip modulator if necessary page 18 For each chan nel strip there is an status LED which indicates if the channel strip is switched on Status LEDs Channel strip A Channel strip B Channel strip C Channel strip D Balance the output levels of the channel strips A D and level them to the output levels of the modulators of other modules used if the difference in level is 1 dB page...

Страница 14: ...SK 8PSK 16APSK 32APSK DTV SETUP V 10 M M M M M M M M M M Bedienhinweise blättert Menüs vorwärts wählen die Eingabeposition wählt Untermenü stellen Werte ein speichert alle Eingaben 1 zeigt die Eingabeposition M S Operating Hints scrolls forward through the menu select the enter position selects a submenu set values and triggers actions saves all entries 1 shows the enter position M S 1000 7500 4 2...

Страница 15: ...her SDT OTHER 0x0000 0xFFFF on off off on off on nur Tuner A und C mit CA Modul only tuner A and C with CA module Die angezeigte Information ist abhängig vom verwendeten CA Modul The information displayed is dependent on the CA module used Bx 4A 01 05 Information MENU Bx 4A PID Check on CA MENU 16APSK 32APSK DTV M M M M M M M M M M M M M M M M A Bx 4 Defaults FACTORY Bx 4 STORE FACTORY S Werkeinst...

Страница 16: ...the module channel strip Switch on the head end station The display shows SETUP BE160 and the software version of the head end station e g V 10 The output level of the output collector can be adjusted in the SETUP menu see STC 160 assembly instructions Ein On SETUP V 10 BE160 M M CANCEL STORE Bx 4 S STORE MEMORY A A Einstellung speichern store factory defaults S M M M A Bx 4 Defaults FACTORY Bx 4 ...

Страница 17: ...sion of the module Press the button The Output settings OUTPUT main menu is activated Output settings In this menu you select the modulator for which you would like to do the output settings in the related submenus Bx 4 Mod A OUTPUT C66 In order to skip the Output settings press button For example an indicated C66 shows the current channel set If C is displayed a frequency which does not correspon...

Страница 18: ...Channel Frequency FREQ submenu is activated Channel Frequency In this menu you can adjust the output channel only at modulator A and C or the output frequency of the respective modulator The QAM signal is normally transmitted with a bandwidth of 8 MHz This means that you can only use the existing channel grid in the range of channels C21 C69 frequency grid 8 MHz The CCIR channel grid is 7 MHz in t...

Страница 19: ... spacing to the modulators A and C can be set via the frequency setting Frequency setting 42 0 MHz 860 0 MHz modulators A D FREQ 834 00 MHz Bx 4A C66 A B 842 00 MHz Bx 4B C67 FREQ 850 00 MHz Bx 4C C68 C D 858 00 MHz Bx 4D C69 For modulators A and C any frequency 42 0 MHz 860 0 MHz can be set via the frequency setting For modulators B and D only this spacing to the modulators A and C can be set via...

Страница 20: ... overflow page 34 Bx 4A QAM MODE In this case increase the output symbol rate or the QAM modulation or remove stations from the data stream using the station filter QAM Modulation In this menu item you can set the QAM modulation For higher QAM modulation the output symbol rate is lowered An output QAM modulation of 64 QAM places a large burden on the cable network Due to noise delay and frequency ...

Страница 21: ...the case of an incorrect input signal FAILURE submenu is activated Substitute signal in the case of an incorrect input signal You use this menu to set whether a Single Carrier signal should be provid ed or the self made tables Tables should transmitted furthermore whenever an incorrect input signal occurs FAILURE Bx 4A Tables Use the buttons to set the required output signal Press the button Retur...

Страница 22: ...C Tuner D 2 1xASI D Tuner A Tuner B Tuner C ASI 2 2xASI B D Tuner A ASI Tuner C ASI 2 2xASI C D Tuner A Tuner B ASI ASI 1 3xASI B C D Tuner A ASI ASI ASI 1 4xASI A B C D ASI ASI ASI ASI 0 Use the buttons to set the required numbers of lines using the ASI input signal On the left side you select the number of ASI lines on the right side you see which lines are used Press the button The Input settin...

Страница 23: ... station filter settings IF tuner is displayed in addition you get access to the tuner settings and if a CA module is retrofitted the corresponding CA menu is available Press button Selection Line The Station filter e g 01 06 submenu is activated page 26 Selection Tuner The LNB oscillator frequency Input LNB submenu is activated LNB oscillator frequency Input This menu is only available if a tuner...

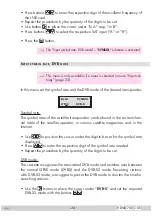
Страница 24: ...L DVB S Bx 4A 27500 Symbol rate The symbol rates of the satellite transponders can be found in the current chan nel table of the satellite operator in various satellite magazines and in the Internet Use to position the cursor under the digit to be set for the symbol rate displayed Press to enter the respective digit of the symbol rate needed Repeat the procedure by the quantity of the digits to be...

Страница 25: ...uency is displayed in MHz e g 1 8 If a question mark appears in the second line of the display there is no input signal present In this case check the configuration of the antenna system and head end station as well as the preceding settings of the cassette FREQ CN 9 Bx 4A 11835 1 8 Use to position the cursor under the digit of the frequency displayed to be set Press to set the respective digit of...

Страница 26: ... Signal quality is insufficient Red No signal Blinking red green Data overflow of the output data rate Off The channel strip modulator is switched off Press the button The Station filter e g 01 06 submenu is activated Operation with a CA module In order to descramble scrambled channels a corresponding smart card is needed The channels to be descrambled are set in submenu station filter Station fil...

Страница 27: ...RA Radio channel type For radio stations the background of the screen of the connected TV or test receiver is darkened The currently selected station is switched off The star means that the TV or radio station selected is scrambled To enable the station the CA module and the appropriate smart card of the station provider are required If a service number e g 131 appears instead of TV or RA this ind...

Страница 28: ...he settings of the CA module dependent on the CA module Bx 4A PID Check on CA MENU PID monitoring The factory default of the PID monitoring is switched on If particular PIDs are not descrambled the CA module is reset Ad ditionally dropouts may occur if several stations are descrambled To prevent this the PID monitoring can be switched off Use the buttons to switch off or on the PID monitoring Use ...

Страница 29: ...A 01 05 MENU Meaning of the indicators Bx 4A Slot 4 tuner A 01 05 The first of five menu items is activated MENU The menu of the CA module is activated For the explanation of further details please use the operating instructions of the CA module used Use the buttons to activate the menu desired Press the button to activate the menu Use the buttons to select the function desired To set the CA modul...

Страница 30: ...ation PID 1 9 Use to position the cursor under the digit of PID to be set Press to set the respective digit of the PID needed Repeat the procedure by the quantity of the digits to be set If required select another memory location and enter the next PID which shall not descrambled To delete a stored PID overwrite it by 0000 Press the button Returning to Input settings main menu page 23 If necessary...

Страница 31: ...channel strips a new identification must be allocated to the further transport streams to realise the channel search of the settop boxes connected without mistakes If the ORGNET ID is changed also a new NIT must be generated page 35 TS ONID off Bx 4A 0x0001 0100 Use the buttons to position the cursor under the digit of the hexadeci mal number to be set Press to set the respective digit of the hexa...

Страница 32: ...data streams Information in the data stream about service parameter of other data streams BAT SDT sdt other Bx 4A bat Using the button place the cursor under bat and switch on BAT or off bat the bouquet association table using the buttons Using the button place the cursor under sdt other and switch on SDT OTHER or off sdt other the service description table using the buttons Capital letters Functi...

Страница 33: ...ng a PID In this menu you can allocate a new address to a PID retaining the complete data content REMAP off Bx 4A 0x0000 0000 Use the buttons to place the cursor under the respective digit of the hexadecimal number of the PID to be changed 0x0000 and set the hexadecimal number using Use the buttons to place the cursor under the respective digit of the hexadecimal number of the new PID 0000 Set the...

Страница 34: ...the station filter is set correctly the current needed data rate is lower than the maximum data rate The value fluctuates since the data rates of individual stations are dynamically modified by the broadcasters Is the current needed data rate higher than the maximum data rate exclamation marks appear in the display and the status LED is blinking red green In this case correct the QAM settings page...

Страница 35: ...IT This process may take a few seconds Then the NIT is generated added and sent to all NIT cassettes The other NIT cassettes also add this new NIT The status of all NIT cassettes in the NIT menu changes to on The display shows read copy To switch off the new NIT off press the button The NITs of the other NIT cassettes will stay switched on When the NIT of the cassette is switched on again on by pr...

Страница 36: ...TORY STORE By pressing the button you will be returned to the menu item Output settings without invoking the factory defaults page 17 Press the button The factory defaults are saved The display shows STORE Back to Selecting the module page 17 By pressing the button you will be returned to the menu item Output settings without saving the factory defaults page 17 If necessary set another channel str...

Страница 37: ... programmed data is saved by pressing the button You will be returned to the menu item Selecting the module channel strip via A page 17 By pressing the button you will be returned to the menu item Selecting the module channel strip via A without saving the programmed data ...

Страница 38: ...urrent EMC regulations Securely tighten the cable connections using an appropriate open ended spanner After programming connect the modulator output G to one of the input sockets I of the output collector page 11 fig 4 Test the output level of the output collector according to the STC 160 assem bly instructions and set the output level required for the cable system Mount the base plate and the fro...

Страница 39: ...466 00 C 21 474 00 C 22 482 00 C 23 490 00 C 24 498 00 C 25 506 00 C 26 514 00 C 27 522 00 C 28 530 00 C 29 538 00 C 30 546 00 C 31 554 00 C 32 562 00 C 33 570 00 C 34 578 00 C 35 586 00 C 36 594 00 C 37 602 00 C 38 610 00 C 39 618 00 C 40 626 00 C 41 634 00 C 42 642 00 C 43 650 00 C 44 658 00 C 45 666 00 C 46 674 00 C 47 682 00 C 48 690 00 C 49 698 00 C 50 706 00 C 51 714 00 C 52 722 00 C 53 730 ...

Страница 40: ...of Conformity Alterations reserved Technical data E O E by GSS GmbH V3 301112012 Service Phone 49 0 911 703 2221 Fax 49 0 911 703 2326 Email service gss de Grundig SAT Systems GmbH Beuthener Straße 43 D 90471 Nürnberg ...

Отзывы: