background image

III.  GENERAL INSTALLATION REQUIREMENTS 


3.1  Receiving Inspection 


Carefully inspect the sampling system for damage as soon as it is received.  Also, verify that the quantity of parts 

or  packages  actually  received  corresponds  to  the  quantity  shown  on  the  packing  slip.    Report  any  damage  or 

shortage to the delivering carrier as soon as possible.  InterSystems' responsibility for the equipment ended with 

acceptance by the delivering carrier.  Refer to the bill of lading. 


3.2  Pre-Installation Preparation 


Note,  before  starting  sampling  system  installation,  study this manual, the certified drawing(s) furnished with the 

system, and other applicable documents (including, but not limited to OSHA Regulations; the National Electrical 

Code; and all other applicable federal, state, and local codes and regulations). 


3.3  Location 


The TD sampler is typically mounted on the end of a belt conveyor carrying the product to be sampled as in Figure 

2-1.    Install  the  sampler  as  it  is  shown  and  noted  on  the  certified  drawings.    The  sampler  may  or  may  not  be 

supplied  with  a  partial  or  a  whole  conveyor  discharge  hood.    Provide  necessary  access  and  maintenance 

platforms for ease of maintenance.  


The sampler is to be installed only as shown on the certified drawing(s).  If an alternate mounting arrangement is 

desired  contact  InterSystems  prior  to  installation  for  proper  guidance.    The sampler is of a general design with 

modifications specifically for your application.  It may be necessary to rework the sampler in order for it to function 

properly if you alter the application. 


3.4  General Mounting Guidelines 


  DANGER  


SAMPLER  CANNOT  SUPPORT  ANY  OTHER  EQUIPMENT  OR  CONVEYING  LINE! 

COLLAPSE  OF  THE  WHOLE  SYSTEM  CAN  CAUSE  DEATH,  SERIOUS  INJURY,  AND 

EXTENSIVE  DAMAGE  TO  EQUIPMENT.    PROPERLY  SUPPORT  ALL  SPOUTS, 

CONTAINERS, AND CONVEYING LINES.   


The sampler needs to be installed, as shown and noted on the certified drawings.   


A.   Locate and mark the desired mounting location of the sampler. 


B.   Position the sampler.  Weld and/or fasten in place. 


Содержание IS TD

Страница 1: ...9575 N 109 th Ave Omaha Nebraska 68142 402 330 1500 www intersystems net SAFETY INSTALLATION OPERATION MAINTENANCE M A N U A L SAMPLER Model TD No PC 522818A Revised 2006 10 26...

Страница 2: ...SE RIGHT Pilot Light 10 4 1 5 Digital Display Timer T 1 Standard 10 4 1 6 Main Fuse 11 4 1 7 Index Relay IR 1 11 4 1 8 Reverse Delay Timer Relays 12 4 1 9 Terminal Strip 12 4 2 Sampler Mounted Electri...

Страница 3: ...RANTY 22 List Of Illustrations Drawings FIGURE 1 1 TD SAMPLER SAFETY LABEL LOCATIONS 4 FIGURE 2 1 TYPICAL INSTALLATION MODEL TD SAMPLING SYSTEM 5 FIGURE 4 1 STANDARD NEMA 12 CONTROL PANEL DETAIL 9 FIG...

Страница 4: ...r its operating environment Careless changes could result in death or serious injury to people and reduce the performance and service life of the equipment Never perform any service on this equipment...

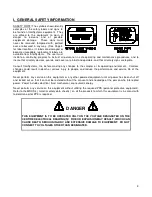
Страница 5: ...4 FIGURE 1 1 TD SAMPLER SAFETY LABEL LOCATIONS...

Страница 6: ...based but which could also be volume or quantity based A sample cycle begins when an electric motor drives the slotted sample cutter through the product flow to collect a sample of the material The s...

Страница 7: ...of special materials such as stainless steel or nedox coatings D Programmable Controls to sequence the sampler and the sample collection equipment E Abrasion resistant linings of urethane AR carbon s...

Страница 8: ...o be sampled as in Figure 2 1 Install the sampler as it is shown and noted on the certified drawings The sampler may or may not be supplied with a partial or a whole conveyor discharge hood Provide ne...

Страница 9: ...O NOT locate the controller in a hazardous area D Most applications require that the sampler be in easy view of the controller 3 7 System Wiring Refer to the certified electrical drawing s for specifi...

Страница 10: ...BY COMMON SENSE CAN RESULT IN DEATH SERIOUS INJURY AND OR EQUIPMENT DAMAGE LOCKOUT POWER BEFORE PERFORMING ANY MAINTENANCE 4 1 Control Components And Their Functions FIGURE 4 1 STANDARD NEMA 12 CONTRO...

Страница 11: ...ly the timer begins timing down When the illuminated display reads all zeroes 000 the timer has timed out and initiates a sampling cycle The sample pelican traverses through the product flow to collec...

Страница 12: ...d the timer is electronically switched to the new units as well 2 LINE FREQUENCY To set the proper line frequency connect the jumper wire to either the 50 HZ or 60 HZ pin These pins are clearly marked...

Страница 13: ...mple cutter is in a rest position Upon initiation of a sample cycle the power is routed through the normally closed contacts of the opposite limit sample to the drive motor starter The drive motor sta...

Страница 14: ...ed intervals while observing all safety precautions observe the sampler as it operates Inspect for A Loose or missing hardware B Noisy motor or motor reducer bearings C Overheated motor or reducer D A...

Страница 15: ...oint where the adjustment of the eye bolts will no longer permit further tightening Shorten the chain by removing a link if necessary 5 4 2 Limit Switch Adjustment Loosen and adjust the limit switch a...

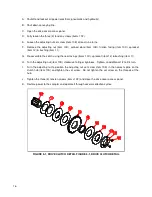
Страница 16: ...clutch may need adjustment if it starts to slip When following the instructions below refer to the clutch drawing page 16 A Shutoff and lockout all power electrical pneumatic and hydraulic B Shut dow...

Страница 17: ...ng the new facings items 10C sprocket item 12 bushing item 11 H Turn the adjusting nut item 10D clockwise to finger tightness Tighten an additional 1 2 to 3 4 turn I Turn the adjusting nut to position...

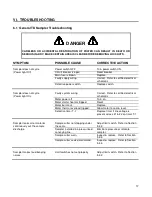
Страница 18: ...rrect Refer to certified electrical schematic Motor power off Turn on Motor starter heaters tripped Reset Motor burnt out Replace Motor thermal overload tripped Allow motor to cool reset Defective tim...

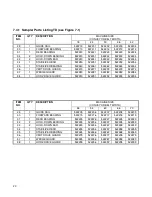
Страница 19: ...lity built piece of machinery As with any machine parts do wear out and fail It is InterSystems recommendation that a small supply of spare parts be kept on hand to cover any minor breakdowns A separa...

Страница 20: ...DJ LS LEVER ARM 2 18 35352 LIMIT SWITCH BRKT 2 19 35354 LIMIT SWITCH 2 20 35073 3 ID GUM RUBBER TUBE A R 21 SEE CERT DWG PELICAN DUST SEAL BRACKET 2 22 SEE CERT DWG SAMPLE PELICAN 1 23 SEE CERT DWG CU...

Страница 21: ...2 522273 522274 37 1 WEDGE GUARD 522280 522281 522282 522283 522284 38 1 HORZ DRIVE GUARD 522290 522291 522292 522293 522294 ITEM NO QTY DESCRIPTION MACHINE SIZE CONVEYOR BELT WIDTH 48 54 60 66 70 29...

Страница 22: ...21 FIGURE 7 1 TD SAMPLER PARTS DRAWING...

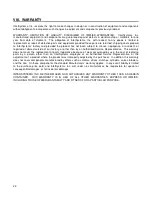
Страница 23: ...r than by an Authorized Service Representative This warranty does not cover the replacement of parts inoperative because of wear occasioned by use the cost of replacing parts by a person other than an...

Отзывы: