


2
CONTENTS
____________________________________________
3-4
Set-up and safety
5-6
Connection/Preparation
5
Mounting the table base
5
Connecting the antenna and the mains cable
6
Connecting the HiFi system
6
Inserting batteries in the remote control
7-10
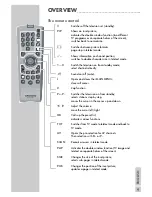
Overview
7
Connections on the television
8
Controls on the television
9-10
The remote control
11-14
Settings
11
Setting television channels automatically
11-12
Changing stored channels
12
Picture settings
13-14
Audio settings
15-19
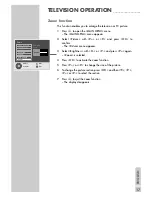
Television operation
15-16
Basic functions
16
Zap function
17
Zoom function
18
Changing the picture format
19
PIP mode
20-21
Teletext mode
20
TOP text or FLOF text mode
20
Normal text mode
20-21
Additional functions
22
Convenience functions
22
Convenience functions with the »Features« menu
23-26
Using external devices
23
Decoder or satellite receiver
24-25
Video recorder, DVD player or SET-TOP box
26
Camcorder
27
PC Monitor Mode
27
Connecting a PC
27
Selecting the channel position for the PC
27
Settings for the PC
28-30
Special settings
28-30
Setting television channels
31-33
Information
31
Technical data,
31
Service information for dealers
32
Troubleshooting
33
Additional Information for units sold in the UK.


