background image

Audio streaming

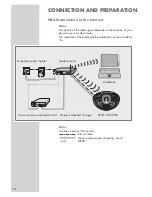
This function enables you to play back tracks from a music archive
in MP3 and WMA format on the device.
The music archive can be a PC or an external hard drive and must
be administered by a UPnP server.

Selecting by artist and track, but also by album, genre, etc., depends
on the structure of the music archive and on the UPnP server soft-
ware in use (e.g. Nero Media Home, Windows Media Player 11).
Access times can lengthen depending on the size of the music
archive, and this makes using it inconvenient. While the UPnP server
is importing the complete music archive, the device can only be op-
erated in a limited fashion, if at all.

If the tracks in the music archive are stored with the ID3 tag format
(track, artist, album, genre, etc.), the information is also displayed on
the device. Tracks can then be selected using this information.

Depending on the configuration of the PC or the hard drive, the de-
vice must be enabled on the PC or the hard drive. The UPnP server
must be approved in any firewalls that may be installed. Several
UPnP servers can be used in parallel.

Selecting the input source music archive (Client) 

1

Press »

M

« to open the main menu.

2

Select »

Client

« with »

A

« or »

S

« and press »

9

« to

confirm.
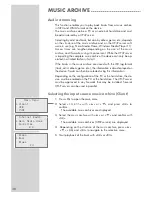
– The available music archives are displayed.

3

Select the music archive with »

A

« or »

S

« and confirm with

»

9

«.

– The available music archives (UPnP servers) are displayed.

4

Depending on the structure of the music archive, press »

A

«,

»

S

«, »

9

« and »

8

« to navigate to the selection menu.

5

Start playback of the track with »

9

« or »

e

II

«.

Main Menu

~ Client

USB

TAPE

Internet Radio

~ Nero Media Home

Favorites

2/3

Drama

~ Rock

Blues

1/4

30

MUSIC ARCHIVE

--------------------------------------------------------------------------

Содержание RRCD 3760 WEB

Страница 1: ...INTERNET RADIO RECORDER CD RRCD 3760 WEB...

Страница 2: ...ng the input source 23 Adjusting the volume 23 Muting 23 Selecting sound settings 24 Setting the custom equalizer 24 Switching the Ultra Bass System on and o 24 Setting the display 25 INTERNET OPERATI...

Страница 3: ...MMC MODE 43 TAPE MODE 43 Selecting the TAPE input source 43 Tape playback 43 Fast forward and reverse search 43 Recording onto tape 44 Recording from FM radio 44 Recording from the CD USB or SD input...

Страница 4: ...vice and the CDs from rain moisture dripping or splashing water sand and heat heaters or direct sunlight etc Only use the device in a moderate climate Do not place any vessels containing liquids for e...

Страница 5: ...select the CD SD FM Internet radio Client USB and tape input sources A In the menus moves the cursor upwards In FM mode selects the next preset S In the menus moves the cursor down In FM mode selects...

Страница 6: ...he time day and date In Internet and FM mode stores radio stations as presets In CD mode stores CD tracks to create a playlist plays tracks in random order INTRO In standby mode activates the setting...

Страница 7: ...e time day date DSC UBS Brie y press to open the menu for the sound settings myEQ Classic Pop Jazz Rock and myEQ again press and hold down to open the setting for the Ultra Bass System ON and OFF OPEN...

Страница 8: ...end Rewinds the tape to the beginning z Starts playback Starts recording Antenna Telescopic antenna for FM VHF reception LAN Socket for connecting to the Ethernet network via LAN cable on the back of...

Страница 9: ...e interrupts or ends playback of a MP3 WMA CD or audio CD press twice to delete the playlist of a CD DSC UBS Brie y press to open the menu for the sound settings myEQ Classic Pop Jazz Rock and myEQ ag...

Страница 10: ...n track information elapsed playing time ID3 tag infor mation and time day date k In FM mode switches between mono reception and FM MODE automatic mono stereo M Opens the main menu of the device for e...

Страница 11: ...racks of a CD or all tracks of an album 8 9 For navigating the menus In FM mode pressing and holding down starts the for wards or reverse frequency search pressing brie y switches the frequency back o...

Страница 12: ...Battery operation 1 Open the battery compartment by pressing OPEN underneath the device and pushing the lid in the direction of the arrow S 2 Insert six batteries 6 x 1 5 V type LR20 AM1 D size observ...

Страница 13: ...device must be switched o while the memory card is being inserted If it is not switched o data can be lost 1 Switch o the device by pressing ON OFF 2 Insert the memory card carefully into the SD MMC...

Страница 14: ...fting it o 2 Observe the polarity marked on the base of the battery com partment when inserting the batteries 2 x 1 5 V LR 03 AM 4 AAA type Notes Do not expose the batteries to extreme heat caused for...

Страница 15: ...socket of the modem router to the Ethernet socket of the device using a standard network cable Twistedpair RJ45 plug The data throughput level is 10 100 MBIT Note The lines represent the function Int...

Страница 16: ...our device to your modem router The substance of the building at the installation site can also a ect this Note The lines represent the function Internet radio Music archive audio streaming client WLA...

Страница 17: ...at any time by open ing the main menu with M and selecting S from Setup In the setup menu press S select the ATS item and press 9 to con rm Con rm the Start function with 9 The search starts and prev...

Страница 18: ...afresh using the RDS time synchronisation If an RDS station which supports time synchronisation is saved on preset 1 the device synchronises automatically after the power comes back on During operatio...

Страница 19: ...ted from the mains for a long time all the presets are deleted Restoring the settings Reset You can delete all settings such as stored radio stations the time and alarm and network access data with th...

Страница 20: ...LAN router You can nd the MAC address unique product ID in the main menu at Setup Network Config Device Status MAC Address 2 Press M to open the main menu 3 Select Setup with A or S and press 9 to con...

Страница 21: ...you select automatic assignment your device is automatically assigned an IP address by the router or its integrated DHCP server If you have con gured your network with a static IP use the set ting de...

Страница 22: ...settings should not be saved select the No option and press 8 to con rm The settings are cancelled 11 After successful registration the available Internet Radio and Favorites menu items appear and acc...

Страница 23: ...ternet Radio Client FM CD USB SD or TAPE by pressing A or S and press 9 to con rm Adjusting the volume 1 Adjust the volume with Display brie y Volume Min 1 to 39 above Max Muting You can switch the de...

Страница 24: ...n and o 1 Select the UBS sound setting by pressing and holding down DSC UBS 2 Switch the ultra bass system on and o with 8 or 9 Display UBS ON or UBS OFF Setting the display 1 Press and hold down DISP...

Страница 25: ...ternet menu by pressing A or S 2 Press A or S to select the menu item 3 Con rm the selected menu item and thereby the function with 9 4 Press 8 to switch back up to the next menu 5 Press DISPLAY to sw...

Страница 26: ...ress DISPLAY to return to the station selection and press A or S to select the radio station and confirm with 9 To switch backwards in the menu structure press DISPLAY and select the menu with 8 Searc...

Страница 27: ...to select the radio station and confirm with 9 To switch backwards in the menu structure press DISPLAY and select the menu with 8 Selecting Internet radio stations which the Internet provider has adde...

Страница 28: ...vious chapter and highlight it with P RANDOM 2 Select preset 1 to 9 with the number buttons 1 to 9 Select presets 10 to 40 by rst entering the tens with the 10 number button and then the units with 1...

Страница 29: ...can be heard when Wait disappears from the display Note See the notes on page 27 for navigating the menus Selecting manually added Internet radio stations You can nd out how to add these radio statio...

Страница 30: ...rmat track artist album genre etc the information is also displayed on the device Tracks can then be selected using this information Depending on the con guration of the PC or the hard drive the de vi...

Страница 31: ...th A or S 2 Press 9 to switch to the next available subfolder 3 Press 8 to switch back up to the next folder Note A quick search can be made using the letters of the number buttons 1 9 Playback functi...

Страница 32: ...the tens with the number button 10 and then the units with 1 to 9 Display CH and for example 25 with the frequency and the station name Stereo mono reception If the device is receiving a stereo broadc...

Страница 33: ...e time automatically if you have se lected this function display CT Refer to the section on setting the time on page 17 18 Time synchronisation can take several minutes and even with good reception th...

Страница 34: ...ttings or by the CD being used Should such problems arise contact the customer services of your CD burner or software manufacturer or look for relevant infor mation for example on the Internet When yo...

Страница 35: ...then the track name and the elapsed playing time of the track Display in CD DA mode the number of the current track and the elapsed playing time of the track or in MP3 WMA mode open the selection men...

Страница 36: ...3 Select the album with 8 or 9 4 Press S to switch the cursor to the File item 5 Select the track by pressing 8 or 9 Playback of the track starts automatically after a short time Selecting informatio...

Страница 37: ...pressing INTRO REPEAT until A appears in the display The CD is repeated from the beginning 2 To quit this function keep pressing INTRO REPEAT until the repeat symbol disappears from the display Note I...

Страница 38: ...stop mode Selecting and storing tracks MP3 WMA only 1 Press P RANDOM to select the function Display the track 000 121 and 01 for the rst preset 2 Select the track with 8 or 9 and press P RANDOM to sa...

Страница 39: ...ylist again press P RANDOM and then press eII Checking the playlist 1 In stop mode keep pressing P RANDOM The stored tracks are displayed Deleting the playlist 1 Press OPEN to open the CD compartment...

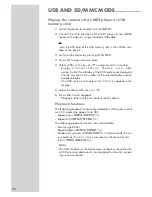
Страница 40: ...er and the available folders If no USB source is connected No Device appears in the display 5 Select the album with A or S 6 Press eII to start playback Playback starts with the rst track of the rst a...

Страница 41: ...facturers appearing every day the compati bility of MP3 players USB memory sticks can only be partially guaranteed If USB operation is impaired or is not possible this does not in dicate a malfunction...

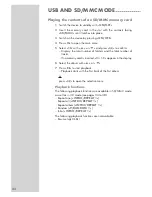
Страница 42: ...ber of folders and the total number of tracks If no memory card is inserted No SD appears in the display 6 Select the album with A or S 7 Press eII to start playback Playback starts with the rst track...

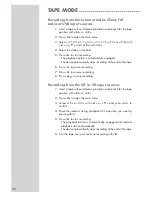
Страница 43: ...erse search 1 In stop mode press or fast forwards to the end rewinds to the beginning Press 7 at the position you want Recording onto tape Erase protection Each new recording writes over the previous...

Страница 44: ...he end of the tape 6 Press II to pause recording 7 Press II to resume recording 8 Press 7 to stop recording Recording from the CD or SD input sources 1 Insert a tape without deletion protection and se...

Страница 45: ...ain menu 3 Select CD or SD with A or S and press 9 to con rm 4 Press to start recording The playback button is automatically engaged Playback starts automatically from the beginning of the medium or f...

Страница 46: ...ld down INTRO REPEAT Display the switch on time 0 00 the alarm and the alarm volume WEC means that the alarm is switched o at week ends see next page 2 Enter the hours of the switch on time with A or...

Страница 47: ...The full dura tion of the alarm is 90 minutes Cancelling the alarm for the day 1 Switch the device to standby with ON OFF when the alarm goes o The switch on timer is activated for the next day Switch...

Страница 48: ...00 mins Sleep timer Setting the sleep timer 1 Switch on the device with ON OFF and select the input source 2 Open the function with SNOOZE NAP SLEEP 3 Select SLEEP with A or S Display SLEEP and 00mins...

Страница 49: ...Network Config Device Status MAC Address Creating favourite lists You can copy radio stations which the V Tuner Internet service provides for GRUNDIG customers into a favourites list This gives you sw...

Страница 50: ...d radio station to an existing favourites group 3 Enter the name of a new favourites group in the entry eld and con rm with the button or open the name eld select the favourites group and con rm with...

Страница 51: ...avourites group 3 Enter the name of a new favourites group in the entry eld and con rm with the button or open the name eld select the favourites group and con rm with the button The radio station is...

Страница 52: ...on your PC 2 Enter the address www grundig radiosetup com The GRUNDIG INTERNET RADIO TUNING SERVICE page appears 3 Enter your e mail address and password and con rm 4 Click the My added radio stations...

Страница 53: ...u item and con rm with 9 The cursor is at the rst place of the name 7 Delete the current name by moving the cursor to the last position with 9 and deleting the characters individually with 7 CLR 8 Sel...

Страница 54: ...Select other information with S You can switch back to the previous information by pressing A You receive information on the name of the device the rmware the hardware etc Device Name Firmware Ver Boo...

Страница 55: ...key with the number buttons 1 9 The sequence of entries of the number button 2 for example is 2 A B C After the input the cursor moves to the next input position Special characters and capital letter...

Страница 56: ...r S and press 9 to con rm Enter the required DNS IP domain name system After entering the last character the next menu Enable Proxy is dis played Note If you do not have a proxy server installed in yo...

Страница 57: ...you do not want to save the settings select No with A or S and con rm with 9 The settings are cancelled 16 After successful registration the menu items Internet Radio and Favourites are displayed and...

Страница 58: ...be found under the following Internet addresses http ec europa eu enterprise rtte weblinks htm System Power supply Operating voltage 230 V Mains frequency 50 60 Hz Max power consumption 31 W Power co...

Страница 59: ...audio CD radio recorder or contact your specialist dealer General faults Problem No sound The device does not respond to button commands The remote control does not work Poor radio reception Tracks on...

Страница 60: ...channel change channel settings on the router then repeat the registration procedure p 20 Indicates a search in the network for the selected radio station When this is displayed navigation in the menu...

Страница 61: ...ds Close the tape compartment You can also play a cleaning cassette to clean the magnetic heads Protect your tapes against moisture dust heat and cold Do not store your tapes near devices with strong...

Страница 62: ...logy for Win dows Media contained in this device WM DRM to protect the integrity of their content Secure Content so that their intellectual property in cluding copyright in such content is not misappr...

Страница 63: ...may be based on completely dif ferent protocols to communicate with each other In the home area a combination of the router and the DSL modem are used as an Internet gateway Hardware version Hardware...

Страница 64: ...s belong to particular IP address ranges that are not routed in the Internet The can be used by anybody for private networks such as LANs Many computer networks require complete connectivity at IP lev...

Страница 65: ...work Conventional routers work on layer 3 of the application layer A router has an interface for every network connected to it When data is received the router determines the correct path to the desti...

Страница 66: ...After 802 11i came into force the Wi Fi group coined the term WPA2 IEEE 802 11e is an industrial standard of the Institute of Electrical and Electronics Engineers IEEE and a supplement to the wireless...

Страница 67: ...Grundig Multimedia B V Atrium Strawinskylaan 3105 NL 1077 ZX Amsterdam http www grundig com...

Отзывы: