Grundig Ovation CDS 7000 DEC Скачать руководство пользователя страница 16

16

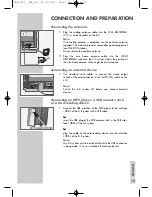
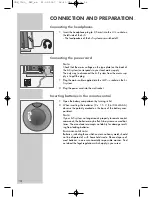
CONNECTION AND PREPARATION

_

Additional information for units sold in the UK.

Units sold in the UK are suitable for operation from a 240V ac, 50Hz mains
supply.
The range of multi-system receivers is built to work in most European coun-
tries. However, the mains plug and socket system for the UK differs from
many European countries.
This appliance has been supplied with a fitted, non-removable, approved
converter plug for use in the UK. This converter plug is fitted with a 5A rated
fuse.

In case this appliance is supplied with a moulded 2-pin Euro plug only,
which is unsuitable for UK operation, this must be cut off and immediately
disposed of. An approved 13A, 3-pin UK plug should then be fitted by a
qualified electrician.

Note:

The severed Euro plug must be destroyed to avoid a possible shock
hazard should it be inserted into a socket elsewhere.

If a non-rewireable 3-pin plug or a rewireable 13A (BS1363) 3-pin plug is
used, it must be fitted with a 5A ASTA or BSI approved BS1362 fuse. If any
other type of plug is used it must be protected by a 5A fuse either in the
plug, or at the distribution board. If this type of plug becomes defective,
ensure that the fuse is removed before disposal, to eliminate potential shock
hazard.

If it is necessary to change the fuse in the non-rewireable plug, the correct
type and rating (5A ASTA or BSI approved BS1362) must be used and the
fuse cover must be refitted. If the fuse cover is lost or damaged, the lead and
plug must not be used until a replacement is obtained. Replacement fuse
covers should be obtained from your dealer.

Important:

The wires in the mains lead are colour coded in accordance with the follo-
wing code:
BLUE – NEUTRAL
BROWN – LIVE
As the colours of the wires in the mains lead of your appliance may not cor-
respond with the coloured marking identifying terminals in your plug, pro-
ceed as follows: 

Connect the BLUE coloured wire to plug terminal marked with the letter “N”
or coloured black.
Connect the BROWN coloured wire to the plug terminal marked with the let-
ter “L” or coloured red.
In no circumstance must any of the wires be connected to the terminal mar-
ked with the letter “E”, earth symbol “

z

”, coloured green, or green & yel-

low.

Replacement mains lead sets can be obtained from your local dealer, or by
contacting Grundig Consumer Relations (01788 570088) 
Moulded 3-pin lead set, suitable for UK use:

Ref: Leadset UK 

8290-991-224

Moulded 2-pin Euro lead set, not suitable for UK use:

Ref: Leadset Euro 

8290-991-316

CDS_7000_ DEC_en  21.05.2007  14:49 Uhr  Seite 16

Содержание Ovation CDS 7000 DEC

Страница 1: ...HIFI MICRO SYSTEM Ovation CDS 7000 DEC GRUNDIG HELPLINE 1800 509 AUSTRALIA GRUNDIG HELPLINE 0800 450 259 NEW ZEALAND CDS_7000_ DEC_en 21 05 2007 14 49 Uhr Seite 1...

Страница 2: ...current file or track Selecting another file or track Searching for a passage within a file or track Selecting albums and files MP3 only Calling up track information only MP3 Repeating a file or a tit...

Страница 3: ...from moisture such as rain or water splashes Do not place the hi fi system close to heating units or in direct sunlight as this will impair cooling Do not place any vessels containing liquids such as...

Страница 4: ...lug 3 5 mm on the left side of the device The speakers of the hi fi system are automatically switched off ON OFF Switches the device into and out of standby mode right side of the device The device is...

Страница 5: ...I Starts and pauses CD playback right side of the device 6 In MP3 and CD DA mode pressing briefly selects the next file or the next track holding down searches for a particular passage 5 In MP3 and CD...

Страница 6: ...tes the track memory of a CD USB mode USB USB interface for connecting an MP3 player a USB memory stick or a card reading device OVERVIEW___________________________________________ ON OFF USB FUNCTION...

Страница 7: ...mode a CD is played back II In MP3 and CD DA mode CD playback is interrupted pause M 1 In MP3 and CD DA mode a file or a track is repeated M ALBUM In MP3 mode all files on an album are repeated M ALL...

Страница 8: ...RDS station is being received PTY In tuner mode the PTY station type function is activated TEXT In tuner mode the radio text function is activated NAP The reminder timer is activated e In timer mode...

Страница 9: ...ket for mains cable The only way to isolate the hi fi system from the mains supply is to pull the plug out FM ANTENNA Antenna socket for the rooftop antenna 75 or the auxiliary antenna supplied MW ANT...

Страница 10: ...r CD DA mode pressing briefly selects files or tracks forwards or backwards pressing and holding down searches forwards or backwards for a particular passage DSC Selects the sound settings USER CLASSI...

Страница 11: ...DISPLAY In tuner mode switches the display between frequency station name station type radio text and time day In CD DA mode switches the display between track number elapsed playing time remaining t...

Страница 12: ...o stations In MP3 and CD DA mode saves files or tracks for track memory plays back files or tracks in random order In stand by mode for setting the time and day manually SLEEP For setting the sleep ti...

Страница 13: ...o connect the audio output sockets of the external device to the AUX IN socket on the hi fi Note Switch the hi fi system off before you connect external devices Connecting an MP3 player a USB memory s...

Страница 14: ...he remote control 1 Open the battery compartment by turning its lid 2 When inserting the batteries 2 x 1 5 V R 6 UM 4 AAA observe the polarity marked on the base of the battery com partment Note If yo...

Страница 15: ...release the four screws in the bracket on the back of the system 2 Unscrew the four round head screws at the back of the hi fi system 3 Attach the holder of the wall bracket to the hi fi system by scr...

Страница 16: ...t the fuse is removed before disposal to eliminate potential shock hazard If it is necessary to change the fuse in the non rewireable plug the correct type and rating 5A ASTA or BSI approved BS1362 mu...

Страница 17: ...RANDOM Display the hours flash 4 Set the hours using A TUNING S and press P RANDOM to confirm Display the minutes flash 5 Set the minutes using A TUNING S and press P RANDOM to confirm Display the day...

Страница 18: ...essing and holding down P RANDOM until the fre quency display switches to rapid run through The stations stored previously will be deleted Automatic station search 1 Switch on the hi fi system by pres...

Страница 19: ...e hi fi is disconnected from the mains for a long time all the preset stations are deleted Storing a favourite station Favourite Station Memory 1 Press A TUNING S to select the station 2 Activate the...

Страница 20: ...the overall brightness of the display back light using v on the remote control in four levels bright medium dark off Selecting the input source 1 Select the input source by pressing FUNCTION Display C...

Страница 21: ...S or TREBLE Display BASS 0 or TRE 0 Note If you do not press any button within five seconds the hi fi system will automatically quit this mode 4 Set the values by pressing VOLUME maximum 6 minimum 6 T...

Страница 22: ...E on the remote control to switch to mono reception Display disappears 2 To switch back to FM stereo press FM MODE on the remote control Display Note If the hi fi is set to stereo reception and is rec...

Страница 23: ...eception the accuracy depends on the time signal being transmit ted Automatic setting is always activated when the hi fi is switched from standby to tuner mode and receives a suitable RDS station disp...

Страница 24: ...control to select another station type 3 Press A TUNING S to start the PTY search Display FM the frequency in rapid run through and PTY flashes The search stops once a station of the desired station t...

Страница 25: ...or software manufacturer or look for rele vant information for example on the Internet When you are mak ing audio CDs observe all legal guidelines and ensure that the copyright of third parties is not...

Страница 26: ...number of the current file followed by the filename and the elapsed playing time of the file Display in CD DA mode R the number of the current track the elapsed playing time of the track 2 Use II to...

Страница 27: ...number of the first file of the album 2 Select the file you want by pressing 5 or 6 Playback of the selected file starts automatically after a short time Notes You can also select albums and files in...

Страница 28: ...on the current album are played back repeatedly 3 To quit the function press INTRO REPEAT repeatedly until the repeat symbol M disappears from the display Repeating all files or tracks Repeat All 1 P...

Страница 29: ...ayed back in numerical order Playing the introductions of files or tracks Intro 1 Press INTRO REPEAT when in stop mode Display INTRO Playback starts automatically The first ten seconds of each file or...

Страница 30: ...bum and file display 001 001 appears again PROG blinks 3 To store more files repeat step 2 Selecting and storing tracks CD DA only 1 Press P RANDOM to call up the function Display track display 00 P 0...

Страница 31: ...e stop position select the file or track with 5 or 6 and press P RANDOM to store Deleting the track memory 1 Open the front screen of the hi fi system or press 7 when the CD is in the Stop position PR...

Страница 32: ...t USB as the source by pressing FUNCTION Display briefly USB then USB READ then MP3 mode with the total number of albums and files in stop mode NO DEV appears in the display if no USB source is connec...

Страница 33: ...1 With the device switched off press and hold down INTRO REPEAT Display and the hour display flashes 2 Set the hours for switching on using A TUNING S 3 Press INTRO REPEAT Display and the minutes disp...

Страница 34: ...e hi fi system off by pressing ON OFF when the alarm is sounding The switch on timer remains activated for the next day Switching off alarm for the weekend You can switch off the alarm function over t...

Страница 35: ...sleep timer 1 Switch on the hi fi system by pressing ON OFF and select the input source you require 2 Press SLEEP to call up the function Display 90 MIN O flashes 3 Enter the required switch off time...

Страница 36: ...requency 50 60 Hz Max power consumption 60 W Power consumption in standby 3 5 W Amplifier unit Output Sine wave power 2 x 4 W 1 x 7 W Music signal power 2 x 6 W 1 x 11 W Receiver unit Reception range...

Страница 37: ...sound The hi fi system does not react when the buttons are pressed The remote control does not work Poor radio reception Tracks on a CD are skipped CD Rs or CD RWs are not played back or are played b...

Страница 38: ...t must be correctly assembled and operated in accor dance with the instructions contained in this manual This product must be used solely for domestic purposes The guarantee does not cover accidental...

Страница 39: ...CDS_7000_ DEC_en 21 05 2007 14 49 Uhr Seite 39...

Страница 40: ...GRUNDIG HELPLINE 1800 509 AUSTRALIA GRUNDIG HELPLINE 0800 450 259 NEW ZEALAND CDS_7000_ DEC_en 21 05 2007 14 49 Uhr Seite 40...

Отзывы: