background image

10

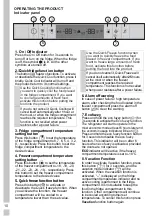
OPERATING THE PRODUCT
Indicator panel

1

2

3

4

5

6

7

8

3. Fridge


compartment


temperature

setting 


button

Press this button 

(    ) 

to set the


temperature 

of the fridge


compartment to 8, 7,


6, 5,

 4

,


3, 2, 

8...


respectively. Press this button to set the 

fridge


compartment temperature


to the 

desired value. 

4.


Freezer 


compartment


temperature

setting


 button

Press this button 

(    ) 

to set the


temperature 

of the freezer


compartment to -18,


-19,


-20,


-21, -22, -23,


-24, -18...


respectively.


Press

this button to set the


freezer


compartment

temperature to the


desired


value.

5.


Quick freeze function button

Press this button 

(   ) 

to activate or


deactivate


the 

Q

uick freeze function.


When 

you activate the function, the


freezer 

compartment will be cooled


to a 

temperature lower than the set


value.

6. Alarm  off   warning

In case of power failure / high temperature 

alarm, after checking the food located in the 

freezer compartment press the alarm off 

button (   ) to clear the warning. 

7. Eco  fuzzy

Press and hold the eco fuzzy button (    )


for 

3

 seconds to activate the 

E

co fuzzy function. 

The 

refrigerator 

will start to operate in the 

most economic mode at least 6 hours later and 

the economic usage indicator will be on (   ). 

Press and hold the eco fuzzy function button 

for 3 seconds to disable the eco fuzzy 

function.


This indicator will be on after 6 

hours when eco fuzzy is activated, provided 

the doors are not opened.

ECO

 indicator will be active if the freezer 

compartment temperature is set to -18

°C.

8. Vacation Function

In order to activate 

V

acation function, press 

this button (


) for 3 seconds, and the 

vacation mode indicator (     ) will be 

activated. When the vacation function is 

activated, “- -” is displayed on the fridge 

compartment   temperature indicator and no 

active 


cooling


i

 performed in the fridge


compartment. It is not suitable to keep the 

food in the fridge compartment in this 

function. Other compartments will continue 

to be cooled according to their set 

temperatures. To cancel this function press 

Vacation

 function button again.

1. On / Off Indicator

Press the On


/


Off button for 3 seconds to 

turn off or turn on the fridge. 

When the fridge 

is off, 

the 

symbol

 (  ) 

is lit. All the other 

symbols are turned


off. 

2.

Quick fridge function

 button

The button

 (     )

 has two functions. To activate 

or deactivate the 

Q

uick 

C

ool function, press it 

briefly. Quick Cool indicator will turn off and 

the product


return to its normal settings

.

Use the 

Q

uick 

C

ooling


function when 

you want


to quickly cool the food


placed 

in the fridge


compartment. If you want


to cool large amounts of


fresh food, 

activate this


function before putting


the 

food into the product.


If you do not cancel it, Quick Cooling will 

cancel itself automatically after 

1

 hour at 

the most, or when the fridge compartment 

reaches the required temperature. This 

function is not recalled when power 

restores after a power failure.

If you do not cancel it,


Quick Freeze will 

cancel


itself automatically after 

25


hours 

at the most or when


the 

freezer


compartment


reaches the required


temperature. 

This function is not recalled 

when power restores after a power failure.

Use the 

Q

uick 

F

reeze


function when 

you want


to quickly freeze the


food 

placed in freezer


compartment. If you 

want


to freeze large amounts


of fresh 

food, activate this


function before 

putting


the food into the product.


Содержание GKFED455

Страница 1: ...Refrigerator Installation User instructions GKFED455 ENG...

Страница 2: ...nline at www grundig co uk Explanation of symbols used throughout this User Manual The terminal in the plug is marked with the symbol The freezer compartment is marked with the symbol C Important info...

Страница 3: ...ood 11 Making ice cubes 11 Defrosting 12 Cleaning and care 13 Replacing the interior light bulb 13 Do s and don ts 13 Energy saving tips 14 Problem solving 14 Installation instructions detailed step b...

Страница 4: ...ible Do not use a multiple adapter bar or extension cable Failure to observe these instructions may invalidate your right to free service during the guarantee period WARNING Keep ventilation openings...

Страница 5: ...fuse Should the fuse need to be replaced an ASTABEAB approved BS 1362 fuse of the same rating must be used Do not forget to refit the fuse cover In the event of losing the fuse cover the plug must not...

Страница 6: ...pty any water in the drain tray before moving See section DEFROSTING and CLEANING AND CARE for further information 7 Make sure that the defrost water pipe at the back of the product is xed to the plas...

Страница 7: ...rature setting to suit your needs If the ambient temperature is below 0 C the food in the fridge compartment will freeze So we recommend you don t use the fridge compartment in such low ambient condit...

Страница 8: ...crisper Freezer fan Frozen food storage drawers Egg tray Door shelf Shelf wire C Figures in this user manual are schematic and may not match the product exactly If the subject parts are not included i...

Страница 9: ...cool before placing them in the fridge Do not store explosive substances High proof alcohol must be stored upright in sealed containers Left over canned food should not be stored in the can 8 Fizzy dr...

Страница 10: ...nds and the vacation mode indicator will be activated When the vacation function is activated is displayed on the fridge compartment temperature indicator and no active cooling is performed in the fri...

Страница 11: ...ion system may also give rise to noise whether the compressor is running or not which is quite normal 5 Front edges of the cabinet may feel warm This is normal These areas are designed to be warm to a...

Страница 12: ...The drain tube can be cleared by pushing the special plastic plunger provided down the drain tube 2 If the frost layer reaches about 1 4 7 mm reduce the temperature setting to restart automatic defros...

Страница 13: ...ortable way The lamps used in this appliance have to withstand extreme physical conditions such as temperatures below 20 C DO S AND DON TS Do Clean and defrost your appliance regularly see DEFROSTING...

Страница 14: ...room temperature to thaw the best way to defrost food is to put it in the fridge to thaw slowly Make sure you avoid defrosting food or food juices drip onto other food ENERGY SAVING TIPS 1 Ensure your...

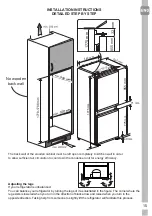
Страница 15: ...urn in the opposite direction Taking help from someone to slightly lift the refrigerator will facilitate this process INSTALLATION INSTRUCTIONS DETAILED STEP BY STEP The back wall of the wooden cabine...

Страница 16: ...16 775 mm 40 mm 71 mm 855 mm 1778 1788 mm...

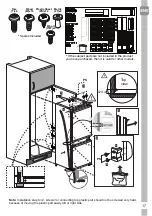
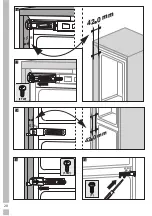
Страница 17: ...ard because of moving the plastic part easily left or right side 1 a 4 b PS Torx T x4 Wood W x15 Plastic Sheet PS x12 Wood 1TW x3 42 mm Top view Spares Included Metric 2T x2 5 17 90o 2 1 3 5 PS If the...

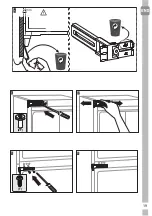
Страница 18: ...18 1 2 3 4...

Страница 19: ...19 8 9 T 5 4 mm 6 7 2T...

Страница 20: ...20 14 13 T 1TW 12 42 0 mm 42 0 mm 10 11 42 0 mm 42 0 mm 1TW...

Страница 21: ...21 20 W 2 0 mm 18 15 17 16 1TW 42 0 mm 42 0mm 19 CLICK...

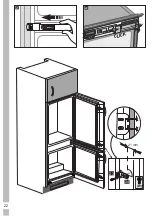
Страница 22: ...22 21 1 2 22 CLICK 23 90 o 21 mm W 24...

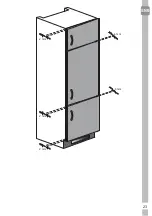
Страница 23: ...23 2 mm 2 mm 2 mm 4 mm 4 mm...

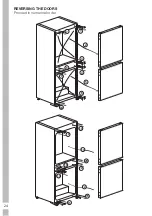
Страница 24: ...REVERSING THE DOORS Proceed in numerical order 24 1 9 1 19 17 20 14 16 13 12 15 11...

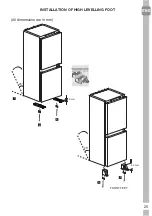
Страница 25: ...All dimensions are in mm 8 INSTALLATION OF HIGH LEVELLING FOOT 25 1 3 3 2 2 45 FRONT FEET 45 8 mm 59 mm...

Страница 26: ...26 4 5 REAR FEET 45...

Страница 27: ...555 mm 27 1836 mm 855 mm 32 mm 71 mm 540 mm 545 mm 91 mm 775 mm 1836 mm 855 mm...

Страница 28: ...allation or use of a product where such installation or use fails to meet the requirements contained in this guarantee or the User Instructions Booklet Repairs to a product operated at any time on com...

Страница 29: ...ll not be liable for delays or if it is unable to carry out a repair because a convenient appointment cannot be arranged Will there be any charge for the repairs It is your responsibility to provide e...

Страница 30: ...od 3 To activate your guarantee you MUST register your appliance within 90 days of the original purchase date by visiting Grundig co uk register 4 Customers will receive a unique reference code as pro...

Страница 31: ...ase have your Model number and Serial number available when you call us as you may be required to input your serial number into your telephone keypad during your call UK Mainland Northern Ireland 0333...

Страница 32: ...www grundig co uk 4578337789_AA Grundig 1 Greenhill Crescent Watford HERTS WD18 8QU Tel 0845 603 1234 Fax 0845 600 4922 www grundig co uk...

Отзывы: