background image

8

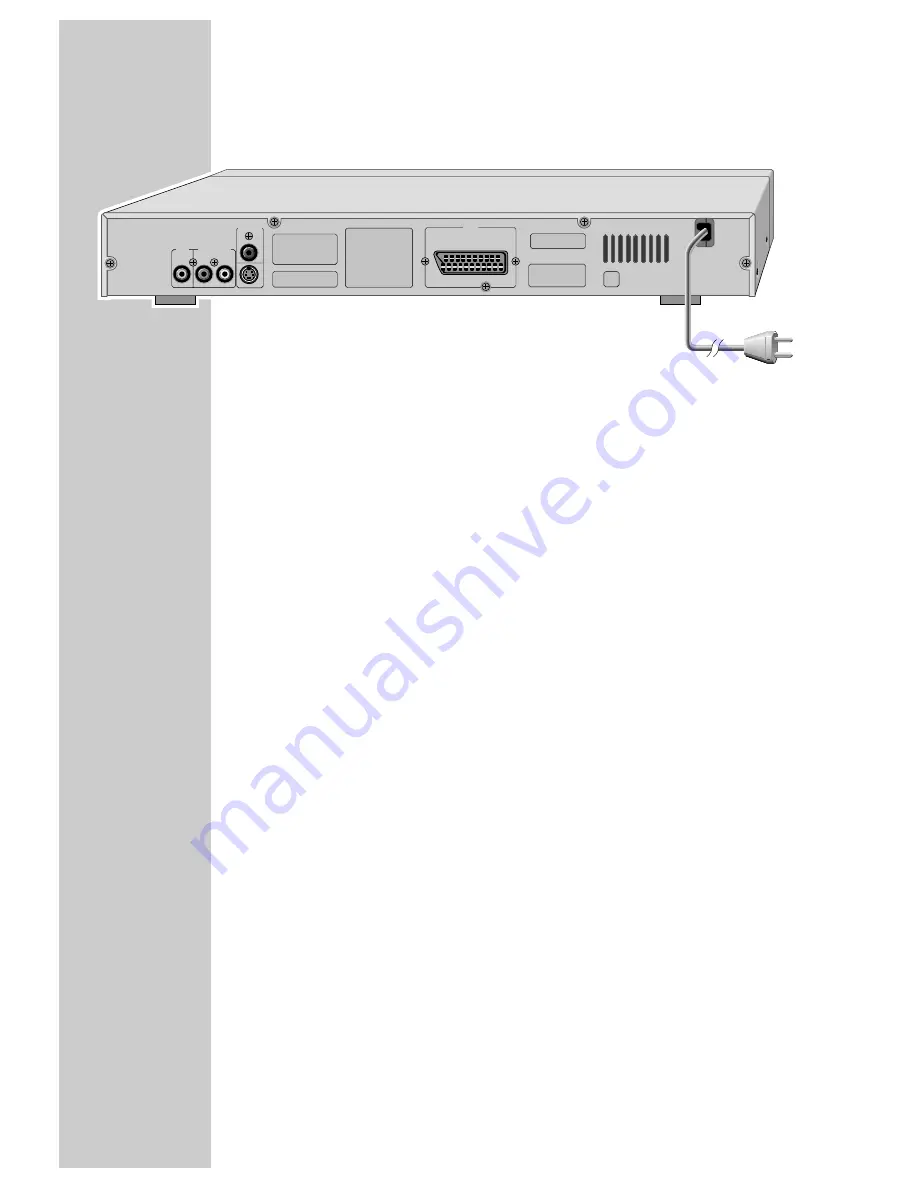
Video

Video output socket (cinch) for connecting a video
recorder.

Down Mix Audio R L

Audio output sockets (cinch) for connecting a television
or video recorder.

Digital Audio Coaxial

Audio output sockets (co-axial) for 

Bitstream/LPCM

PCM/MPEG2/AC3/DTS signals, for connecting to a
digital multi-channel audio/video amplifier.

S-Video

Video output socket (S-Video) for connecting a tele-
vision with an S-VHS socket.

Scart

Video/audio output socket for connecting to a tele-
vision.

220-240V AC

Power cord.

~

50/60 Hz

Caution:

Do not connect any devices while the DVD player is switched on.
Never touch the inside of the sockets and plugs of the connecting cables. 
An electrostatic discharge can damage the DVD player.

The back of the DVD player

OVERVIEW

__________________________________________________________________________________

Video

Down Mix Audio

V

R

L

S-Video

Coaxial

Digital Audio

Bitstream/LPCM

220-240V AC

  ~50/60Hz

SCART

VIDEO / Down Mix Audio / RGB

Содержание GDP 2200

Страница 1: ...DVD PLAYER ǵ DEUTSCH ENGLISH GDP 2200 ...

Страница 2: ...nd PCM 13 Connecting a digital multi channel amplifier 13 Connecting the power cord 13 Inserting batteries in the remote control 14 16 Getting started 14 15 Language settings 16 Adapting the DVD player to the television set 17 23 DVD playback 17 DVD features 17 Special DVD features 18 Preparing and inserting a DVD 18 Basic playback functions 19 Calling up information 19 Selecting titles and chapte...

Страница 3: ...Repeat functions 28 Creating a programme 29 Parental lock 29 Activating the parental lock of the DVD player 29 Changing the code number 30 Audio settings 30 Adapting the digital output of the DVD player to a digital multi channel amplifier 31 33 Information 31 Resetting the DVD player to the original state 31 Technical data 32 General information for laser devices 33 Rectifying minor problems 33 C...

Страница 4: ...explicitly that only operating software authorized by GRUNDIG is permissible for the DVD player You can obtain this software from your dealer or in the near future from the Grundig websites www grundig com or www grundig de Any instance of operating software from a dubious Internet source being loaded to the device will impair functioning and also since it is an unauthorized intervention invalidat...

Страница 5: ...as vases on the DVD player as they may spill liquid thus presenting a safety risk Thunderstorms are a danger to all electrical devices Even if the DVD player is switched off it can be damaged by a lightning strike to the mains Always remove the mains plug during an electrical storm If the DVD player cannot scan DVDs MP3 or audio CDs perfectly use a com mercially available cleaning CD to clean the ...

Страница 6: ... and closes the disc compartment PLAY ı Starts playback PAUSE Freeze frame and frame by frame playback for DVDs Pause for MP3 and audio CDs STOP 7 Press once to pause or resume playback Press twice to stop playback PREV 5 a During playback selects the previous title or section NEXT s 6 During playback selects the next title or section Display C B A OFF ON POWER GDP 2200 DVD CD MP3 PLAYER EJECT PLA...

Страница 7: ...guage The DVD provides a Dolby ProLogic audio signal dts The DVD provides a Dolby dts audio signal LPCM The DVD provides a PCM audio signal Programme function on off Repeat function OFF deactivated C repeating chapter T repeating title Displays for audio CDs CD CD inserted T 01 22 Selected track and available tracks T 00 01 03 Playing time of the track so far Program function on off Repeat functio...

Страница 8: ...g a tele vision with an S VHS socket Scart Video audio output socket for connecting to a tele vision 220 240V AC Power cord 50 60 Hz Caution Do not connect any devices while the DVD player is switched on Never touch the inside of the sockets and plugs of the connecting cables An electrostatic discharge can damage the DVD player The back of the DVD player OVERVIEW___________________________________...

Страница 9: ...a section on the disc 1 0 10 Numeric keys for various inputs CLEAR Deletes inputs SETUP Calls up the DVD player menu a sAS Select various functions in the menus move the picture section in zoom mode ENTER Confirms inputs and selected functions PAL NTSC Selects the PAL or NTSC television format MENU Opens up the disc menu of the DVD during playback and switches the content menu of an MP3 CD file br...

Страница 10: ... Adjusts the volume 3 During playback of DVDs switches to reverse picture search at various speeds 4 During playback of DVDs switches to forward picture search at various speeds PAUSE STEP Freeze frame and frame by frame playback for DVDs pause for MP3 and audio CDs STOP 7 Press once to pause or resume playback press twice to stop playback PLAY 8 Starts playback ǵ PLAY STOP PAUSE STEP VOLUME SLOW ...

Страница 11: ...ed EURO AV Scart cable into the Scart socket on the DVD player and the corresponding socket AV 2 on the television using a cinch cable 1 Plug a standard cinch cable into the Video socket on the DVD player and the corresponding socket VIDEO IN on the television 2 Plug standard cinch AV cables into the Down Mix Audio L R sockets on the DVD player and the corresponding sockets AUDIO IN on the tele vi...

Страница 12: ... a standard cinch cable into the Digital Audio Coaxial socket on the DVD player and into the corresponding socket on the digital multi chan nel amplifier Note The correct digital output format must be set on the DVD player Observe the settings in the chapter entitled Adapting the digital output of the DVD player to a digital multi channel amplifier on page 30 Video Down Mix Audio V R L S Video Coa...

Страница 13: ...rtment by pressing the snap catch and remove the lid 2 When inserting the batteries Micro type e g R 03 or AAA 2 x1 5 V observe the polarity marked on the battery compartment 3 Close the battery compartment Note If the DVD player no longer reacts properly to remote control commands the batteries may be flat Always remove flat batteries No liability is accepted for damage resulting from leaking bat...

Страница 14: ...ENTER to confirm 2 Select the desired dubbing language by pressing S or A and press ENTER to confirm indicates the selected dubbing language 3 Press RETURN to return to the LANGUAGE menu Selecting the language for the subtitles If subtitles are available on the current DVD they are shown in the language you have selected If the language you have selected for the subtitles is not on the DVD the fir...

Страница 15: ...select the language of your choice 1 Select the MENU item using S or A and press ENTER to confirm 2 Select the language for the DVD menus using S or A and press ENTER to confirm indicates the selected DVD menu language 3 Press RETURN to return to the LANGUAGE menu 4 Press SETUP to quit the menu PORTUGUESE ITALIAN RETURN SPANISH 8MENU FRENCH SUBTITLE GERMAN AUDIO 8 ENGLISH OSD LANGUAGE ...

Страница 16: ...t or S VIDEO for the S Video socket using S or A and press ENTER to confirm 4 Press S or A to select ON or OFF and press ENTER to confirm 5 Press SETUP to quit the menu Selecting the screen format of your television set If your television has a 16 9 screen format then select 16 9 For a conventional television with the 4 3 screen format select 4 3 LB or 4 3 PS 1 Press SETUP to open the MAIN MENU 2 ...

Страница 17: ...es Many DVDs have audio tracks recorded in up to eight languages This enables you to select the language you prefer Many DVDs are recorded by the manufacturer with subtitles in several languages You can select subtitle superimposition from up to 32 different languages Since films are released in parts of the world at different times all DVD players world wide are given a regional code Your DVD pla...

Страница 18: ...LOAd followed by the elapsed playing time of the DVD Playback starts automatically Note If the symbol appears on the television screen then the selected function is not possible with this DVD Basic playback functions 1 After the disc compartment closes and the DVD is scanned playback starts automatically Note Depending on the DVD you are using you may have to select a title or chapter from its tab...

Страница 19: ...he available selected chapters There is a cursor by the first digit of the chapter 2 Press 1 0 10 to select the chapter and then press ENTER to confirm or use a to move the cursor to the first digit of the title use 1 0 10 to select the title and press ENTER to confirm Playback starts with the selected title or chapter using the menu of the DVD player The menu of the DVD may contain selection opti...

Страница 20: ...ocates the chapter and starts playback Pausing and resuming playback The playback of a DVD can be interrupted at any point and then resumed from the same place 1 Interrupt playback by pressing STOP 7 only once 2 Resume playback at the same point by pressing PLAY 8 Note After 20 seconds the screen saver starts up automatically To resume playback press PLAY 8 twice Ending playback Playback of the DV...

Страница 21: ...le 1 During playback press SLOW 2 Select the slow motion speed using SLOW 3 Press PLAY 8 to resume normal playback Frame by frame playback 1 During playback press PAUSE STEP repeatedly The picture is advanced step by step to the next freeze frame 2 Press PLAY 8 to resume normal playback Repeating a chapter or a title These functions repeat the current chapter or title 1 During playback press REPEA...

Страница 22: ...evision screen 1 During playback select the camera angle function by pressing ANGLE The display 1 3 shows the camera angle in this case the first of three options 2 Press ANGLE to select a different camera angle Enlarging the picture and moving screen sections Zoom 1 During playback or while playback is paused press ZOOM once or twice Display ZOOM X2 ZOOM X4 a section of the picture is enlarged 2 ...

Страница 23: ...ng playback press SUB TITLE Display e g 3 21 ENGLISH is displayed briefly and the current dubbing language is shown in this case German 2 Keep pressing SUB TITLE to select the language for the subtitles Note To switch off the subtitles keep pressing SUB TITLE until OFF appears in the display DVD PLAYBACK_________________________________________________________________________ 2 21 DEUTSCH 3 21 ENG...

Страница 24: ... player switch it on and select the audio input for the DVD player 4 Press ə 5 Insert the MP3 CD in the disc compartment with the label facing upwards 6 Press ə DVD player display CLOSE LOAd then StOP A menu appears on the screen showing the content of the MP3 CD Note If the symbol appears on the television screen then the selected function is not available Selecting folders and tracks 1 Select th...

Страница 25: ...D player 2 To pause playback press PAUSE STEP 3 Press PLAY 8 to resume playback 4 Press STOP 7 to end playback Ending playback 1 Press STOP 7 to end playback Removing the MP3 CD 1 Press ə on the DVD player to open the disc compartment MP3 CD PLAYBACK _________________________________________________________________ ...

Страница 26: ...and select the audio input for the DVD player 4 Press ə The disc compartment opens DVD player display OPEN 5 Insert the audio CD in the disc compartment with the label facing upwards 6 Press ə DVD player display CLOSE LOAd followed by the elapsed playing time of the CD Playback starts automatically Note If the symbol appears on the television screen then the selected function is not available Audi...

Страница 27: ... also end playback at any time by pressing STOP 7 Repeat functions Repeating a track or an entire CD These functions repeat the track currently playing or the entire CD 1 During playback press REPEAT Display REPEAT TRACK the track currently playing is repeated or During playback press REPEAT twice Display REPEAT DISC the contents of the entire CD are repeated 2 Press REPEAT again to quit the funct...

Страница 28: ... using a s A or S and repeat the entry Playing back a programme 1 Start the programme by pressing PLAY 8 2 Press STOP 7 to end playback Deleting a programme 1 Press STOP 7 to switch off the DVD player and then press ə The disc compartment opens and the programme is deleted CREATING A PROGRAMME____________________________ START ņ PLAY ŀ QUIT ņ STOP ŀ MOVE ņ ń į Ņ ї ŀ CLEAR ņ CLEAR ŀ CHOOSE 01 13 18...

Страница 29: ...unction repeat steps 1 to 6 and press A or S to select LV 8 ADULT If you forget or lose the code number read the section entitled Rectifying minor problems on Page 33 Changing the code number 1 Place any disc in the compartment After playback has begun automatically end playback with STOP 7 2 Press SETUP to open the main menu 3 Select the PREFERENCES item using A or S and press ENTER to confirm 4 ...

Страница 30: ...or A and press ENTER to confirm indicates the selected output format 3 Press RETURN to return to the AUDIO SETUP menu Setting the sampling rate This function is used to limit the sampling rate for the digital multi channel ampli fier 1 Select SAMPLE RATE using S or A and press ENTER to confirm This is set to 48 KHZ at the factory 2 Select the desired value 96 KHZ or 48 KHZ using S or A and press E...

Страница 31: ...en the DVD player The manufacturer will not accept any liability for damage resulting from improper handling Mains voltage 220 240V 50 60 Hz Power consumption Operating approx 25 W Ambient temperature 10 C to 35 C Playback standard PAL 50 Hz 625 lines NTSC 60 Hz 525 lines Playback system DVD Video DVD Rs RWs CD Rs CD RWs audio CDs Laser Semiconductor laser Wavelength 650 nm for DVD Wavelength 780 ...

Страница 32: ...t this may lead to dangerous radiation exposure Manufactured with permission from Dolby Laboratories The Dolby label and the double D logo ij are trademarks of Dolby Laboratories Confidential unpublis hed material 1992 1997 Dolby Laboratories Inc All rights reserved This product contains components which are covered by certain U S patents or for other reasons are considered intellectual property of...

Страница 33: ...erprints on the disc and follow the cleaning instructions on this page The disc cannot be played Check if the disc label is facing upwards Clean the disc Check if the disc is damaged by testing another disc No sound Check the audio connections Try another playback source Distorted sound from the HiFi system Ensure that the audio connections have not been connected to the phono input on the amplifi...

Страница 34: ...Grundig AG Beuthener Str 41 D 90471 Nürnberg http www grundig com 72011 602 5500 ...

Отзывы: