background image

GETTING  STARTED

Unpack the unit.

Read through this owner`s manual before

installation and use.

Load batteries into the remote control unit.

Connect the system, make sure the connec-

tons are secured.

Connect the power plug to the AC power outlet.

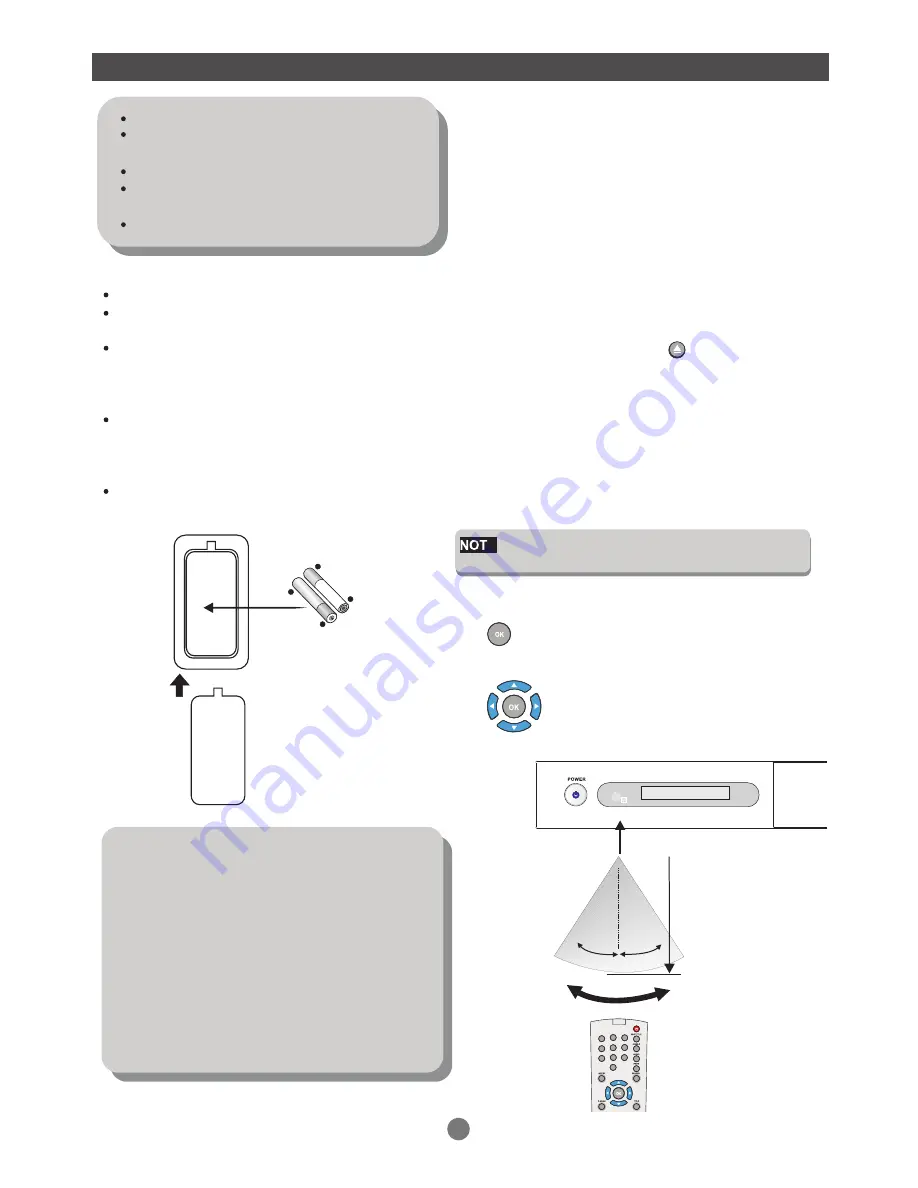
Loading batteries to the remote control

     Remove the battery compartment cover.

     Load two AAA (UM-4 or R03) batteries into the 

     battery compartment.

     Make sure that the batteries have been inserted

     in the correct polarities matching to the symbols

     +,- marked in the battery compartment. Close the

     battery compartment cover.

     When replacing batteries, replace both batteries.

     Do not mix new and used batteries operating

     together, otherwise, the operation lifetime will be

     much shorter than normal.

     Remove the batteries if the unit will not be used 

     for a prolonged period of time.

The remote control  transmits a directional infr-

ared beam. Be sure to aim the remote control 

directly at the infrared sensor of the unit during 

operation.

If the sensor has been covered or there is a lar-

ge object between the remote control and the s-

ensor, the sensor will not respond.

The sensor may not able to receive the remote

signal when it is exposed to direct sunlight or

a strong artificial light (fluorescent or strobe 

light). In this case, change the direction of the

light or reposition the unit to avoid direct lighting.

If a DVD disc menu appears on screen

Press PLAY button on the remote

(or on the unit)to start playing.

Press the  DIRECTION buttons to select 

the desired feature in the menu. And then 

press ENTER  button to confirm a 

selection in the menu.

Switch on the player

Press the main power switch on the DVD player.

 Power on the TV set, and the amplifier if connected.

Set up the system

   Select the corresponding setting of the TV set

   (AV1, AV2, S-Video, DVD etc.).

   For connectional through a RF modulator, select 

   the corresponding channel until the DVD screen 

   appears. 

   If amplifier has been connected, select the corr-

   esponding output mode.

Load a disc

Press OPEN/CLOSE button         on the remote

control ( or front panel ) to eject the disc tray.

Load a disc, label side up, onto the disc tray and

press OPEN/CLOSE button.

Automatic playback

The unit will take a few seconds to load the disc`s

initial data, display the disc type logo on the left

upper corner on screen, and then start playing back

automatically.


E

Normally, when a MP3 disc is loaded, the player

will take longer time to load.

Remote

sensor

Within approximately

6 meter (20 feet)

0

30

0

30

(2xAAA 1.5V batteries)

-

+

-

+

9

1

2

3

4

5

6

7

8

9

0

Содержание GDP 1600P

Страница 1: ...GDP 1600P ENGLISH DVD PLAYER ...

Страница 2: ...FETY INFORMATION INTRODUCTION About DVD About the player Front panel Rear panel Remote control GETTING STARTED Play a disc Problem disc message Power management FUNCTION BUTTONS SETUP MENU GENERAL SETUP AUDIO SETUP DOLBY SETUP VIDEO SETUP TROUBLE SHOOTING SPECIFICATIONS Manufactured under license from Dolby Laboratories Dolby and the double D symbol are trademarks of Dolby Laboratories Confidentia...

Страница 3: ...contact qualified service personnel Accessories Do not place this video product on an unstable cart stand tripod bracket or table The video product may fall causing serious injury to a child or adult as well as serious damage to the video product Use this video product only with a cart stand tripod bracket or table recommend ed by the manufacturer s or sold with the video product Any mounting of t...

Страница 4: ... Screen Format Region code 1 2 3 4 5 6 Region Canada USA Europe incl Poland Romania The Czech republic Japan Middle East incl Saudi Arabia Egypt Iran South Africa East Asia incl Hong Kong Taiwan South Korea South East Asia Australia Caribbean Central South America Mexico New Zealand Africa Former Soviet Union India North Korea Pakistan Turkmenistan China DVD Region Code DVD discs and DVD players a...

Страница 5: ...st forward search Skip forward 7 Fast backward search Skip 1 Power button 7 8 3 VFD Display 6 9 3 9 Eject button Audio L output Audio R output Coaxial Digital Audio output S video output Composite Video Output L S VIDEO COAXIAL R VIDEO Pr Cr Pb Cb Y Y Pb Cb Pr Cr Component Video Output GDP1600P ...

Страница 6: ...ignals The sensor may not be able to receive signals properly when it is exposed to direct sunlight or a strong artificial light such as a fluorescent or strobe lights In this case change the direction of the light or reposition the unit to avoid direct lighting 1 2 3 4 5 6 7 8 9 0 OPEN CLOSE AUDIO ANGLE SUBTITLE SLOW MENU TITLE P SCAN MUTE PROG REPEAT NEXT BUTTON FAST FORWARD PREV BUTTON FAST BAC...

Страница 7: ...g to a TV set that does not have AV input jacks This connection gives the lowest qicture quality Television Set S V i d e o C a b l e Stereo amplifier Digital decofing amplifier DO NOT connect the AC power socket to the wall outlet before the system connection is completed SYSTEM CONNECTION System connection figure 6 ...

Страница 8: ...yer s Y Cb Cr audio L R to the TV s Y Cb Cr audio L R as shown in Diag 2 for Progressive Scan Regarding the VIDEO OUT set up please refer to the SETUP menu on page 17 7 Select ONE of the below connections ONLY Connect the player s audio Left Right Composite Video or S Video outputs to the TV s audio left rightand Video or S Video inputs ...

Страница 9: ...SR SL NOTE SYSTEM CONNECTION Pb Cb Pr Cr Pb Cb Pr Cr 8 ...

Страница 10: ...n it is exposed to direct sunlight or a strong artificial light fluorescent or strobe light In this case change the direction of the light or reposition the unit to avoid direct lighting If a DVD disc menu appears on screen Press PLAY button on the remote or on the unit to start playing Press the DIRECTION buttons to select the desired feature in the menu And then press ENTER button to confirm a s...

Страница 11: ... is equipped with automatic disc quality detection software When the played detects a problem disc or a damaged disc the player may keep playing the disc at lower quality or stop playing depending on the damaged level of the disc Production qualities of DVD discs vary some discs might deviate from the industrial standard Some incorrectly formatted discs may playback on the player However the playb...

Страница 12: ...sc tray Press PAUSE to suspend playback still picture Press STEP on the remote for frame by frame playback Press PLAY to resume normal playback Reverse Fast Forward To turn the unit on when it is in the standby mode press the STANDBY button on the remote control Multi Angle Subtitle Audio While playing back a DVD press ANGLE repeatedly to select the desired camera angle A DVD may contain up to 9 s...

Страница 13: ...rs in CD mode Use the 10 key to input numbers greater than 9 1 2 3 4 5 6 7 8 9 10 Exit Next __ __ __ __ __ __ __ __ __ __ E Some DVDs do not allow program setting Single track discs cannot be programmed 1 2 3 4 5 6 7 8 9 10 Exit Next __ __ __ __ __ __ __ __ __ __ Press PROG toenter the programmenu Make sure theplayer is notin PBC mode Numeric Keypad Direct Program access Enters numbered choices an...

Страница 14: ...d Lang Captions Screen Saver Hdcd Lb On Eng Off On Off General Setup Page General Audio Dolby Video Preference Tv Display Angle Mark Osd Lang Captions Screen Saver Hdcd Lb On Eng Off On Off To access the SETUP menu Press SETUP on the remote The menu opens with the General Setup Page highlighted SETUP 1 2 Press the to select a different menu Audio Setup Video Setup Preference Setup Password Setup o...

Страница 15: ...display below General Audio Dolby Video Preference General Audio Dolby Video Preference General Audio Dolby Video Preference General Audio Dolby Video Preference Tv Display Angle Mark Osd Lang Captions Screen Saver Hdcd Lb On Eng Off On Off Angle mark When a DVD providing multiple angles is used the user may select a particular shooting angle Follow the operating instructions stated in DVD menu se...

Страница 16: ...not to disturb the neighbour This settingcan dynamically lower the volume and still keep theoriginal tone quality This is the range measured indecibels between the loudest and the quietest soundregisters in a soundtrack Spdif Off Spdif Raw Spdif Pcm Speaker Setup Page Spdif Output Follow the operating instructions stated in DVD menu setup to select the desired option in the following figure VIDEO ...

Страница 17: ...tructions stated in DVD menu setup to select the desired option in the following figure TV Type Audio Subtitle Disc Menu Parental Password Default Pal Eng Eng Eng 8 General Audio Dolby Video Preference Audio English French Spanish Chinese Japanese Korean Russion Thai Preference Page Sets the default audio language when a DVD is played if the DVD supports the selected language Pal Eng Eng Eng 8 Gen...

Страница 18: ...to select the desired option in the following figure Preference Page Preference Page There are 8 levels of Parental Control as follows 1 KID SAF 2 G 3 PG 4 PG13 5 PGR 6 R 7 Nc17 8 ADULT Level one opens discs to people of all ages Level eight is suitable only for adults If you want to change the Parental Control setting enter the level number and then the four digit pass code The default code is 88...

Страница 19: ...t power on for one or two hours No disc load a disc Disc has been loaded upside down Place the disc with the label side up Disc s region code does not match to the player Disc s rating level is higher than the player s rating level setting Disc is not correct type for the player Disc is damaged or dirty clean the disc or try another disc Does not play Check if the TV set has power on use TV remote...

Страница 20: ...MP3 disc no sound or noisy Remote control does not function When PC program files or other data files are mixed with MP3 files in the same disc the player may play the non MP3 files with noise or no sound Check the disc if all the files on disc are MP3 files Skip the file try other files Remove the obstacles between the remote control and the player Point the remote control towards the remote sens...

Страница 21: ...NS Body size 430x230x50mm Packing size 466x94x333mm Net weight 2 0kg 110 240V 50 60Hz Digital audio coaxial optical output X1 20 15W PO BOX 6287 SILVERWATER NSW 1811 Grundig Helpline 1800 509 394 www grundig net au ...

Отзывы: