


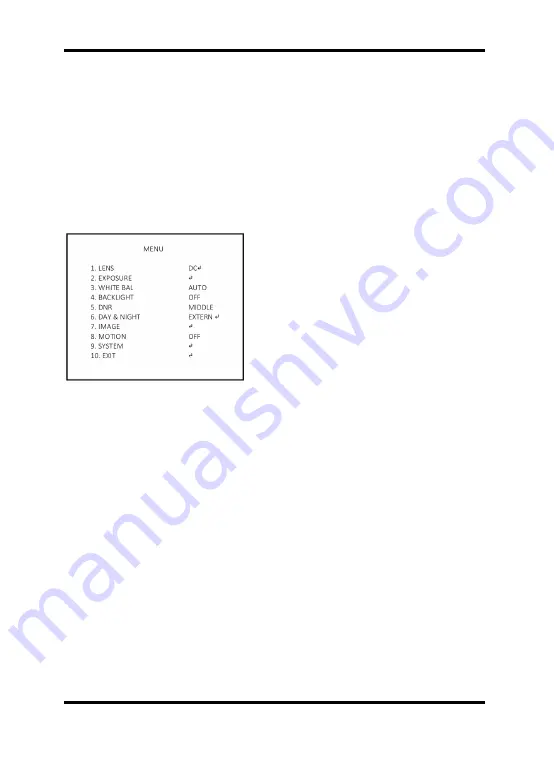
6. OSD Menu
1. Press the SET UP stick to access the menu mode.
2. Select the desired feature by using UP/DOWN.
3. If there is a setting for this feature on the right side of the screen, use LEFT/RIGHT to
switch between the settings and confirm your choice by pressing the stick. If an ENTER
arrow (
↵
) is displayed, press the stick to access the according submenu.
4. In the sub-menus, please press with the stick on RETURN to return to the previous
menu.
5. To exit the menu, please press the stick on EXIT in the main menu.
When you press the SET UP stick for the first time, the MENU page will be displayed on
the monitor.
LENS: You can choose between Indoor or
Outdoor mode.
EXPOSURE: This function is used to
control the light exposure.
WHITE BAL: You can control the white
balance under different lighting conditions
here.
BACKLIGHT: You can control the backlight
compensation here.
DNR: This noise reduction function is to decrease the noise which can be generated
under low light conditions.
DAY&NIGHT: This function is used to improve the camera's sensitivity at night or when
the brightness level of the ambient environment is low.
IMAGE: You can set different picture related settings like mirroring, sharpness, hue and
gain.
MOTION: This function is used to detect moving objects in the monitoring area.
SYSTEM: Configures camera related functions and data.
EXIT: Here you can exit the menu.
6.1. LENS
Here you can configure the lens setting.
LENS [DC, MANUAL] :
If you are using a lens with manual Iris, set this item to MANUAL. If you are using a DC
controlled lens, set it to DC.
5
English
Содержание GCT-K2326D
Страница 2: ......
Страница 5: ...3 1 Zoom Focus Adjustment 3 2 3 Axis Gimbal Adjustment 3 English...
Страница 17: ...Dimensions 15 English...


