


14
En
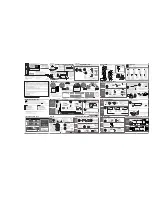
comment controls/Keys and connections
No Description
Meaning
1
Microphone hole
internal microphone
2
Keypad
Record control and play-back control of the cur
-
rent dictation (see Fig. 4, 23-26)
3
Display buttons
Labeling in the display
4
Up-down buttons
Navigation
5
On/Off button
Digta On- and Off switching
6
Battery compartment
For rechargeable 962- or AAA-batteries
7
Unlocking button
Unlocking button for the battery compartment
8
Menu button
Digta menu access
9
OK button
Key button
End recording of dictation and play it back (only
if activated in the Digta Configurator)
10
New button
Create a new dictation
End recording and create a new dictation
11
Left-right buttons
Navigation
12
Display
Operational status indicator and indicator of
the adjustable menu functions (for details see
Fig. 5)
13
Lower function button
• Press button briefly: Help for the current On-/
Off-setting of functions
• Long pressing: Keylock On/Off switch
No Description
Meaning
14
Upper function button
• Press button briefly: Display illumination On-/
Off
• Press button long: EOL* (if activated)
15
Battery compartment
Battery compartment for batteries or rechar
-
geable batteries*
16
Memory card*
Memory medium for recorded dictations
17
Recording LED
Multicolored LED lights up during recording,
blinks regularly during recording pause
• red = overwrite/append
• orange = insert
• green = play-back in USB-audio mode
• yellow = USB-connection/data transmission
18
Microphone socket
Connection for external extra microphone
19
Card slot
For memory card
20
Earphone jack
Connection for earphone or headphone
21
Contact strip
Docking station* connection
22
USB-connection
Interface for PC and Grundig power supply
23
g
REC button
Control of the current dictation’s recording:
Start recording, record pause and continue the
recording
Only for devices with speech recognition*:
• Keep pressing: Activates speech recognition for
input of numbers and letters