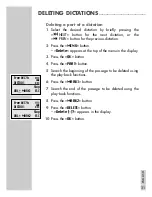
Grundig Digta 3010 Скачать руководство пользователя страница 30

30

Version

Using the »

Version

« function, you can display the version of

the machine’s software.
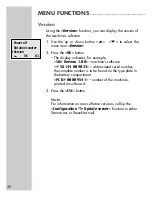
1

Use the up or down button »

«  »

« to select the

menu item »

Version

«. 

2

Press the »

OK

« button.

– The display indicates, for example,

»

SW-Version  1.00

« – machine’s software.

»

# 58144 009033

« – abbreviated serial number,

the complete number is to be found on the type plate in
the battery compartment.
»

PCB# 00009541

« – number of the machine’s 

printed circuit board.

3

Press the »

ESC

« button.

Note

For information on new software versions, call up the
»

Configuration

=

>

Update server

« function in either

Steno.trans or StenoNet.mail.

MENU FUNCTIONS

________________________________

Power off
Dictation counter

Ł

Version

Ļļ

OK

ESC

Содержание Digta 3010

Страница 1: ...Digta 3010 ENGLISH...

Страница 2: ...5 Switching On 15 Switching on and off 15 Switching on the first time 15 Subsequent switching on 15 Switching off 15 Safety lock 16 Recording 16 Dictation 16 New dictation 17 Recording pause 17 Ending...

Страница 3: ...enoNet mail 33 System requirements for Steno trans and Steno mail 34 Connectiong the dictation machine with the PC and dis conneting it 35 Firmware update 35 Carrying out a firmware update CONTENTS___...

Страница 4: ...ke absolutely sure that the machine is protected against damp ness rain water splashes Do not place the dictation machine close to the heating or in direct sunshine You may not open the dictation mach...

Страница 5: ...microphone Commercially available microphones with 3 5 mm mono jack plug may be used The built in microphone is automatically disconnected External headphone any commercial mono or stereo earphone or...

Страница 6: ...tal Card are not exposed to strong mechanical stress The cards are insensitive to dirt and moisture but must nevertheless be introduced into the machine in dry and proper condition New MultiMediaCard...

Страница 7: ...microphone Recording button Safety lock Button for new dictaton back escape Microphone Recording indicator Display Function buttons Lettering in bottom display row Up down button Menu OK button USB in...

Страница 8: ...ELEMENTS_______________________ HOLD STOP START F FWD PREV REW NEXT 0 35 A 3 V EAR EAR 3 V 0 35 A Power supply socket 3 V 0 35 A Headphone socket imped 32 min Card ejection slide switch Battery compa...

Страница 9: ...ory Dictation name Current function Button lettering Symbol for the bat tery rechargeable battery charge state Indication for voice activation and micro phone sensitivity Dictation position total leng...

Страница 10: ...n If the dictation machine has been switched on and is connected to a charging unit the unit will supply the dictation machine with power Inserted batteries or rechargeable batteries will be neither u...

Страница 11: ...nserting rechargeable batteries Only Grundig rechargeable batteries 462 may be charged inside the dictation machine using power supply charging units 472 473 1 Switch off the dictation machine 2 Open...

Страница 12: ...le that part or all of the dictation could be lost if original Grundig rechargeable batteries are not used Rechargeable batteries from other manufacturers are identified by the dictation machine as no...

Страница 13: ...During recording mode operation will automatically switch over to play mode The rechargeable battery symbol will flash on the dis play You will still be able to dictate for a few minutes before the di...

Страница 14: ...appears after a non formatted MultiMediaCard is inserted confirm with the OK button The Format card and Card formatted are confir med using the OK button as well The MultiMediaCard may not be formatt...

Страница 15: ...machine is ready for use Subsequent switching on 1 Press the ON OFF button until the display is activated Switching off 1 Briefly press the ON OFF button Safety lock 1 Push the slide switch up Note If...

Страница 16: ...Record Stop recording pause appears in the display Note If Typist Dictation type Group or No Ref have been activated in the menu the respective selection lists will then appear see chapter MENU FUNCT...

Страница 17: ...and minutes 1 Select the desired dictation by briefly pressing the NEXT button for the next dictation or the PREV button for the previous dictation 2 During play back press the Start Stop button STOP...

Страница 18: ...ition 1 During play back press the Start Stop button STOP 2 Press the red recording button Record Stop appears in the display 3 Press the INS button Insert Stop appears in the display 4 Press the Star...

Страница 19: ...hine on again with the ON OFF button Fast skip to the beginning or the end of the dictation 1 Start play back by pressing the Start Stop button START 2 Briefly press the right function button to skip...

Страница 20: ...te several dictations connect the dictation machine to your PC then use the Steno trans or StenoNet mail programme to delete the dictations After deleting all dictations the administration data remain...

Страница 21: ...top of the menu in the display 3 Press the OK button 4 Press the PART button 5 Search the beginning of the passage to be deleted using the play back functions 6 Press the MARK1 button 7 Search the end...

Страница 22: ...ent of the microphone sensitivity PC microphone Dictation machine connected as microphone without recording to a PC sound card This function is used for enrolment and direct dictation using a voice re...

Страница 23: ...tton to select the Typist menu item 2 Press the OK button 3 Use the up or down button to select TR on TR off or TR auto If TR on is chosen a selection will be offered for each new dictation TR auto me...

Страница 24: ...n of formats will be offe red for each new dictation DT auto means that each new dictation will be of the same type 4 Press the OK button Notes If you have a new dictation or if you have selected the...

Страница 25: ...be selected for each new dictation GR auto means that each new dictation has the same group 4 Press the OK button Notes If you have a new dictation or if you have selected the GR auto function use th...

Страница 26: ...nction use the up or down button to select your number reference from the list 6 Confirm the entry by pressing the OK button 7 Repeat the entry for other letters Notes Digits and special characters ar...

Страница 27: ...Press the OK button Microphone sensitivity If the Mic sensitivity function is switched to conference the microphone will record already at low voice levels e g when it is placed on the conference tab...

Страница 28: ...menu item PC microphone 2 Press the OK button Activate PC microphone appears in the display 3 Press the OK button PC microphone mode appears in the display 4 Use the VOL _ button to adjust the record...

Страница 29: ...nction you can reset the dictation counter The dictation counter is able to count till 999 You should not reset the counter too often to avoid conflicts with dictations having the same name and being...

Страница 30: ...software 58144 009033 abbreviated serial number the complete number is to be found on the type plate in the battery compartment PCB 00009541 number of the machine s printed circuit board 3 Press the E...

Страница 31: ...Reset all Typist automatic Dictation type automatic Group automatic No Ref automatic Voice activation off Microphone sensitivity dictation Power off after 10 minutes Dictation counter DICT001 Individ...

Страница 32: ...the entire memory space is available for recording dictations Note It is not allowed to format the MultiMediaCard as remove able disk using the format function of a PC Language Using the Language func...

Страница 33: ...tations for example with the dictation type deadline and priority in order to perfectly organize your transcription service If all dictations have the same priority you simply plug the USB cable into...

Страница 34: ...the USB interface only via the task bar as otherwise the data transfer may be incomplete You should not transfer dictations when the batteries are weak as weak batteries distroy the dictation Note St...

Страница 35: ...you may also use a card reader to copy the firmware onto the MultiMediaCard Make certain that the MultiMediaCard has already been formatted in the dictation machine Firmware updates should only be car...

Страница 36: ...ender the dictation machine inoperative 7 Disconnect the USB cable from the dictation machine 8 Confirm LOAD UPDATE with YES 9 Wait for the loading process to be completed and confirm the dictation ma...

Отзывы: