background image


17 


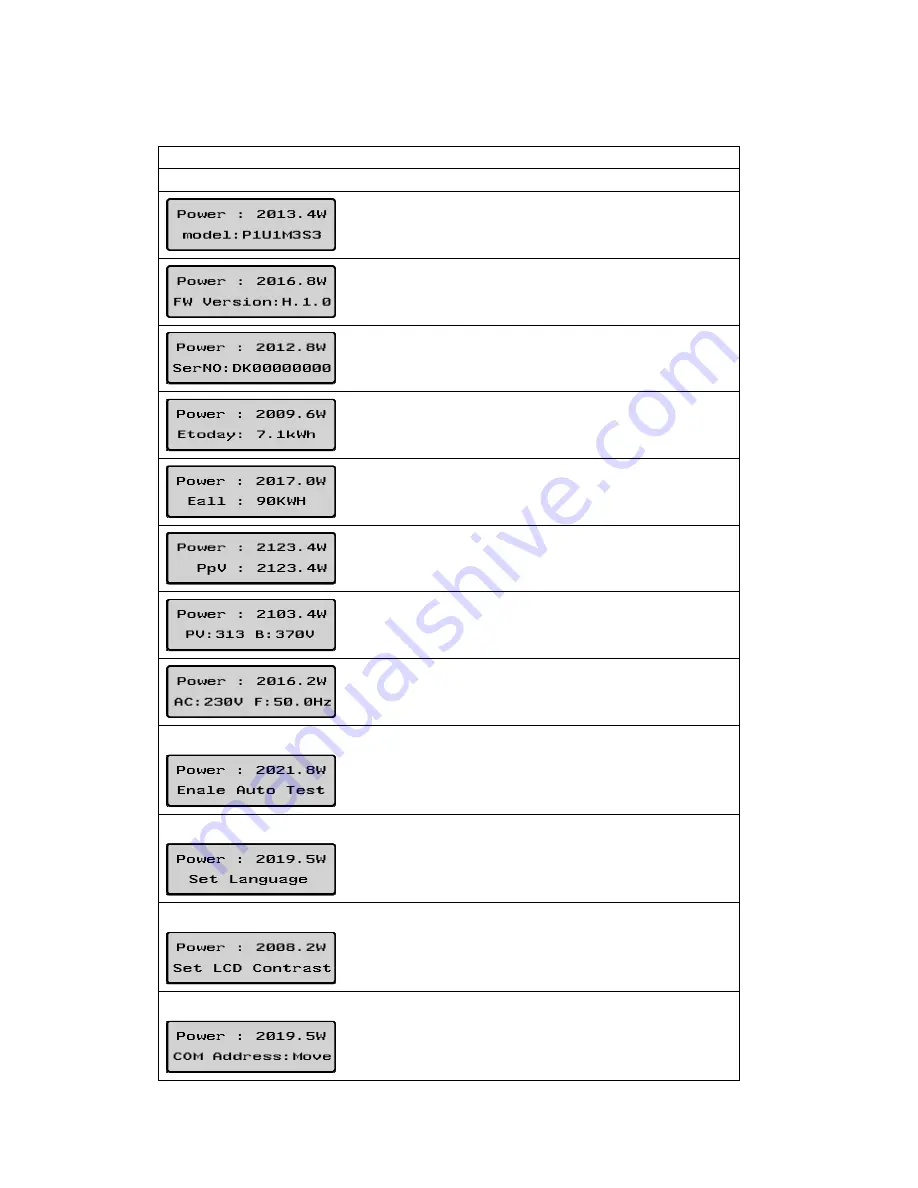
The Second line can change by knock on     

The Second Line Of LCD 
CYCLE DISPLAY 

DISPLAY TIME/S 

REMARK 


The inverter model 


The software version 


The Serial Number 


The energy today 


The energy all 


PV input watt 


The PV and Bus Voltage 


The grid system 

Enable auto test 


The enable auto test 

Set Language 


Set Language 

Set contrast 


Set LCD Contrast 

Set COM    Address 


Set Communications Address 

Содержание 2000HF

Страница 1: ...1 Instruction Manual Growatt 2000 HF Growatt 2500 HF Growatt 3000 HF...

Страница 2: ...ny indirect incidental or consequential damages under any circumstances The exclusion of implied warranties may not apply in all cases under some statutes and thus the above exclusion may not apply Sp...

Страница 3: ...gram with Inverter Electrical connection 13 5 2 Safety 14 5 3 Connecting to the grid AC utility 14 5 4 Connect to PV Panel DC input 15 5 5 Commissioning Checking 15 6 DISPLAY AND MESSAGES 16 6 1 LCD d...

Страница 4: ...rmation concerning the connected equipment is available from the manufacturer of the equipment 1 2 Target Group This manual is for qualified personnel Qualified personnel have received training and ha...

Страница 5: ...erview House grid Energy flows into the house grid The consumers connected for example household devices or lighting consume the energy The energy left over is fed into the public grid When the Growat...

Страница 6: ...6 Front View Bottom View...

Страница 7: ...ter by the type label It is on the left side of the enclosure The type of product Type Model Device specific characteristics Certificates and approvals 3 UNPACKING AND INSPECTION After opening the pac...

Страница 8: ...s 4 5 Mounting frame screws sleeve 6 6 AC socket 1 7 AC socket assembly screws 4 8 Installation operation manual 1 4 INSTALLATION 4 1 Safety instructions Do not remove the casing Inverter contains no...

Страница 9: ...AC source or generator Connecting Inverter to external devices could result in serious damage to your equipment Carefully remove the unit from its packaging and inspect for external damage If you fin...

Страница 10: ...3 Fixed the mounting on the wall Inverter requires adequate cooling space Allow at least 20cm space above and below the inverter Using the mounting frame as a template drill 4 holes as illustrated in...

Страница 11: ...11 Fix the mounting frame as the figure shows Do not make the screws to be flush to the wall Instead leave 2 to 4mm exposed 4 4 Fixed the inverter on the wall Hang the inverter on the mounting frame...

Страница 12: ...Inverter and ensure it fits on to the bracket Check the secure mounting of the PV Inverter by trying to raise it from the bottom The PV Inverter should remain firmly attached Select the installation...

Страница 13: ...onverts DC Direct Current power from PV panel s to AC Alternating Current power Because Inverter is grid connected it controls the current amplitude according to the PV Panel power supply Inverter alw...

Страница 14: ...ute the inverters between the phases in order to reduce the power unbalances between the phases Always refer to the local standards 5 3 2 Connection of the AC wiring AC output A Measure grid utility v...

Страница 15: ...r s maximum DC current Use MC Muli contact connectors for PV array terminals Connect the positive and negative terminals from the PV panel to positive terminals and negative terminals on the PV Invert...

Страница 16: ...matically turns off after 30 seconds The display on the inverter can be control by Knock on the front of it The first line will show some status of the inverter there are 5 status listed in below tabl...

Страница 17: ...The inverter model 2 The software version 2 The Serial Number 4 The energy today 4 The energy all 4 PV input watt 4 The PV and Bus Voltage 4 The grid system Enable auto test 4 The enable auto test Se...

Страница 18: ...ait until the display become dark Setting luminance of the display Knock to make the display bright knock to set LCD contrast double knock to enter LCD contrast 2 knock to select the luminance you nee...

Страница 19: ...be red 7 3 Shutdown mode During periods of little or no sunlight Inverter automatically stops running In this mode Inverter does not take any power from the grid The display and LED s on the front pa...

Страница 20: ...ction No Utility No Grid Connect GFDI Fault Leakage current too large PV Voltage High PV panel Voltage too high AC V Outrange Grid Voltage out of range AC F Outrange Grid Frequency out of range Invert...

Страница 21: ...ide of the main interface is the detailed information of inverter 9 3 Detailed information Detailed setting method and other functions refer to Shine NET Manual in the CD 10 TROUBLE SHOOTING In most s...

Страница 22: ...HF Growatt 2000 HF and Growatt 3000 HF 2 If PV voltage is less than 600Vdc for Growatt 1500 HF Growatt 2000 HF and Growatt 3000 HF and the problem still occurs please call local service Consistent Fau...

Страница 23: ...9 0 99 THDI 3 3 3 AC connection Single phase Single phase Single phase Efficiency Max efficiency 96 96 96 Euro eta 95 5 95 5 95 5 MPPT efficiency 99 5 99 5 99 5 Protection devices DC reverse polarity...

Страница 24: ...free from defects and or failure specified for a period not exceeding five 5 years from the date of sale as shown in the Proof of Purchase to the Original purchaser The warranties described in these...

Страница 25: ...ation or extreme weather conditions or other circumstances not reasonably attributable to Growatt The warranty shall also cease to apply if the product cannot be correctly identified as the product of...

Страница 26: ...related logistical and process costs incurred by all parties in relation to this warranty claim 16 CONTACT If you have technical problems concerning our products contact your installer or Growatt Duri...

Отзывы: