background image

-8-

H2933/H2934/G0447/G0581 Wide Belt Sander

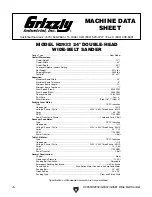
Design Type ........................................................................................................................Floor Model
Overall Dimensions: 
 

Overall 

Height W/Dust Ports .................................................................................................... 79

"


Overall 

Height W/O Dust Ports .................................................................................................73"   


Overall Width ..........................................................................................................................53

1

2

"


Overall 

Depth .........................................................................................................................59

1

2


Conveyor Height at Lowest Setting ...........................................................................................32''


Net Weight

 .......................................................................................................................

3197 lbs.


Shipping Weight

 ..............................................................................................................

3637 lbs.


Footprint .......................................................................................................................... 52" x 31"

Capacities:


Maximum Board Width ...........................................................................................................36

1

2

"


Maximum Board Thickness .........................................................................................................6"


Minimum Board Length .............................................................................................................11" 


Minimum Board Thickness .........................................................................................................

1

4

"


Drum Speed (Front) ...................................................................................................... 3543 FPM


Drum Speed (Rear) ....................................................................................................... 2554 FPM


Conveyor Speed ........................................................................................................... 17-63 FPM


Dust Ports ............................................................................................................................ Six, 4''


Drum Diamiter ..........................................................................................  (Front 7.87"), (Rear 4")

Sanding Drum Motor:
 

Type ......................................................................................................................TEFC Induction


Horsepower ..........................................................................................................................20 HP


Voltage / Phase / Cycle ........................................................... 220V / 440V Three-Phase ⁄ 

60 HZ


Amps ................................................................................................................................ 50 / 25A


RPM ..............................................................................................................................1725 RPM 


Power Transfer to Drums ........................................................................................... Triple V-Belt 

Conveyor Feed Motor:
 

Type ......................................................................................................................TEFC Induction


Horsepower ............................................................................................................................1 HP


Voltage / Phase / Cycle ........................................................... 220V / 440V Three-Phase ⁄ 60 HZ 


Amps .............................................................................................................................. 3.4 / 1.7A


RPM ..............................................................................................................................1725 RPM


Power Transfer ........................................................................................... Twin and Triple V-Belt

Table Lift Motor:
 

Type ......................................................................................................................TEFC Induction


Horsepower ......................................................................................................................... 1⁄4 HP


Voltage / Phase / Cycle ........................................................... 220V / 440V Three-Phase ⁄ 60 HZ 


Amps .............................................................................................................................. 1.2 / 0.6A


RPM ..............................................................................................................................1725 RPM


Power Transfer ..................................................................................................................... V-Belt

General Construction:


Cabinet ...................................................................................................................................Steel


Operating Air Pressure ........................................................................................................ 75 PSI


Sanding Belt Oscillation ................................................................................................ Adjustable


Emergency Sanding Belt Brake .............................................................................. Air Disc Brake


Control Panel ................................................. Push Button Motor Controls, and Amp Load Meter


Sanding Belt .................................................................................................................... 37" x 75"


Graphite Size ............................................................................................................... 37.8" x 3.5"


Sanding Type

 ..............................................................................................................

Platen Style

Specifications, while deemed accurate, are not guaranteed.

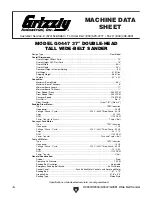
MODEL G0447 37" DOUBLE-HEAD 

TALL WIDE-BELT SANDER

Customer Service #: (570) 546-9663 • To Order Call: (800) 523-4777 • Fax #: (800) 438-5901

MACHINE DATA 

SHEET

Machine Data Sheet (G0447)

Содержание G0447

Страница 1: ... assembly with an air cylinder Note At the top of each page is a note that indicates which page it replaces in the original manual On the parts list the new parts are designated with a V2 Aside from this information all other content in the owner s manual applies and MUST be read and under stood for your own safety IMPORTANT Keep this update with the owner s manual for future refer ence For questi...

Страница 2: ...G0447 G0581 112 112 127 111 110V2 104 116V2 124 102 129 126A 105 106 109 115 114 134V2 139V2 H2933 440V Conversion Kit 135 113V2 111V2 110V2 104 121 120 119 116V2 123 117 118V2 109 115 107 128 130 108 131 133 103 101 H2933 H2934 G0447 G0581 118V2 118V2 112V3 115 1 115 1 132 132 132 122 122 115 139 115 139 139 115 114 134 139 H2934 G0447 440V Conversion Kit 135 134 139 G0581 440V Conversion Kit 135...

Страница 3: ...29338110V2 TRANSFORMER V2 03 10 127V2 P05818127V2 START DELAY LSD V2 03 10 G0581 111 PH29348111 CONTACTOR SCHN LC1D38 220V G0447 G0581 H2934 128 PH29338128 START SWITCH 111V2 PH29338111V2 CONTACTOR SCHN LC1D40A 220V V2 04 13 H2933 129 PH29338129 STOP SWITCH 112 PH29348112 OL RELAY SCHN LR3D32 23 32A G0447 H2934 130 PH29338130 POWER INDICATION LIGHT 112 P05818112 OL RELAY SCHN LR3D35 30 38A G0581 1...

Страница 4: ...ke workshop kid proof DANGEROUS ENVIRONMENTS Do not use machinery in areas that are wet cluttered or have poor lighting Operating machinery in these areas greatly increases the risk of accidents and injury MENTAL ALERTNESS REQUIRED Full mental alertness is required for safe operation of machin ery Never operate under the influence of drugs or alcohol when tired or when distracted For Your Own Safe...

Страница 5: ... moving parts or flying debris Make sure they are properly installed undamaged and working correctly BEFORE operating machine FORCING MACHINERY Do not force machine It will do the job safer and better at the rate for which it was designed NEVER STAND ON MACHINE Serious injury may occur if machine is tipped or if the cutting tool is unintentionally contacted STABLE MACHINE Unexpected movement dur i...

Страница 6: ...tely heed hazards and warnings below FEEDING WORKPIECE DO NOT place fingers under bottom of workpiece while feeding it into sander Fingers can become pinched between workpiece and conveyor ENTANGLEMENT HAZARDS DO NOT wear loose clothing gloves or jewelry and tie back long hair Never reach inside operating machine or try clearing jammed workpiece Keep all guards in place and secure and all doors cl...

Страница 7: ...d output power On machines with multiple motors this is the amperage drawn by the largest motor or sum of all motors and electrical devices that might operate at one time during normal operations H2933 Full Load Current Rating at 220V 40 6A Full Load Current Rating at 440V 20 3A H2934 G0447 Full Load Current Rating at 220V 54 6A Full Load Current Rating at 440V 27 3A G0581 Full Load Current Rating...

Страница 8: ...operate on a 440V power supply refer to Voltage Conversion instructions that has a verified ground and meets the following requirements Nominal Voltage 440V 480V Cycle 60 Hz Phase 3 Phase Power Supply Circuit 50 Amps G0581 Circuit Requirements For 220V This machine is prewired to operate on a 220V power supply circuit that has a verified ground and meets the following requirements Nominal Voltage ...

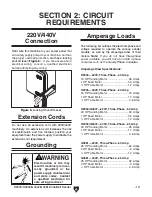
Страница 9: ...all applicable electrical codes and ordinances Extension Cords Since this machine must be permanently con nected to the power supply an extension cord cannot be used Serious injury could occur if you connect the machine to power before completing the setup process DO NOT connect to power until instructed later in this manual Grounding Instructions In the event of a malfunction or breakdown groundi...

Страница 10: ... at 570 546 9663 Note When using a phase converter the power from the manufactured power leg sometimes called the wild wire can fluctuate Connect the manufactured power leg to the S terminal to pre vent damage to the transformer The wire from the S terminal can handle some fluctuation because it goes directly to the motor The power going to the R and T terminals goes to the transformer and must be...

Страница 11: ... 11 10 9 8 6 5 5 3 3 2 15 7 16 12V OV B X1 X2 10 14 13 21 22 X1 X2 14 13 14 18 1 2 4 3 2 3 14 15 11 10 9 8 7 6 5 4 3 2 1 12 13 14 15 16 17 18 19 20 21 22 7 CONVEYOR BELT START SWITCH POWER LAMP EMERGENCY STOP BUTTON CONVEYOR BELT STOP SWITCH 1 3 2 4 1 2 3 4 5 3 5 3 BELT TRACKING LIMIT SWITCH BELT TRACKING LIMIT SWITCH TABLE UP DOWN SAFETY LIMIT SWITCH TABLE UP DOWN SAFETY LIMIT SWITCH OUT TO SANDI...

Страница 12: ... 15 7 4 12V OV B X1 X2 9 14 13 21 22 X1 X2 14 13 13 20 21 5 1 2 4 3 8 3 2 3 14 15 11 10 9 8 7 6 5 4 3 2 1 12 13 14 15 16 17 18 19 20 21 22 7 1 2 4 3 8 3 CONVEYOR BELT START SWITCH POWER LAMP EMERGENCY STOP BUTTON CONVEYOR BELT STOP SWITCH EMERGENCY STOP PUSH PANEL LIMIT SWITCH 1 3 2 4 1 2 3 4 8 3 8 3 BELT TENSION LIMIT SWITCH BELT TRACKING LIMIT SWITCH BELT TRACKING LIMIT SWITCH TABLE UP DOWN SAFE...

Страница 13: ...H2933 H2934 G0447 G0581 Update Mfd Since 1 14 13 Electrical Box Wiring Diagram H2933 Grnd Replaces Page 46 ...

Страница 14: ... 14 H2933 H2934 G0447 G0581 Update Mfd Since 1 14 Electrical Box Wiring Diagram G0447 H2934 Grnd Replaces Page 48 ...

Страница 15: ...H2933 H2934 G0447 G0581 Update Mfd Since 1 14 15 Electrical Box Wiring Diagram G0581 Grnd Replaces Page 50 ...

Страница 16: ... 16 H2933 H2934 G0447 G0581 Update Mfd Since 1 14 General Wiring Diagram H2933 Replaces Page 52 ...

Страница 17: ...H2933 H2934 G0447 G0581 Update Mfd Since 1 14 17 General Wiring Diagram G0477 H2934 Replaces Page 53 ...

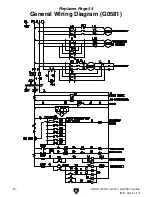
Страница 18: ... 18 H2933 H2934 G0447 G0581 Update Mfd Since 1 14 General Wiring Diagram G0581 Replaces Page 54 ...

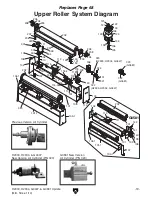
Страница 19: ...304 301 302 305 105 104 108 304 303 111 320 206 207 203 204 205 208 101 1 323 104 1 103 1 203 202 202 113 103 205 208 130 131 132 128 201 129 118 115 201 111 113 101 112 104 101 1 137 103 139 140 141 142 G0581 104 1 138 103 1 202 324 131 321 323 H2933 H2934 G0447 323 G0581 322 G0581 306 322 H2933 H2934 G0447 Previous Version Air Cylinder H2933 H2934 G0447 New Version Air Cylinder P N 323 G0581 New...

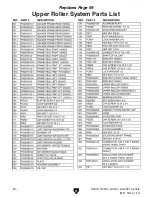
Страница 20: ...G0581 202 PH29336202 UPPER ROLLER H2934 G0447 104 1 PH29336104 1 FRAME SEAL FRNT LFT H2933 202 PH29346202 UPPER ROLLER G0581 104 1 PH29346104 1 FRAME SEAL FRNT LFT H2934 203 PH29336203 UPPER ROLLER BRACKET 104 1 P04476104 1 FRAME SEAL FRNT LFT G0447 204 P99625204 BEARING UCC205 104 1 P05816104 1 FRAME SEAL FRNT LFT G0581 205 PSS02M SET SCREW M6 1 X 6 105 PFH03 FLAT HD SCR 1 4 20 X 1 2 206 PSB33 CA...

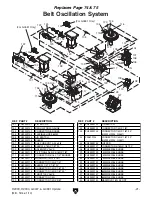
Страница 21: ...BOW 5 16N X 1 8T 90º 127 PH29339127 CONNECTOR 5 16N X 1 8T 90º 109 PH29339109 SOLENOID VALVE 128 PH29339128 8MM FLEXIBLE HOSE 110 PH29339110 T FITTING 5 16N X 5 16N X 1 8T 129 PH29339129 8MM FLEXIBLE HOSE 111 PH29339111 CONNECTOR 5 16 X 1 4T BRONZE 131 PH29339131 6MM FLEXIBLE HOSE 112 PH29339112 MANIFOLD 1 4N 2 PORT 132 PH29339132 6MM FLEXIBLE HOSE 113 PH29339113 CONNECTOR 1 4N X 1 4T 133 PH293391...

Страница 22: ......

Страница 23: ...C REVISED JUNE 2006 WARNING NO PORTION OF THIS MANUAL MAY BE REPRODUCED IN ANY SHAPE OR FORM WITHOUT THE WRITTEN APPROVAL OF GRIZZLY INDUSTRIAL INC CR7108 PRINTED IN TAIWAN MODEL H2933 H2934 G0447 G0581 DOUBLE HEAD WIDE BELT SANDER INSTRUCTION MANUAL ...

Страница 24: ......

Страница 25: ...ion Cords 13 Grounding 13 Amperage Loads 13 440V Connection 14 SECTION 3 SET UP 15 Unpacking 15 Inventory 15 Hardware Chart 16 Clean Up 17 Site Considerations 17 Beginning Assembly 18 Air Line Installation 18 Dust Collection 18 Sanding Belt 19 Pressure Rollers 20 Start Up 20 Recommended Adjustments 21 SECTION 4 OPERATIONS 22 Operation Safety 22 Choosing Sandpaper 22 Table Movement 23 Adjusting Fee...

Страница 26: ...m 58 Sanding Motor System Parts List 59 Table Lift System Diagram 60 Table Lift System Parts List 61 Conveyor System Diagram 62 Conveyor System Parts List 63 Feed Drum and Pressure Roller Diagram 64 Feed Drum and Pressure Roller Parts List 65 Sanding Drum and Platen Diagram 66 Sanding Drum and Platen Parts List 67 Upper Roller System Diagram 68 Upper Roller System Parts List 69 Cabinet Assembly Di...

Страница 27: ...This machine is part of a growing Grizzly family of fine woodworking machinery When used according to the guide lines set forth in this manual you can expect years of trouble free enjoyable operation and proof of Grizzly s commitment to customer satis faction We are pleased to provide this manual with the H2933 H2934 G0447 G0581 Wide Belt Sander It was written to guide you through assembly review ...

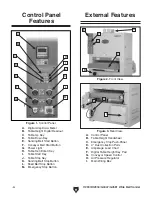
Страница 28: ...ble Set Enter Key I Table Start Key J Table Stop Key K Sanding Belt Stop Button L Feed Belt Stop Button M Emergency Stop Button B F L G M I A H C J D D F E K E C Figure 2 Front View Figure 1 Control Panel A Control Panel B Table Height Handwheel C Emergency Stop Push Panel D 4 Dust Collection Ports E Amperage Load Chart F Digital Table Height Key Pad G Conveyor Speed Control H Air Pressure Regulat...

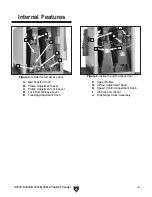
Страница 29: ... Platen Adjustment Lock Lever D Lock Post Release Lever E Tracking Adjustment Knob Figure 4 Inside the left access door F Upper Rollers G Airflow Adjustment Knob H Speed Control Adjustment Knob I Air Fork and Air Jet J Diaphragm Valve Assembly A B C Figure 5 Inside the right access door G H I J A B C D E D F ...

Страница 30: ...ums Triple and Twin V Belt Conveyor Feed Motor Type TEFC Induction Horsepower 1 HP Voltage Phase Cycle 220V 440V Three Phase 60 HZ Amps 3 4 1 7A RPM 1725 RPM Power Transfer V Belt Table Lift Motor Type TEFC Induction Horsepower 1 4 HP Voltage Phase Cycle 220V 440V Three Phase 60 HZ Amps 1 2 0 6A RPM 1725 RPM Power Transfer V Belt General Construction Cabinet Steel Operating Air Pressure 75 PSI San...

Страница 31: ...rums Twin and Triple V Belt Conveyor Feed Motor Type TEFC Induction Horsepower 1 HP Voltage Phase Cycle 220V 440V Three Phase 60 HZ Amps 3 4 1 7A RPM 1725 RPM Power Transfer V Belt Table Lift Motor Type TEFC Induction Horsepower 1 4 HP Voltage Phase Cycle 220V 440V Three Phase 60 HZ Amps 1 2 0 6A RPM 1725 RPM Power Transfer V Belt General Construction Cabinet Steel Operating Air Pressure 75 PSI Sa...

Страница 32: ...M Power Transfer to Drums Triple V Belt Conveyor Feed Motor Type TEFC Induction Horsepower 1 HP Voltage Phase Cycle 220V 440V Three Phase 60 HZ Amps 3 4 1 7A RPM 1725 RPM Power Transfer Twin and Triple V Belt Table Lift Motor Type TEFC Induction Horsepower 1 4 HP Voltage Phase Cycle 220V 440V Three Phase 60 HZ Amps 1 2 0 6A RPM 1725 RPM Power Transfer V Belt General Construction Cabinet Steel Oper...

Страница 33: ...A RPM 1725 RPM Power Transfer to Drums Twin and Triple V Belt Conveyor Feed Motor Type TEFC Induction Horsepower 2 HP Voltage Phase Cycle 220V 440V Three Phase 60 HZ Amps 6 3A RPM 1725 RPM Power Transfer V Belt Table Lift Motor Type TEFC Induction Horsepower 1 4 HP Voltage Phase Cycle 220V 440V Three Phase 60 HZ Amps 1 2 0 6A RPM 1725 RPM Power Transfer V Belt General Construction Cabinet Steel Op...

Страница 34: ...cinogen and can cause cancer and severe respiratory illnesses For Your Own Safety Read Instruction Manual Before Operating this Machine The purpose of safety symbols is to attract your attention to possible hazardous conditions This manual uses a series of symbols and signal words which are intended to convey the level of importance of the safety messages The progression of symbols is described be...

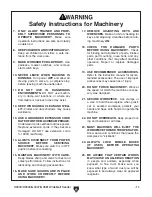
Страница 35: ...ricating and changing accessories 16 MAKE SURE GUARDS ARE IN PLACE AND WORK CORRECTLY BEFORE USING MACHINERY Safety Instructions for Machinery 17 REMOVE ADJUSTING KEYS AND WRENCHES Make a habit of checking for keys and adjusting wrenches before turn ing machinery ON 18 CHECK FOR DAMAGED PARTS BEFORE USING MACHINERY Check for binding and alignment of parts broken parts part mounting loose bolts and...

Страница 36: ...Replace sanding belt when it becomes worn or damaged 12 FOREIGN MATERIAL Always inspect workpiece for nails staples knots and other imperfections that could be dis lodged and thrown from the machine dur ing sanding operations 13 DUST COLLECTION Never operate the sander without an adequate dust collec tion system in place and running 14 ALLERGIES Certain woods may cause an allergic reaction in peop...

Страница 37: ...p G0581 220V Three Phase 60 Amp 25 HP Sanding Motor 64 Amps 2 HP Feed Motor 6 Amps 1 4 HP Table Motor 1 2 Amps G0581 440V Three Phase 25 Amp 25 HP Sanding Motor 32 Amps 2 HP Feed Motor 3 Amps 1 4 HP Table Motor 0 6 Amp Hard wire this machine to your power panel that can safely supply power to your machine and has the proper overload protection and has a locking shut off lever Figure 6 If you are u...

Страница 38: ...ay part numbers If you do not have three phase power available for your wide belt sander you must install a phase converter such as a Grizzly Phase Converter Note When using a phase converter the power from the manufactured power leg sometimes called the wild wire can fluctuate Connect the manufactured power leg to the S terminal to pre vent damage to the transformer The wire from the S terminal c...

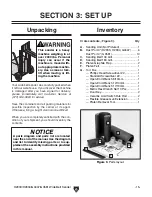
Страница 39: ... Personal injury can occur if the machine is moved with out appropriate machin ery Use a crane or fork lift when moving or lift ing the machine NOTICE A parts diagram and parts list are located near the end of the manual Use the diagram and list to identify missing parts or to sup plement the assembly instructions provided in this manual B C D E F G Crate contents Figure 9 Qty A Sanding Unit Not P...

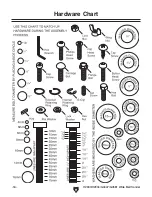
Страница 40: ... 16 H2933 H2934 G0447 G0581 Wide Belt Sander 5mm Hardware Chart ...

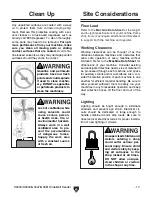
Страница 41: ...tor amp loads Be sure to observe local electrical codes for proper installa tion of new lighting or circuits Unsupervisedchildrenand visitors entering a shop could suffer serious per sonal injury Ensure child and visitor safety by keep ing all entrances to the shop locked at all times DO NOT allow unsuper vised children or visitors in the shop at any time Clean Up Any unpainted surfaces are coated...

Страница 42: ...ur safety is important Please follow the warnings below during this entire section Disconnect power to the machine for the assem bly process Failure to do this may result in serious personal injury Figure 10 Air inlet located on regulator Air Line Installation Figure 11 Regulator knob Dust Collection Figure 12 Typical three port configuration An efficient and clean dust collection system is essent...

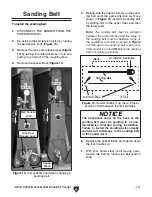
Страница 43: ...belt must be between tongs of the oscillation controller as shown in Figure 14 Damage to the sanding belt could occur if the sander is turned ON before the sanding belt is correctly positioned 6 Replace the spacer block and tighten down the lock handle bolt 7 With your hands clear of all moving parts tension the belt by turning the belt tension knob Figure 14 Sander Outline Top View Proper positio...

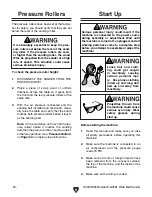
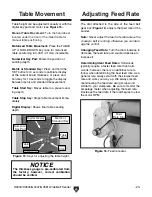
Страница 44: ...essure Rollers on Page 34 for step by step instructions The pressure rollers have been set at the factory but for safety you should verify that they are set below the level of the sanding roller Start Up Before starting the machine 1 Read this manual and make sure you take all safety precautions before operating this machine 2 Make sure the machine is connected to an air compressor and the pressur...

Страница 45: ...oves in the same direction as the button description If not then the power needs to be discon nected and any two power wires need to be switched at the circuit breaker in the electri cal box If using a phase converter switch the R and T wires 4 Press the FEED BELT START and FEED BELT STOP buttons The feed belt should start run and stop smoothly 5 Press the SANDING BELT START and SANDING BELT STOP ...

Страница 46: ...orkpiece with progressively higher grit numbers with no one grit increase of more than 50 however the type of wood and desired finish will determine the best grit to use Grit Type 60 80 100 120 150 Coarse Medium Fine To avoid serious personal injury read and become familiar with the entire instruction manual before using this wide belt sander Damage to your eyes lungs and ears could result from fa...

Страница 47: ...lt gear box Figure 16 adjusts the feed rate of the sander Note Never adjust the feed rate dial unless the conveyor belt is running otherwise you can dam age the control Changing Feed Rate Turn the dial clockwise to decrease the feed rate and counterclockwise to increase it Determining Ideal Feed Rates Softwoods typically require a faster feed rate than hard woods however there is no definitive rul...

Страница 48: ...iple passes or install a coarser grit paper Amp load will be directly affected by many factors such as feed rate depth of cut wood type sand paper grit and workpiece width If the amp load is in the red load range the machine is overloaded and motor damage will occur Keep the amp load in the green range during operation Figure 17 Typical amp draw meter and load chart NOTICE DO NOT VOID WARRANTY Kee...

Страница 49: ... is equipped with an adjustable felt platen and graphite slip for those extra sensitive sanding operations The platen position allows for 3 basic types of sanding These different posi tions can be adjusted by rotating the height lever shown in Figure 18 Figure 18 Platen height controls Lock Lever Height Lever Scale and Pointer The three basic platen positions Platen Up The platen is raised above t...

Страница 50: ...motors transformers and resistance loads at 100 power and 95 efficiency while saving big dollars at cheaply metered single phase electrical rates Complete step by step instructions are furnished along with complete wire and fusing requirements for various motor loads Each model operates up to twice its name plate rating in a mixed motor load On heavily loaded or hard start applications such as hig...

Страница 51: ...them to slip off of the pulleys After the First 100 Hours The oil inside the conveyor gear reducer should be replaced after the first 100 working hours of operation We recommend 90 Wt gear oil Every 2500 Hours After the first conveyor gear reducer oil change replace the oil after every 2500 working hours of operation We recommend 90 Wt gear oil General Your safety is important Please follow the wa...

Страница 52: ... trap Regulator Water Trap Drain Valve Sanding Belts You can greatly increase the lifespan of your sanding belts if you clean them often As men tioned on Page 26 cleaning pads are the fastest way to remove saw dust build up Air System If a component in the air system is malfunc tioning bleed all air from the system and fix the problem before you resume sanding The air system is durable and reliabl...

Страница 53: ...eter or set of calipers Continue sanding the board at that height until the average thick ness measurement is within 0 003 Note These final passes should be done without adjusting the table height This ensures the most consistent average thick ness 7 Observe the digital display read out it should indicate the average thickness of the sanded wood If it does the sander is properly calibrated and acc...

Страница 54: ... the reverse of removal 6 Install new brake pads mount the caliper and reconnect the air line 7 Test the safety shutdown operation by run ning the sander and pressing the emergency stop controls Brake Service Tools Needed Qty 14mm Open End Wrench 1 Small Snap Ring Pliers 1 6mm Hex Wrench 1 2 Phillips Screwdriver 1 Eventually the brake pads will wear out Checking and replacing these is a simple pro...

Страница 55: ...e belt are dependent upon adequate airflow through the air fork gap To set the correct amount of airflow through the air fork gap 1 Remove the sanding belt and turn the belt tension knob to the tensioned position 2 Loosen the lock nut on the airflow adjustment knob Figure 27 3 Turn the airflow adjustment knob Figure 27 clockwise until the airflow is completely OFF The upper roller should pivot to ...

Страница 56: ...scillation should take a similar amount of time to oscillate If the oscillation time to the right is 2 sec onds but the oscillation time to the left is longer loosen the oscillation adjustment knob Figure 28 and move it to the left until proper tracking is achieved Tighten down the oscillation adjustment knob when satis fied Figure 28 Oscillation adjustment knobs If the oscillation time to the lef...

Страница 57: ...t knob 2 Turn the knob clockwise to decrease the oscillation speed and counterclockwise to increase it 3 Tighten the lock nut loosened in Step 1 to secure the knob Lock Nut The corners of the table can be independently adjusted up or down By disconnecting the chain and turning the pertinent table elevation screw sprocket Figure 30 table parallelism can be achieved Adjusting the table parallelism c...

Страница 58: ...RCE 2 Plane a 6 long 2x4 to a uniform thickness and cut it in half Place one board along the length of the feed belt on the right hand side and place the other board on the left hand side 3 With the sanding belt tensioned Figure 32 move the sanding rollers by hand and manu ally raise the table until you hear the sandpa per just contact the surface of the wood DO NOT continue to raise the table bey...

Страница 59: ...il it just touches the board Note DO NOT continue to lower the roller beyond that point 10 Tighten the roller lock nuts and recheck your settings Note Variables such as feed rate depth of the cut and the type of sanding belt can play a big part in determining the proper amount of downward pressure exerted by the rollers Some experimentation may be necessary to achieve the desired results However u...

Страница 60: ...on Make sure that you test your settings with the hand wheel manually so you don t crash the table if incorrectly set the first time around 17 With a helper install the gearbox vibration dampener washers and mounting bracket 18 Install the emergency stop pushpanel assem bly and the limit switch 19 Start the conveyor motor and turn the con veyor tracking bolts as required until the conveyor belt tr...

Страница 61: ...H2933 H2934 G0447 G0581 Wide Belt Sander 37 1 3 4 5 6 WARNING DISCONNECT POWER 2 8 7 9 10 Vibration Dampening Washer Table Guide Tracking Adjustment Bolts Figure 37 Conveyor belt removal sequence ...

Страница 62: ...Needed Qty 20mm Wrench or Socket 1 2 Phillips Screwdriver 1 To adjust the feed belt tension 1 DISCONNECT THE SANDER FROM THE POWER SOURCE 2 Find the adjustment ports in the safety guard Figure 38 at the front end of the feed table 3 Turn both left and right adjustment bolts Figure 38 clockwise equally to increase tension Figure 38 Feed belt tension adjustment bolts Note Safety guard removed for cl...

Страница 63: ...Belt Limit Switch Q Belt Tension Limit Switch R Emergency Brake Contactor A Shop Compressor B Air Pressure Regulator C Emergency Brake Solenoid D Emergency Brake E Air Distribution Manifold F Airflow Adjustment Knob Oscillation Timing G Speed Control Adjustment Knob Oscillation Speed H Oscillation Controller Air Fork Air System Diagram Electrical Wire Air Line A B C D E F G I J K L H Front Upper R...

Страница 64: ...onveyor belt is worn 1 Pressure rollers set too high 2 Dirty conveyor belt 3 Conveyor belt is worn 1 Pressure rollers are dirty or dam aged 1 Sanding belt damaged or dirty CORRECTIVE ACTION 1 Correct situation that caused limit switch to engage reset the emer gency stop button 2 Check power line for proper voltage 3 Inspect all lead connections on motor for loose or open connec tions 1 Inspect cor...

Страница 65: ...1 Air pressure incorrect 2 Air leak in system 3 Brake rotor contaminated with oil 4 Brake pads worn out 1 Brakes severely worn out CORRECTIVE ACTION 1 Repair or replace sanding belt 1 Replace sanding belt 2 Raise rear pressure roller See warning in Pressure Roller sec tion 1 Replace with a coarser grit sanding belt 2 Reduce depth of cut 3 Allow wood to dry out 1 Adjust air pressure to 75 PSI at pr...

Страница 66: ... Sander Control Panel Component Locations H2933 H2934 G0447 G0581 Sanding Belt STOP Button Conveyor Belt STOP Button Emergency Stop Button Sanding Belt START Button Conveyor Belt START Button Power Lamp Digital Amp Draw Meter Digital Panel ...

Страница 67: ...X2 14 13 14 18 1 2 4 3 2 3 14 15 11 10 9 8 7 6 5 4 3 2 1 12 13 14 15 16 17 18 19 20 21 22 7 CONVEYOR BELT START SWITCH POWER LAMP EMERGENCY STOP BUTTON CONVEYOR BELT STOP SWITCH EMERGENCY STOP AND BELT TENSION LIMIT SWITCHS 1 3 2 4 1 2 3 4 5 3 5 3 BELT TRACKING LIMIT SWITCH BELT TRACKING LIMIT SWITCH TABLE UP DOWN SAFETY LIMIT SWITCH TABLE UP DOWN SAFETY LIMIT SWITCH OUT TO SANDING MOTOR TABLE HEI...

Страница 68: ...3 20 21 5 1 2 4 3 8 3 2 3 14 15 11 10 9 8 7 6 5 4 3 2 1 12 13 14 15 16 17 18 19 20 21 22 7 1 2 4 3 8 3 CONVEYOR BELT START SWITCH POWER LAMP EMERGENCY STOP BUTTON CONVEYOR BELT STOP SWITCH EMERGENCY STOP PUSH PANEL LIMIT SWITCH 1 3 2 4 1 2 3 4 8 3 8 3 BELT TENSION LIMIT SWITCH BELT TRACKING LIMIT SWITCH BELT TRACKING LIMIT SWITCH TABLE UP DOWN SAFETY LIMIT SWITCH TABLE UP DOWN SAFETY LIMIT SWITCH ...

Страница 69: ...H2933 H2934 G0447 G0581 Wide Belt Sander 45 Notes ...

Страница 70: ...NO 14 22 A2 T1 T2 T3 2 4 6 NC NO 13 21 A1 L L2 L3 1 3 5 NO NC 13 21 A1 L L2 L3 1 3 5 NO NC 13 21 A1 L L2 L3 1 3 5 NO NC 14 22 A2 T1 T2 T3 2 4 6 NC NO 3 2 CURRENT SENSOR E S R 12 13 S OL E NOI D VAL VE U1 V1 U2 V2 W 2 19 12 13 11 9 10 8 6 5 3 3 2 14 L 3 T 440V 220V W 1 5 15 12 13 17 5 2 2 T S R U1 V1 W1 2 14 15 W2 V2 U2 2 11 16 17 10 10 21 20 2 R S T R S 1 11 T S R R S T FUSE FUSE TRANSFORMER OVERL...

Страница 71: ...33 Transformer Sanding Motor Contactor Conveyor Motor Contactor Amp Meter Current Sensor Emergency Brake Contactor UP DOWN Table Motor Contactors Sanding Motor Overload Relay Conveyor Motor Overload Relay Two 4 Amp Fuses 220V 440V Three Phase Power Supply Junction Block ...

Страница 72: ...W 97 98 95 96 NO NC R S T 13 21 A1 L L2 L3 1 3 5 NO NC 14 22 A2 T1 T3 2 6 NC NO 13 21 A1 L L2 L3 1 3 5 NO NC 14 22 A2 T1 T2 T3 2 4 6 NC NO 13 21 A1 L L2 L3 1 3 5 NO NC 14 22 A2 T1 T2 T3 2 4 6 NC NO T1 T2 T3 2 4 6 12 13 17 5 2 2 T S R U1 V 1 W1 2 31 Z1 Y1 X1 33 R S T 14 15 S R T W2 V2 U2 2 11 2 1 6 1 7 67 NO 55 NC 68 NO 56 NC 9 9 30 32 10 10 21 20 2 R S T R S 1 T S R 11 Y1 X1 Z1 CURRENT SENSOR TRAN...

Страница 73: ... Motor Start Delay Conveyor Motor Contactor Emergency Brake Contactor UP DOWN Table Motor Contactors Conveyor Motor Overload Relay Two 4 Amp Fuses 220V 440V Three Phase Power Supply Junction Block Sanding Motor Contactor Sanding Motor Overload Relay Amp Meter Current Sensor Transformer ...

Страница 74: ...21 A1 L L2 L3 1 3 5 NO NC 14 22 A2 T1 T2 T3 2 4 6 NC NO 13 21 A1 L L2 L3 1 3 5 NO NC 14 22 A2 T1 T2 T3 2 4 6 NC NO 13 21 A1 L L2 L3 1 3 5 NO NC 14 22 A2 T1 T2 T3 2 4 6 NC NO T1 T2 T3 2 4 6 11 20 21 25 R S 2 8 2 22 2 T S R 9 10 U1 V1 W1 2 19 17 12 Z Y X 13 24 24 18 16 24 24 R S T 19 2 14 15 24 12 14 15 12 11 S R T U2 V2 W2 2 12 3 13 24 24 10 2 3 0V 220V 200V 440V 0V E 0 1 2 3 TABLE UP DOWN CONTACTO...

Страница 75: ...tor Start Delay Conveyor Motor Contactor Emergency Brake Contactor UP DOWN Table Motor Contactors Conveyor Motor Overload Relay Two 4 Amp Fuses 220V 440V Three Phase Power Supply Junction Block Sanding Motor Contactor Transformer Sanding Motor Overload Relay Amp Meter Current Sensor ...

Страница 76: ...V 3 2 SANDING BELT CONVEYOR BEL T R Emergency Stop SANDING BELT CONVEYOR BELT R S TABL E L I FTING LOWERING E A AM 14 15 U1 V 1 W1 OL3 M3 M3 11 A R U V S a b Emergency Brake a b a b PCR1 10 M3 T T W U2 V 2 W2 OL1 F R U S V T W R U S V T W T W W 440V 415V 220V 200V 380V 1 0 4A 2 2 FUSE S 2 STOP START OL3 GL PCR 2 EMERGENCY BRAKE A PC LS5 LS6 LS7 MOTOR MOTOR MOTOR 4A FUSE General Electrical Diagram ...

Страница 77: ... T OL3 U V W R S T D Y1 Z1 0 12 A PC PCR1 16 LS 17 F 20 R 18 LS 19 R 21 F 11 M3 S 30 31 D 32 33 9 EMG STOP 5 A STAR DELTA A AM 14 15 X1 M3 U V W R S T U V W PCR2 D 3 S3 A R U V S a b 3 TR GL LS5 LS6 LS7 2 CONVEYOR BELT SANDING BELT POWER SOURCE BRAKE EMERGENCY BRAKE CONVEYOR BEL T SANDING BELT TABL E L I FTI NG LOWERING TABL E L I FTING LOWERING MOTOR MOTOR EMERGENCY BRAKE FRONT CONVEYOR STOP LIMI...

Страница 78: ...T OL3 Z X Y R S T D Y Z 0 20 A PC PCR1 4 LS 22 F 25 R 5 LS R F 10 TR S 18 13 16 17 12 EMG STOP FRONT CONVEYOR STOP LIMIT SWITCH 8 A X S U V W D A TR GL MOTOR MOTOR CONVEYOR BELT SANDING BELT POWER SOURCE BRAKE EMERGENCY BRAKE CONVEYOR BEL T SANDING BELT TABL E L I FTI NG LOWERING Emergency Brake Emergency Stop MOTOR UP DN 23 26 24 D S S D 19 M3 4A FUSE TABL E L I FTING LOWERING A AM 15 14 STAR DEL...

Страница 79: ...V5 W5 U1 V1 W1 U2 V2 W2 U5 V5 W5 U1 V1 W1 220V 440V 220V 440V W6 W2 U5 U1 U6 U2 V5 V1 V6 V2 W5 W1 W2 W6 U2 U6 V2 V6 U2 V2 W2 U5 V5 W5 U1 V1 W1 U2 V2 W2 U5 V5 W5 U1 V1 W1 U1 V1 W1 U2 V2 W2 U1 V1 W1 U2 V2 W2 U1 V1 W1 U5 V5 W5 S T A R DE L T A Z X Y Z X Y U V W U V W TABLE UP DOWN MOTOR 220V 440V CONVEYOR BELT MOTOR SANDING BELT MOTOR Motor Wiring H2933 220V 440V 3 PH Motor Wiring H2934 G0447 G0581 2...

Страница 80: ... 56 H2933 H2934 G0447 G0581 Wide Belt Sander 1 2 4 7 2 3 13 9 8 6 5 12 11 10 7 1 Tool Box and Accessories Diagram 0000 Series Parts ...

Страница 81: ...DPAPER 180 37 X 60 H2934 4 PH2934004 37 3 4 PLATEN FELT H2934 G0447 7 2 P04470007 2 SANDPAPER 180 37 X 75 G0447 4 P058100004 44 PLATEN FELT G0581 7 2 P05810007 2 SANDPAPER 180 43 X 60 G0581 5 PH29330005 GRAPHITE 25 X 3 54 H2933 8 PH29330008 2 PHILLIPS SCREWDRIVER 9 PH29330009 SCREWDRIVER FLAT 2 10 PH29330010 WRENCH 8 X 10 5 P05810005 GRAPHITE 44 X 3 54 G0581 11 PH29330011 WRENCH 12 X 14 6 PH293300...

Страница 82: ...04 106 105 108 103 106 104 114 115 116 113 112 111 126 128 127 212 210 211 208 202 203 302 312 123 122 307 121 310 311 206 205 301 303 304 305 306 313 301 1 308 209 129 133 132 119 213 117 101 109 201 109 2 109 1 110 118 Sanding Motor System Diagram 1000 Series Parts ...

Страница 83: ...8 16 208 PH29331208 IDLE WHEEL SHAFT 209 PH29331209 BALL BEARING 6305ZZ 109 1 PH29331109 1 MOTOR FAN H2933 210 PH29331210 PULLEY 109 1 PH29341109 1 MOTOR FAN H2934 G0447 211 PH29331211 BALL BEARING 6206ZZ 109 1 P05811109 1 MOTOR FAN G0581 212 PH29331212 EXT RETAINING RING 25MM 109 2 PH29331109 2 MOTOR FAN COVER H2933 213 PH29331213 V BELT A 40 4L400 301 PH29331301 BRAKE BRACKET 301 1 PH29331301 1 ...

Страница 84: ...309 310 311 312 313 314 315 316 317 307 303 101 103 105 102 108 107 106 104 206 204 202 203 109 110 410 409 401 408 407 406 406 405 404 403 402 331 333 334 332 336 111 318 319 320 321 337 338 340 324 335 339 341 324 325 326 328 326 331 2 331 1 201 Table Lift System Diagram 2000 Series Parts ...

Страница 85: ...ETAINING RING 35MM 333 PH29332333 HEX BOLT 1 2 12 X 4 1 2 206 PH29332206 SPROCKET WHEEL 334 PH29332334 PROXIMITY SWITCH PLATE 301 PH29332301 ELEVATION GEAR BOX 335 PH29332335 HEX BOLT 1 4 20 X 1 2 302 PH29332302 WORM GEAR 336 PH29332336 PROXIMITY SWITCH 303 PH29332303 BALL BEARING 6005ZZ 337 PH29332337 SPECIAL SCREW M3 5 X 40 304 PH29332304 BEARING CAP 338 PH29332338 HEX NUT M3 5 305 PH29332305 CA...

Страница 86: ...02 133 142 143 140 141 144 201 203 204 138 137 132 131 135 136 101 206 205 107 108 119 112 113 114 115 117 123 126 127 103 118 116 117 113 113 113 106 110 104 109 111 105 121 120 128 124 129 130 121 123 2 123 1 Conveyor System Diagram 3000 Series Parts ...

Страница 87: ...33138 HEX NUT 5 16 18 110 PH29333110 BREATHER 111 PH29333111 PLUG 112 PH29333112 BALL BEARING UCF205 113 PH29333113 LOCK WASHER 3 8 114 PH29333114 HEX BOLT 3 8 16 X 1 1 4 115 PH29333115 BEARING CAP 116 PH29333116 DRIVEN PULLEY 141 PH29333141 PHLP HD SCR 1 4 20 X 1 2 117 PH29333117 HEX BOLT 3 8 16 X 1 1 2 142 PH29333142 LIMIT SWITCH 118 PH29333118 DRIVING PULLEY 143 PH29333143 PHLP HD SCR 10 24 x 1...

Страница 88: ...204 201 103 301 205 302 107 202 203 204 203 204 201 107 205 107 G0447 306 310 309 307 308 304 302 313 312 311 101 103 105 107 108 104 106 109 203 204 205 203 204 102 301 302 303 205 103 107 H2933 H2934 G0581 201 202 102 102 102 302 Feed Drum and Pressure Roller Diagram 4000 Series Parts ...

Страница 89: ...108 PH29334108 HEX BOLT 5 16 18 X 1 1 4 306 P04474306 LF PISTON BRACKET G0447 109 PH29334109 LOCK WASHER 5 16 201 PH29334201 PISTON ROLLER SHAFT H2933 308 P04474308 LR PISTON BRACKET G0447 309 PH29334309 LOCK WASHER 5 16 201 P05814201 PISTON ROLLER SHAFT G0581 310 PH29334310 HEX BOLT 5 16 18 X 1 1 4 202 PH29334202 PISTON ROLLER H2933 311 P04474311 REAR DEFLECTOR G0447 202 PH29344202 PISTON ROLLER ...

Страница 90: ... 202 311 310 309 312 314 315 316 313 306 203 204 321 322 106 103 104 105 107 108 112 113 205 206 112 113 109 115 116 203 321 322 323 117 118 119 119 110 111 104 107 203 411 409 410 108 406 405 417 408 114 112 120 115 102 407 205 206 402 401 109 114 114 403 114 Sanding Drum and Platen Diagram 5000 Series Parts ...

Страница 91: ...335316 FLAT WASHER 3 8 203 PH29335203 SPECIAL SET SCREW M6 75 X 6 317 PH29335317 FLAT WASHER 3 8 204 PH29335204 BEARING UCC205 318 PH29335318 HANDLE 205 PH29335205 HANDLE 319 PH29335319 SET SCREW 5 16 18 X 1 2 206 PH29335206 SPECIAL SCREW 320 PH29335320 ADJUSTMENT RING 211 PH29335211 BEARING BRACKET PAD H2933 321 PH29335321 HEX BOLT 5 16 18 X 1 322 PH29335322 FLAT WASHER 5 16 323 PH29335323 HANDLE...

Страница 92: ...110 109 108 101 117 115 1 120 130 131 116 112 131 107 106 116 1 115 310 304 301 302 305 105 104 108 304 303 111 320 206 207 203 204 205 208 101 1 104 1 103 1 203 202 202 116 1 113 102 306 103 205 208 130 131 132 128 201 129 118 115 201 111 113 101 112 104 101 1 137 103 139 140 141 142 G0581 104 1 138 103 1 202 102 102 Upper Roller System Diagram 6000 Series Parts ...

Страница 93: ...16202 UPPER ROLLER G0581 104 1 PH29346104 1 FRAME SEAL FRNT LFT H2934 203 PH29336203 UPPER ROLLER BRACKET 104 1 P04476104 1 FRAME SEAL FRNT LFT G0447 204 PH29336204 BEARING UCC205 104 1 P05816104 1 FRAME SEAL FRNT LFT G0581 205 PH29336205 SET SCREW M6 1 X 6 105 PH29336105 FLAT HD SCR 1 4 20 X 1 2 206 PH29336206 CAP SCREW 10 24 x 3 4 106 PH29336106 LOCK WASHER 3 8 207 PH29336207 LOCK WASHER 3 8 107...

Страница 94: ... 70 H2933 H2934 G0447 G0581 Wide Belt Sander 107 108 104 109 110 106 101 113 115 103 109 1 114 105 111 102 112 Cabinet Assembly Diagram 7000 Series Parts ...

Страница 95: ...T ACCESS PANEL G0447 105 P05817105 RIGHT ACCESS PANEL G0581 106 PH29337106 DOOR LOCK 107 PH29337107 HEX BOLT 5 16 18 X 3 4 108 PH29337108 FLAT WASHER 5 16 112 PH29337112 FLAT WASHER 1 4 113 PH29337113 PHLP HD SCR M6 1 X 12 114 PH29337114 HEX BOLT 1 4 20 X 3 4 115 PH29337115 STANDOFF BRACKET 109 P04477109 RIGHT DOOR LOWER FRAME G0447 109 PH29347109 RIGHT DOOR LOWER FRAME H2934 RIGHT DOOR LOWER FRAM...

Страница 96: ... 115 H2933 H2934 G0447 G0581 H2933 H2934 G0447 G0581 112 134 440V 127 111 110 104 116 124 102 129 126A 105 106 109 115 114 113 111 110 104 121 120 119 116 123 117 118 109 115 107 128 130 108 131 133 103 101 135 440V 134 440V 135 440V 135 440V H2933 H2934 G0447 G0581 118 118 134 440V 112 115 1 115 1 132 132 132 122 122 8000 Series Parts ...

Страница 97: ...3 PH29338113 FUSE TE10 3 X 38 500V 4Ax2 133 PH29338133 COMPUTER 127 127 WIRE COLUMN H2933 H2934 G0447 P05818132 132 116 PH29348116 POWER WIRE TERMINAL H2934 G0447 START DELAY LADS2 H2934 G0447 START DELAY TRD N STON BRAND G0581 P05818127 PH29348127 CONTACTOR LC1 D256 H2934 G0447 PH29348115 1 115 1 RELAY LR3D 126 220V 2 5 4A G0581 P05818114 114 P05818112 112 111 PH29348111 CONTACTOR LC1 D368 H2934 ...

Страница 98: ...108 109 110 111 111 123 123 112 112 113 113 114 114 115 115 116 116 116 116 117 117 123 123 119 119 120 120 122 124 123 123 123 123 122 124 125 125 127 128 129 131 132 133 134 135 137 138 136 138 131 132 134 137 135 136 133 130 Belt Oscillation System Diagram 9000 Series Parts ...

Страница 99: ...R 5 16N X 1 8T 90º 108 PH29339108 ELBOW 5 16N X 1 8T 90º 128 PH29339128 8MM FLEXIBLE HOSE 109 PH29339109 SOLENOID VALVE 129 PH29339129 6MM FLEXIBLE HOSE 110 PH29339110 T FITTING 5 16N X 5 16N X 1 8T 131 PH29339131 6MM FLEXIBLE HOSE 111 PH29339111 CONNECTOR 132 PH29339132 6MM FLEXIBLE HOSE 112 PH29339112 MANIFOLD 1 4N 2 PORT 133 PH29339133 6MM FLEXIBLE HOSE 113 PH29339113 CONNECTOR 5 16N X 1 8T 134...

Страница 100: ...ation Left and Right of Machine 215 216 217 Machine Label Diagram 9000 Series Parts Safety labels warn about machine hazards and ways to prevent injury The owner of this machine MUST maintain the original location and readability of the labels on the machine If any label is removed or becomes unreadable REPLACE that label before using the machine again Contact Grizzly at 800 523 4777 or www grizzl...

Страница 101: ...202 PH29339202 LABEL DOOR CLOSED 213 P02933213 LABEL G0581 AMP SCALE 203 PH29339203 LABEL HAND PINCH IN BELT 214 PH2933214 LABEL G0581 AMP SCALE 204 PH29339204 LABEL DUST MASK 214 PH29349214 LABEL G0581 AMP SCALE 205 PH29339205 LABEL EMERGENCY STRIPE 214 P04479214 LABEL G0581 AMP SCALE 206 PH29339206 LABEL ROTATION LABEL 214 P05819214 LABEL G0581 AMP SCALE 207 PH29339207 LABEL SAFETY GLASSES 215 P...

Страница 102: ...rizzly shall be tried in the State of Washington County of Whatcom We shall in no event be liable for death injuries to persons or property or for incidental contingent special or consequential damages arising from the use of our products To take advantage of this warranty contact us by mail or phone and give us all the details We will then issue you a Return Number which must be clearly posted on...

Страница 103: ...r _____ 0 2 Years _____ 2 8 Years _____ 8 20 Years _ ____20 Years 6 How many of your machines or tools are Grizzly _____ 0 2 _____ 3 5 _____ 6 9 _ ____10 7 Do you think your machine represents a good value ______Yes _ _____No 8 Would you recommend Grizzly Industrial to a friend ______Yes _ _____No 9 Would you allow us to use your name as a reference for Grizzly customers in your area Note We never...

Страница 104: ...D LINE FOLD ALONG DOTTED LINE GRIZZLY INDUSTRIAL INC P O BOX 2069 BELLINGHAM WA 98227 2069 Place Stamp Here Name_______________________________ Street_______________________________ City______________State______Zip______ Send a Grizzly Catalog to a friend ...

Страница 105: ......
Страница 106: ...zly Trusted Proven and a Great Value OR SECURE ORDERING ORDERS SHIPPED WITHIN 24 HOURS E MAIL RESPONSE WITHIN ONE HOUR Visit Our Website Today And Discover Why Grizzly Is The Industry Leader Call Today For A FREE Full Color Catalog ...

Отзывы: