GUBELLINI di D. Gubellini – Via Fiorentina 3508/H, 40059 Medicina BO – Italy – PI 02132331204 – CF GBLDGI75L02A944H
WEB: www.gripone.com – Email: [email protected]
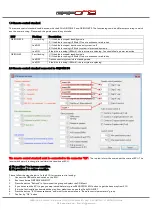
1.0 Remote control standard
The remote control standard could be used with the ECUs GRIPONE 2 and GRIPONE P3. The functioning could be different according to which
ecu the user are using. Please read this guide to avoid any mistake.
ECU
Flashing
Description
GRIPONE P3
Fast flashing
1) If the bike is stoped: standby mode
2) If the bike is running (>20kmh): One or each sensor are broken
Led OFF
1) If the bike is stoped: traction control system is off
2) If the bike is running (>20kmh): system is into standby mode
Led ON
If the bike is running (>20kmh): the rear tyre are spinning. You should feel a power reduction
GRIPONE 2
Fast flashing
1) If the bike is stoped: standby mode
2) If the bike is running (>20kmh): One or each sensor are broken
Led OFF
Traction control system is into standby mode
Led ON
If the bike is running (>20kmh): the rear tyre are spinning
2.0 Remote control standard connected to GRIPONE P3
The remote control standard must be connected to the connector “RE”.
The red led inform the user about the state of ECU. The
lever switch permit to change (in real time) the sensitive of ECU.
a) Fix position 1 to increase sensitive.
b) Fix position 2 to reduce sensitive.
Please follow the steps below to fix the ECU for remote control analog:
1.
Connect the USB cable and switch on the ECU
2.
Run the software GRIPONE WINSOFT
3.
Press the button “Refresh” in Communication group and select the COM port
4.
If you have used the ECU, open you map (saved before) or press READ FROM ECU button to get the base map from ECU
5.
If it is the first installation download the map from website and open the file by WINSOFT
6.
Press the button “ECU advanced setup” and modify the parameters in “Remote control parameters” group
7.
Confirm by “OK” button


