background image

10

Grindmaster

®

ET1 Espresso Machine

Cleaning and sanitizing portafilter:

Notice:

To avoid damage, do not immerse espresso

Porta Filter handle in water. Do not put group gasket
(item B from 

Figure I

) in water or any liquid detergent.

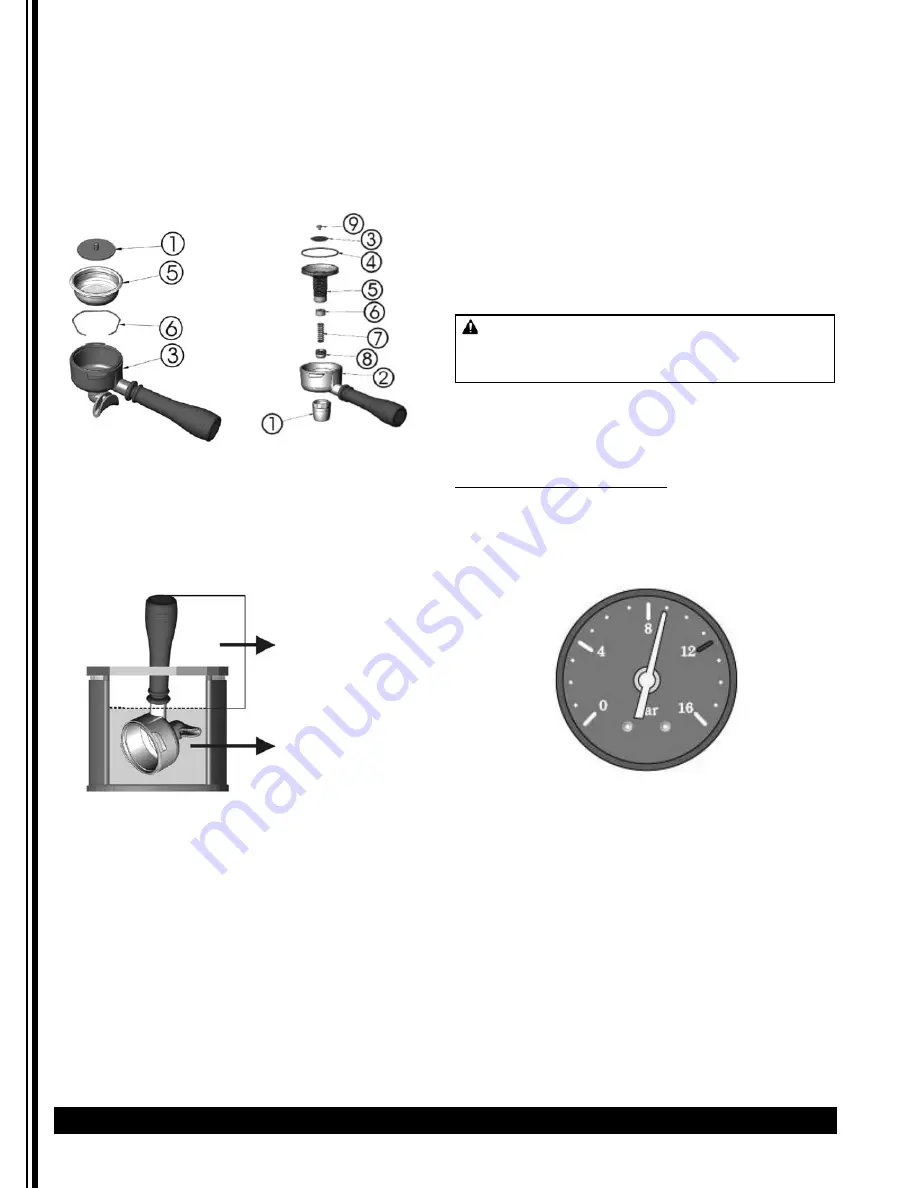
1. Disassemble Portafilter. (see 

Figure K

)

2. Remove sprayer from hot water wand.

3. Remove nipple from steam arm.
4. Add loose group head parts [screw (E), shower

screen (D), and plate(C) from 

Figure I

]. 

5. Use brush to clean and wash parts in detergent or

espresso urn cleaner/sanitizer. DO NOT immerse
Portafilter handle. (see 

Figure L

)

6. Rinse parts.

7. Prepare a sanitizing solution in accordance with

local health department regulations. You may also
refer to the US Food and Drug Administration
regulation 21 CFR 178.1010 “Sanitizing Solutions”
and US Environmental Protection Agency 40 CFR
18.940 “Tolerance exemptions for active and inert
ingredients for use in antimicrobial formulations
(Food-contact surface sanitizing solutions)”.

8.  Follow the instructions provided with the sanitizing

agent.

9. Let all sanitized parts drain and dry naturally. DO

NOT WIPE THEM DRY. 

10. Reassemble parts.

Drain Tray and Discharge Trough:

1. Remove and wash the drain tray after stopping use.  
2. Wipe and remove sediments in the discharge

trough with a wet cloth and wash with hot water
to clear the discharge tube.

3. If water does not discharge properly, place a

teaspoon of detergent into the discharge trough
and flush with hot water to dissolve residual oils in
the tube.

4. Reassemble after the water tray has dried.

Adjustments

The rest of this manual contains information to aid the
service technician who is maintaining this equipment.
This section has information on performing common
service tasks.

Water Pressure Adjustment

The water pressure has been factory adjusted to 9 bar
(the recommended pressure). After machine starts up
and water refills, press continuous flow button and read
pressure on pressure gauge to determine if the
indicator is in blue zone (8-10 bar) as shown in 

Figure

M

If the pressure is not in the blue zone, adjust pressure
as shown below:
1. Remove left side panel (see 

Figure N

, next page).

2. Attach Portafilter into the brewing group with

filled ground coffee. 

3. Press continuous flow button. Turn screw clockwise

as shown in 

Figure O

on next page to increase

pressure; turn counterclockwise to reduce pressure.

Handle
Do not immerse

Liquid

Figure L

Cleaning (continued)

Figure K

Water Pressure 9 bars

Figure M

WARNING: SHOCK / BURN HAZARD

Only a qualified service technician should perform
electrical and mechanical adjustments or repairs.

Содержание ET1

Страница 1: ...iring Diagram 20 Thank you for purchasing this quality espresso machine For your safety and the safety of others read all warnings and the operator manual before installing or using the product Properly instruct all operators Keep training records For future reference record serial number here Table of Contents 2018 Grindmaster Cecilware Printed in Taiwan 0218 Form GC 300 01 Part 390 00168 Grindma...

Страница 2: ...e personnel only Improper installation could result in electrocution Shock hazard Disconnect power before adjusting steam pressure To reduce the risk of electrical shock unplug the dispenser power cord before repairing or replacing any internal components of the unit Before any attempt to replace a component be sure to check all electrical connections for proper contact Only a qualified service te...

Страница 3: ...t use extension cord Make sure that the outlet the unit plugs into is grounded Check rating marking on nameplate to be sure electric lines match voltage phase and amperage requirements of appliance Follow national and local electrical codes Do not use the machine and turn off the power during water outage This equipment must be installed in compliance with applicable Federal State and or Local plu...

Страница 4: ...achine as illustrated below The label includes information of model number voltage serial number wattage and its certificate Do not remove this label Model Group Boiler Voltage Watts Hertz Weight Dimensions Capacity A B C ET1 1 3L 220 240 1500 50 60 26 kg 57 lbs 37 cm 15 in 50 cm 20 in 43 6 cm 17 in 37 cm 15 in 50 cm 20 in 43 6 cm 17 in Figure A Figure B ...

Страница 5: ...required 4 10 2 cm for water and electrical connections Water connection size 3 4 GHT 1 2 water line required Water pressure between 20 PSI and 90 PSI 138 kPa 621 kPa Use regulator if higher pressure 1 Foot 7 Power Indicator 2 Water pressure gauge 8 Control Panel 3 Water tray 9 Steam control knob 4 Power Switch 10 Brewing group 5 Hot water outlet nozzle 11 Steam tube 6 Hot water control knob 12 St...

Страница 6: ...single portion 2 Coffee double portion 3 Tea single portion 4 Tea double portion Continuous Flow Button Power Switch The power switch has 3 settings POSITION 0 OFF POSITION 1 WATER FILL POSITION 2 MACHINE ON HEATING Figure E Figure F Water Pressure 9 bars Steam Pressure 1 0 bar Figure G ...

Страница 7: ...m diameter drain line to bottom center of machine 5 Attach appropriate plug to cord Power source corresponds to the electrical rating shown on the serial tag on unit Plug the ET1 Espresso machine into a dedicated power supply outlet 6 Turn the Power Switch on front of unit to POSITION 1 see Figure E The tank will fill in approximately 2 3 minutes 7 Press continuous flow button on control panel see...

Страница 8: ...pty Portafilter to the brewing group to store and keep warm Steam Wand This can be used by turning the knob counterclockwise which allows for a varied amount of steam or by pulling out the handle which will dispense the maximum amount of steam 1 To drain condensate ensure steam wand is pointed toward the drain grid and pull handle out briefly to dispense a small amount of steam 2 Pour cold milk in...

Страница 9: ...remove any residual milk remaining in the nozzle Daily Exterior Wipe the machine exterior with soft slightly dampened cloth daily before starting operations If necessary a mild non corrosive cleaning agent may be applied to the cloth NOTICE Do not spray cleaning fluid directly on the espresso machine to avoid corrosion or possible electrical damage Back flushing 1 Remove screw E shower screen D an...

Страница 10: ...ping use 2 Wipe and remove sediments in the discharge trough with a wet cloth and wash with hot water to clear the discharge tube 3 If water does not discharge properly place a teaspoon of detergent into the discharge trough and flush with hot water to dissolve residual oils in the tube 4 Reassemble after the water tray has dried Adjustments The rest of this manual contains information to aid the ...

Страница 11: ...sure If there is a need to change the pressure follow below procedure for calibration 1 Turn off machine 2 Remove top cover of machine and locate the pressure switch in the center back area see Figure Q 3 Use slotted screwdriver to adjust the pressure as shown in Figure R Turn screw clockwise to increase pressure or counterclockwise to reduce pressure A complete screw turn results in about 0 1 bar...

Страница 12: ...r proper contact Only a qualified service technician should perform electrical and mechanical adjustments or repairs Note Wait at least 3 seconds to restart the machine after turning it off to ensure previous error stored in memory is cleared If you need help call Grindmaster Cecilware Technical Service Department 502 425 4776 or 800 695 4500 USA Canada only Monday through Friday 8 AM 6 PM EST Ple...

Страница 13: ...15 16 17 Item Part Description Item Part Description 1 MUG TRAY 10 BASE 2 LEFT SIDE PLATE 11 ANTI SLIP MATS 3 GAUGE BRACKET 12 FOOT 4 F SERIES STEAM HOT WATER VALVE BRACKET 13 RIGHT PLATE 5 MOISTURE BOARD 14 BOILER BRACKET 6 FORMER TRIM 15 REAR COVER 7 FRONT TRIM 16 F1 DRAINAGE STENT 8 F SERIES WATER TRAY 17 PRESSURE SWITCH BRACKET Body Parts Assembly ...

Страница 14: ... Part Description 1 HING SPRAY HOSE BRAIDED STEEL 2400MM 7 01312L TEFLON WASHER 2 410 00547 MOTOR 230V 8 BRASS CONNECTOR 3 MOTOR SHOCK FOOT 9 BRASS CONNECTOR 4 SPRING WASHER M6 10 FILTER 5 STAINLESS STEEL HEXAGON NUTS M6 11 01323 NBR O RING 6 01368L PUMP PO074 12 HING SPRAY HOSE BRAIDED STEEL 350MM Motor Pump Assembly ...

Страница 15: ...T MANIFOLDS 24 01325L FLOW METER DOSER 7 410 00551 3 8 LEVEL PROBE SET 95L 25 TYPE I FLARED CONNECTOR 8 LARGE BOILER INLET PIPE GROUP 26 410 00550 FLOW METER GAUGE 9 LEFT HOT BRASS GROUP 27 FLOWMETER INLET PIPE GROUP 10 COOKING HEAD INTO THE PIPE GROUP 28 410 00358 S C N R DOSER VALVE 11 BAROMETER TUBE GROUP 29 PRESSURE GAUGE TUBE SET 12 COOKING HEAD BACK TO THE TRACHEA GROUP 30 PRESSURE SWITCH GR...

Страница 16: ...3 01382L FILTER NOZZLE 11 410 00506 STAINLESS STEEL SOCKET HEAD CAP M4 15 4 01381L COOKING COPPER NOZZLE HEAD 12 STAINLESS STEEL SPRING WASHER M4 5 STAINLESS STEEL SOCKET HEAD CAP M5 10 13 410 00552 SOLENOID VALVE ODE 6 R SERIES COFFEE COOKING HEAD COPPER 14 TYPE I FLARED CONNECTOR 7 01300L FILTER SUPPORT RUBBER SEAL HOLDER 15 WATER INLET CONNECTOR 8 410 00501 GROUP PLATE 16 R SERIES COFFEE COOKIN...

Страница 17: ...E NUT 5 01313L O RING 22 410 00512 STEAM PIPE HOT WATER NOZZLE VALVE SCREW 6 STEAM PIPE BASE 23 01336L KNOB 7 STEAM PIPE 24 01311L R STEEL CIRCLIP 8 410 00516 SEAL SCALD 25 01337L STEAM PIPE HOT WATER NOZZLE VALVE ASSEMBLY 9 O RING 26 01308L SI GASKET 10 01383L STEAM NOZZLE 27 STEAM HOT WATER VALVE SPINDLE 11 410 00554 STEAM PIPE ASSEMBLY 28 01310L COPPER WASHER 12 01332L HOT WATER KNOB CAP 29 COM...

Страница 18: ... 3 01352L FILLTERHOLDER SPRING 12 H TYPE STOPPER GASKET 4 01350 FILTER CUP HOLDER 13 STAINLESS STEEL STOPPER 5 01354L FILTER CUP HANDLE 14 STEAM TAP SPRING 6 01358L DUAL CUP SPOUT OPTIONAL 15 ADJUST VALVE 7 01348L FILTER 1 CUP 16 FILTER CUP HOLDER 8 BIG FLAT HEAD SCREW STAINLESS 17 STRESS BRASS SPOUT 9 FILTER TEA BAG Item Part Description Item Part Description 1 WATER PRESSURE 4 410 00533 SPRING W...

Страница 19: ...NEL BOX GROUP 27 ANTI INTERFERENCE SIGNAL LINES 8 OPERATION PANEL UP COVER COFEE TEA 28 WATER LEVEL PROBE WIRE 9 ROUND ALUMINUM 29 T1 FLOWMETER LINE 10 OPERATION NAMEPLATES 30 FLOWMETER CONNECTOR 11 WIRE RETAINER 31 SOLENOID VALVE CONNECTOR 12 SETTING SWITCH STICKERS 32 410 00528 COFFEE SERIES CONTROL PC MAINBOARD 13 POWER SWITCH STICKER 33 CONTROL BOX WITHOUT IC BOARD UP COVER 14 410 00529 SET MO...

Страница 20: ...1 A120005 00 L N E 1 2 3 4 5 6 7 8 M Power Switch Motor Pump Pressure Switch Heating pipe 1 25KW Connector Connector Keyboard Water level probe Flowmeter Solenoid ValvĞ Water out Solenoid ValvĞ Water in ET1 Circuit Diagram 1 Phase 220V 50 60 Hz 2018 Grindmaster Cecilware Printed in Taiwan 0218 Form GC 300 01 Part 390 00168 ...

Отзывы: